This guide walks you through how to install WooCommerce in WordPress from start to finish. You’ll learn how to add the plugin, configure basic settings, and launch your online store with confidence.
Key Takeaways
- WooCommerce is a free plugin: It turns your WordPress site into a fully functional online store without coding.
- Installation takes minutes: You can install WooCommerce directly from your WordPress dashboard.
- Choose a compatible theme: Use a WooCommerce-ready theme for the best design and functionality.
- Configure essential settings: Set up payments, shipping, taxes, and currency during setup.
- Add products easily: Use the intuitive product editor to upload images, set prices, and manage inventory.
- Test before going live: Always preview your store and run test orders to ensure everything works.
- Keep everything updated: Regularly update WooCommerce and your theme to maintain security and performance.
Introduction: Why Install WooCommerce in WordPress?
If you’re looking to start an online store, WooCommerce is one of the best tools available. It’s a free, open-source plugin that integrates seamlessly with WordPress, the world’s most popular content management system. Whether you’re selling physical products, digital downloads, or services, WooCommerce gives you full control over your store’s design, pricing, and functionality.
In this guide, you’ll learn how to install WooCommerce in WordPress step by step. We’ll cover everything from plugin installation to initial setup, product addition, and troubleshooting common issues. By the end, you’ll have a working online store ready to accept orders.
Step 1: Prepare Your WordPress Site
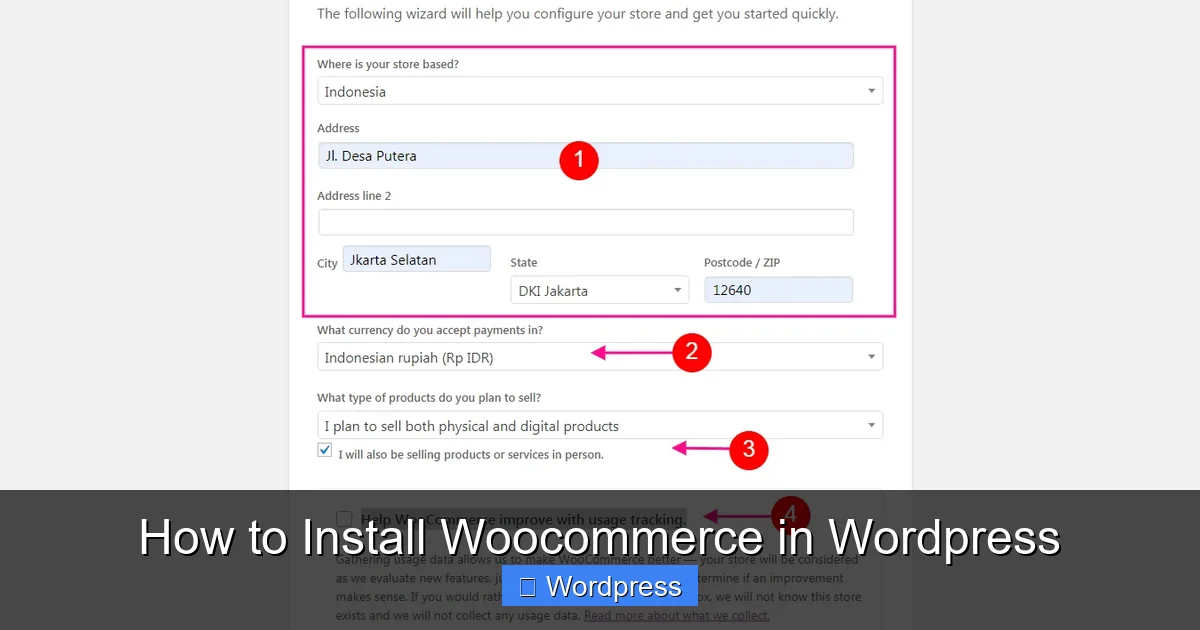
Visual guide about How to Install Woocommerce in WordPress
Image source: idnetter.com
Before installing WooCommerce, make sure your WordPress site is ready.
Check Your WordPress Version
WooCommerce requires WordPress 6.0 or higher. To check your version, go to Dashboard > Updates. If an update is available, install it. Keeping WordPress updated ensures compatibility and security.
Choose a WooCommerce-Compatible Theme
Not all themes work well with WooCommerce. Choose a theme labeled “WooCommerce-ready” or “eCommerce-focused.” Popular options include Storefront (made by WooCommerce), Astra, and OceanWP.
If you need help selecting or applying a theme, check out our guide on how to apply a WordPress theme.
Backup Your Website
Always back up your site before making major changes. Use a plugin like UpdraftPlus or your hosting provider’s backup tool. This protects your content in case something goes wrong.
Step 2: Install the WooCommerce Plugin
Visual guide about How to Install Woocommerce in WordPress
Image source: metacubic.com
Installing WooCommerce is simple and takes just a few clicks.
Go to the Plugins Section
Log in to your WordPress admin dashboard. In the left sidebar, click Plugins > Add New.
Search for WooCommerce
In the search bar, type “WooCommerce.” The official plugin by Automattic should appear at the top of the results.
Install and Activate
Click Install Now, then click Activate once the installation is complete. You’ll be redirected to the WooCommerce setup wizard.
Step 3: Run the WooCommerce Setup Wizard
The setup wizard helps you configure your store quickly.
Select Your Store Location
Choose your country. This affects currency, tax, and shipping options. Click Continue.
Set Your Industry
Pick the category that best matches your business (e.g., clothing, electronics, digital products). This helps WooCommerce suggest relevant features.
Choose Your Product Types
Select whether you’re selling physical products, digital downloads, subscriptions, or services. You can add more later.
Pick a Theme (Optional)
WooCommerce may suggest a free theme like Storefront. You can install it now or skip and use your current theme. If you’re unsure which theme to use, learn how to set a default theme in WordPress.
Configure Payments
Enable payment methods like PayPal, Stripe, or bank transfers. You can add more later under WooCommerce > Settings > Payments.
Set Up Shipping
Choose your shipping zones and methods. For example, you might offer free shipping within your country and flat-rate shipping internationally.
Review and Finish
Once all steps are complete, click Let’s go! WooCommerce will finalize your setup.
Step 4: Add Your First Product
Now it’s time to add products to your store.
Go to Products > Add New
In your WordPress dashboard, click Products > Add New.
Enter Product Details
– Title: Give your product a clear name.
– Description: Write a detailed description highlighting features and benefits.
– Product Image: Upload a high-quality photo. You can add multiple images in the gallery section.
– Price: Set the regular and sale price (if applicable).
– Inventory: Enable stock management and set stock quantity.
– Categories & Tags: Organize your products for easier browsing.
Publish the Product
Click Publish when you’re ready. Your product will now appear in your store.
Step 5: Customize Your Store
Make your store look professional and match your brand.
Customize the Theme
Go to Appearance > Customize to change colors, fonts, and layout. Most WooCommerce themes support the WordPress Customizer.
Add Pages
WooCommerce automatically creates essential pages like Shop, Cart, Checkout, and My Account. Make sure these pages are published and linked in your menu.
Set Up Menus
Go to Appearance > Menus and add links to your shop, cart, and account pages. This improves navigation for customers.
Install Helpful Plugins
Consider adding plugins for SEO (like Yoast), security (like Wordfence), or email marketing (like Mailchimp). These enhance your store’s functionality.
Step 6: Test Your Store
Before launching, test your store thoroughly.
Place a Test Order
Add a product to your cart and go through the checkout process. Use a test payment method (like Stripe’s test mode) to ensure payments work.
Check Emails
Verify that order confirmation emails are sent to customers and admin notifications come to you.
Test on Mobile
Visit your store on a smartphone or tablet. Make sure it’s responsive and easy to use.
Fix Any Issues
If something doesn’t work, check plugin conflicts or theme compatibility. Disable other plugins temporarily to isolate the problem.
Troubleshooting Common Issues
Even with careful setup, you might run into problems.
WooCommerce Not Appearing in Menu
If WooCommerce doesn’t show up in your dashboard, try reactivating the plugin. Go to Plugins > Installed Plugins, deactivate WooCommerce, then activate it again.
Pages Not Loading Correctly
If your shop or cart pages show errors, reset the pages. Go to WooCommerce > Status > Tools and click “Create default WooCommerce pages.”
Payment Gateway Not Working
Ensure your payment plugin is active and configured. Check API keys and test mode settings. Also, verify that your SSL certificate is installed (required for secure payments).
Theme Conflicts
If your store looks broken, switch to a default theme like Storefront. If the issue disappears, your original theme may not be fully compatible. Learn how to deactivate a theme in WordPress to troubleshoot safely.
Conclusion: Launch Your Online Store
You’ve now learned how to install WooCommerce in WordPress and set up a functional online store. From installing the plugin to adding products and testing orders, each step brings you closer to selling online.
Remember to keep your site updated, monitor performance, and listen to customer feedback. As your store grows, explore advanced features like subscriptions, memberships, and marketing tools.
With WooCommerce and WordPress, you have a powerful, flexible platform to build your dream business. Start small, stay consistent, and watch your store thrive.