This guide walks you through installing a WordPress theme on GoDaddy hosting using the built-in theme installer or manual upload. Whether you’re using a free theme from the directory or a premium one, we’ll show you exactly how to get your site looking great in minutes.
Key Takeaways
- GoDaddy simplifies WordPress management: With one-click installs and a user-friendly dashboard, GoDaddy makes it easy to manage your WordPress site and themes.
- You can install themes directly from the WordPress dashboard: No need for FTP—just use the built-in theme installer for free themes.
- Premium themes require manual upload: If you’ve purchased a theme, you’ll need to upload the .zip file via the Appearance > Themes section.
- Always back up your site before installing a new theme: This protects your content in case something goes wrong during installation.
- Check theme compatibility and updates: Ensure your theme works with your current WordPress version to avoid errors.
- Troubleshooting is straightforward: Common issues like missing styles or broken layouts can often be fixed with a few simple steps.
- You can switch themes anytime: WordPress lets you preview and activate new themes without losing your existing content.
Introduction: Why Installing a WordPress Theme on GoDaddy Matters
Your website’s theme determines its look, feel, and functionality. Whether you’re launching a blog, portfolio, or online store, choosing and installing the right WordPress theme is a crucial step. If you’re using GoDaddy hosting—one of the most popular web hosts for beginners and small businesses—you’re in luck. GoDaddy offers a streamlined WordPress experience, making it simple to install and manage themes.
In this guide, you’ll learn how to install a WordPress theme on GoDaddy hosting using two main methods: the built-in WordPress theme installer (for free themes) and manual upload (for premium or custom themes). We’ll also cover best practices, common pitfalls, and how to troubleshoot issues. By the end, you’ll be able to confidently change your site’s design with ease.
Prerequisites: What You Need Before Starting
Before you begin installing a WordPress theme, make sure you have the following:
- A WordPress site hosted on GoDaddy: If you haven’t set up WordPress yet, GoDaddy offers a one-click install option in your hosting dashboard.
- Admin access to your WordPress dashboard: You’ll need to log in as an administrator to install themes.
- A theme file (if using a premium theme): This is usually a .zip file you downloaded from a marketplace like ThemeForest or Elegant Themes.
- A backup of your current site: Always back up your website before making major changes. GoDaddy offers backup tools, or you can use a plugin like UpdraftPlus.
Method 1: Installing a Free Theme from the WordPress Directory
This is the easiest way to install a theme if you’re using a free option from the official WordPress theme library. Here’s how:
Visual guide about How to Install WordPress Theme on Godaddy Hosting
Image source: gracethemes.com
Step 1: Log in to Your WordPress Dashboard
Go to your GoDaddy account, navigate to your hosting dashboard, and click on your WordPress site. Then, click “Manage in WordPress” to log in. Alternatively, go directly to yoursite.com/wp-admin and enter your login credentials.
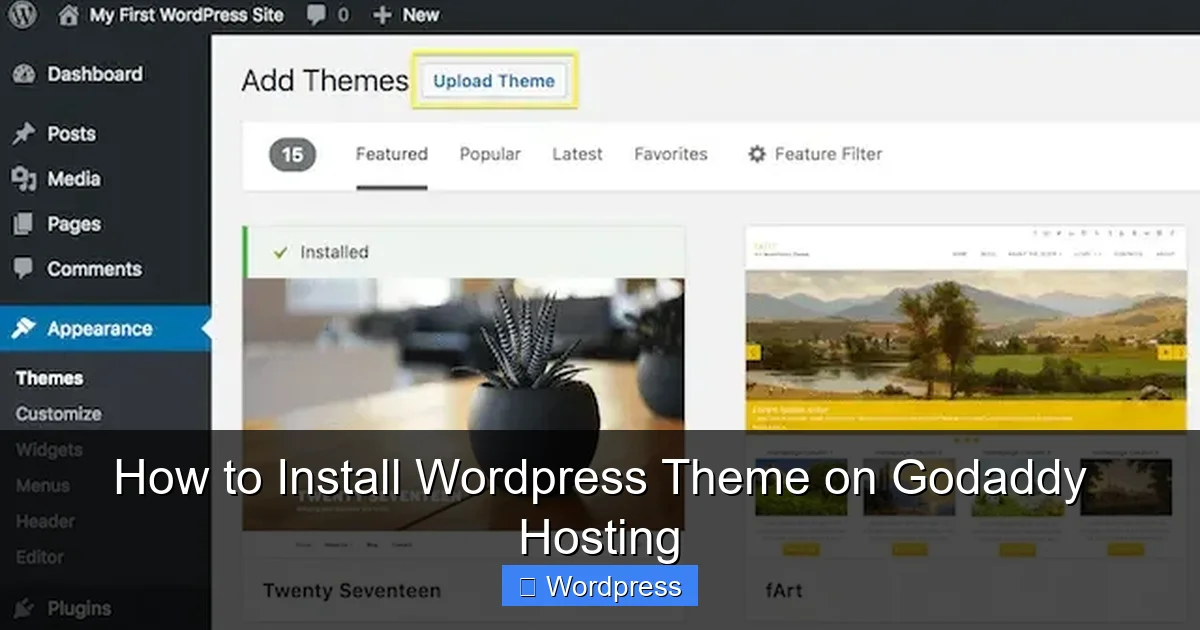
Step 2: Navigate to the Themes Section
Once logged in, go to Appearance > Themes in the left-hand menu. Click the “Add New” button at the top of the page.
Step 3: Search for a Theme
Use the search bar to find a theme by name, feature, or keyword (e.g., “blog,” “responsive,” “minimal”). You can also filter by popularity, latest releases, or featured themes. For example, try searching for “Astra” or “Neve”—two popular free themes known for speed and flexibility.
Step 4: Preview and Install
Click on any theme to see a live preview. This shows how your content will look with the new design. If you like it, click “Install.” WordPress will download and install the theme automatically.
Step 5: Activate the Theme
After installation, click “Activate” to make the theme live on your site. Your website will now use the new design. Visit your site to see the changes.
Pro Tip: You can install multiple themes and switch between them anytime. Only one theme is active at a time, but you can preview others under Appearance > Themes.
Method 2: Uploading a Premium or Custom Theme
If you’ve purchased a premium theme or downloaded a custom one, you’ll need to upload it manually. Here’s how:
Visual guide about How to Install WordPress Theme on Godaddy Hosting
Image source: godaddy.com
Step 1: Download the Theme File
After purchasing a theme, you’ll typically receive a .zip file. Do not extract it—WordPress needs the .zip format for upload.
Step 2: Go to the Theme Uploader
In your WordPress dashboard, go to Appearance > Themes > Add New. Click the “Upload Theme” button at the top.
Step 3: Choose and Upload the File
Click “Choose File,” select the .zip file from your computer, and click “Install Now.” WordPress will upload and extract the theme automatically.
Step 4: Activate the Theme
Once uploaded, click “Activate” to apply the theme to your site. You may see a message asking you to install required plugins—follow the prompts to complete the setup.
Note: Some premium themes come with demo content. You can usually import this via the theme’s customizer or a dedicated import tool.
Method 3: Installing via FTP (Advanced)
If you’re comfortable with FTP, you can manually upload a theme to your server. This method is useful if the WordPress uploader fails due to file size limits.
Step 1: Extract the Theme Folder
Unzip the theme .zip file on your computer. You should see a folder with the theme name (e.g., “my-theme”).
Step 2: Connect to Your GoDaddy Hosting via FTP
Use an FTP client like FileZilla. Log in using your GoDaddy FTP credentials (found in your hosting dashboard under “FTP Accounts”).
Step 3: Upload the Theme Folder
Navigate to /public_html/wp-content/themes/ and upload the extracted theme folder.
Step 4: Activate in WordPress
Go back to your WordPress dashboard, visit Appearance > Themes, and you should see the new theme. Click “Activate” to use it.
Tip: If you’re unsure about FTP, stick with the WordPress uploader. It’s safer and easier for most users.
Best Practices After Installing a Theme
Once your theme is installed, follow these steps to ensure everything works smoothly:
Check for Required Plugins
Many themes rely on plugins for features like sliders, contact forms, or page builders. After activation, WordPress may prompt you to install these. Do so to avoid missing functionality.
Customize Your Theme
Go to Appearance > Customize to adjust colors, fonts, layouts, and other settings. Most modern themes offer live previews, so you can see changes in real time.
Test Your Site on Mobile
Use the customizer’s mobile preview or visit your site on a phone. Ensure the design is responsive and looks good on all devices.
Update Your Theme Regularly
Themes receive updates for security, performance, and new features. Keep your theme updated to avoid vulnerabilities. Learn how to update a theme on WordPress safely.
Troubleshooting Common Issues
Even with careful installation, you might run into problems. Here’s how to fix the most common ones:
White Screen After Activation
This usually means a PHP error. Try switching to a default theme like Twenty Twenty-Four via FTP by renaming the problematic theme folder. Then, debug or reinstall the theme.
Missing Styles or Broken Layout
Clear your browser cache and WordPress cache (if using a plugin). Also, check if the theme requires a specific page builder or plugin.
“The package could not be installed” Error
This happens if the .zip file is corrupted or not a valid theme. Re-download the file and try again. Ensure it’s the correct format.
Theme Not Appearing in Dashboard
If you uploaded via FTP but don’t see the theme, check that the folder is in /wp-content/themes/ and contains a valid style.css file.
Conclusion: You’re Ready to Rock Your New Theme
Installing a WordPress theme on GoDaddy hosting is simple once you know the steps. Whether you’re using a free theme from the directory or uploading a premium one, the process is straightforward and user-friendly. Remember to back up your site, test your design, and keep your theme updated.
Now that your theme is installed, explore customization options and consider enhancing your site with plugins or custom CSS. If you ever need to switch themes, you can do so easily—just be sure to preview first. For more tips, check out our guide on how to apply a WordPress theme effectively.
With the right theme, your website will not only look professional but also perform well for visitors and search engines. Happy designing!