Adding CAPTCHA to Contact Form 7 helps block spam submissions and keeps your WordPress site secure. This guide walks you through installing and configuring reCAPTCHA step by step, even if you’re a beginner.
Key Takeaways
- CAPTCHA prevents spam: It stops bots from submitting fake messages through your contact forms.
- Use Google reCAPTCHA: It’s free, reliable, and integrates smoothly with Contact Form 7.
- Get API keys first: You need a site key and secret key from Google before setup.
- Install the plugin correctly: Make sure Contact Form 7 is active and updated.
- Test after setup: Always check that the CAPTCHA appears and works on your live form.
- Troubleshoot common issues: Fix problems like missing keys or JavaScript errors quickly.
- Keep it simple for users: Choose reCAPTCHA v2 “I’m not a robot” for better user experience.
Why Add CAPTCHA to Contact Form 7?
Contact Form 7 is one of the most popular plugins for creating forms in WordPress. But without protection, it’s an easy target for spam bots. These bots flood your inbox with fake submissions, wasting your time and cluttering your database. That’s where CAPTCHA comes in.
CAPTCHA—short for “Completely Automated Public Turing test to tell Computers and Humans Apart”—helps verify that the person filling out your form is actually human. By adding CAPTCHA to Contact Form 7, you dramatically reduce spam and keep your site clean and professional.
In this guide, you’ll learn how to add Google reCAPTCHA (the most trusted option) to your Contact Form 7 forms—step by step. No coding skills needed!
Step 1: Install and Activate Contact Form 7
If you haven’t already installed Contact Form 7, start here. It’s required for this process.
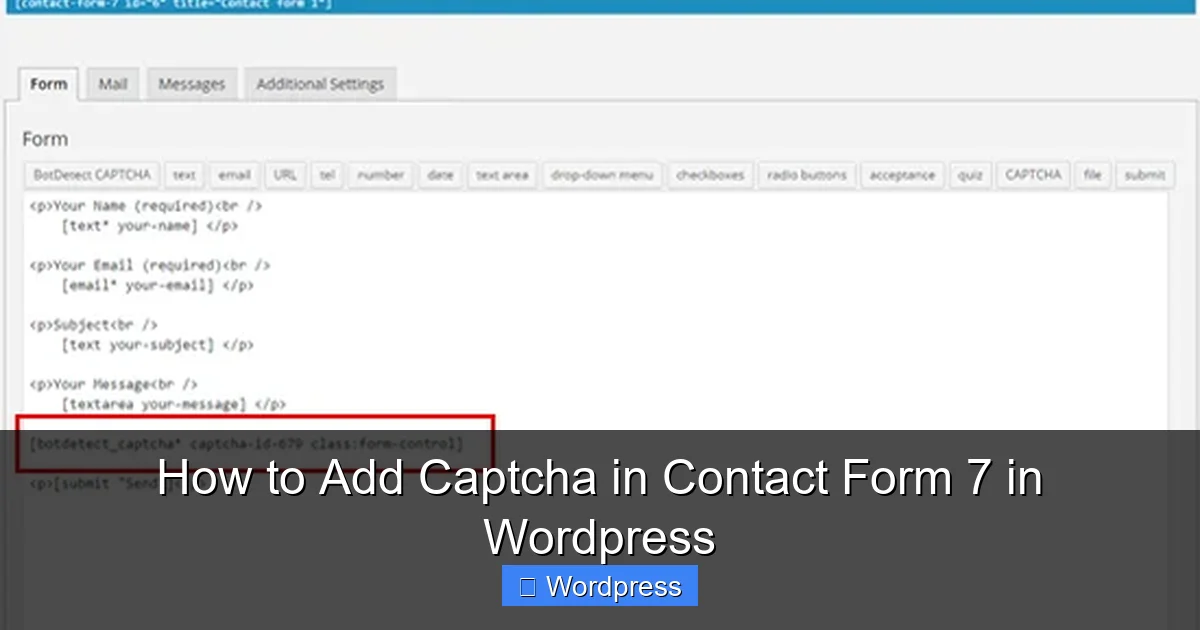
Visual guide about How to Add Captcha in Contact Form 7 in WordPress
Image source: captcha.com
Check if Contact Form 7 Is Already Installed
Go to your WordPress dashboard. Look under Plugins > Installed Plugins. If you see “Contact Form 7” listed and activated, you’re good to go. If not, follow the next step.
Install Contact Form 7
- Go to Plugins > Add New.
- Type “Contact Form 7” in the search bar.
- Click Install Now on the official plugin by Takayuki Miyoshi.
- Once installed, click Activate.
Now you’re ready to add CAPTCHA.
Step 2: Get Your Google reCAPTCHA API Keys
Google reCAPTCHA requires two keys: a Site Key and a Secret Key. You’ll get these for free from Google.
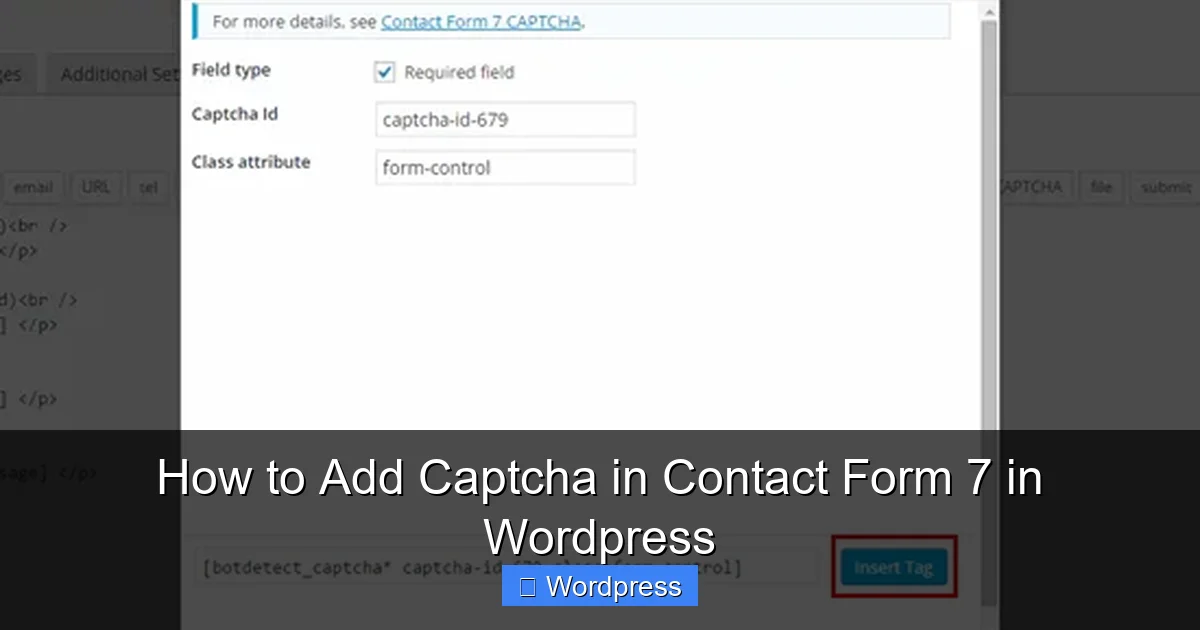
Visual guide about How to Add Captcha in Contact Form 7 in WordPress
Image source: captcha.com
Visit the reCAPTCHA Admin Console
Go to https://www.google.com/recaptcha/admin and log in with your Google account.
Register a New Site
- Enter a label (e.g., “My WordPress Site”).
- Choose reCAPTCHA v2 and select “I’m not a robot” Checkbox (this is user-friendly and widely supported).
- In the “Domains” field, enter your website’s domain (e.g.,
yourwebsite.com). Don’t includehttp://orhttps://. - Accept the terms and click Submit.
Copy Your Keys
After registration, Google will show your Site Key and Secret Key. Copy both—you’ll need them in the next step.
Tip: Keep this page open or save the keys in a secure note. You’ll need them again if you reset or migrate your site.
Step 3: Add reCAPTCHA to Contact Form 7
Now it’s time to connect your keys to Contact Form 7.
Open Contact Form 7 Settings
In your WordPress dashboard, go to Contact > Integration.
Enter Your reCAPTCHA Keys
- You’ll see a section labeled Google reCAPTCHA.
- Paste your Site Key into the “Site Key” field.
- Paste your Secret Key into the “Secret Key” field.
- Click Save Changes.
That’s it! Contact Form 7 now knows how to talk to Google reCAPTCHA.
Step 4: Add CAPTCHA to Your Form
Next, you need to place the CAPTCHA field inside your actual contact form.
Edit Your Contact Form
Go to Contact > Contact Forms and click Edit on the form you want to protect.
Insert the reCAPTCHA Tag
In the form editor, place your cursor where you want the CAPTCHA to appear (usually above the submit button). Then, type:
[recaptcha]
This shortcode tells Contact Form 7 to display the reCAPTCHA widget there.
Save the Form
Click Save to apply your changes.
Pro Tip: Avoid placing the CAPTCHA too early in the form—users might get frustrated if they can’t start filling it out until they solve the puzzle.
Step 5: Test Your Form
Never skip this step! Testing ensures everything works as expected.
Preview the Form
Go to the page where your form is published (or use the “Preview” button in WordPress). You should now see the “I’m not a robot” checkbox.
Submit a Test Message
- Fill out the form normally.
- Check the CAPTCHA box.
- Click Submit.
If everything is set up correctly, your message should go through. If you forget to check the CAPTCHA, the form should show an error like “Please verify that you are not a robot.”
Note: If the CAPTCHA doesn’t appear, double-check your API keys and make sure no caching plugins are blocking JavaScript.
Troubleshooting Common Issues
Sometimes things don’t work perfectly on the first try. Here’s how to fix the most common problems.
CAPTCHA Not Showing Up
- Make sure you entered both keys correctly in Contact > Integration.
- Clear your browser cache and WordPress cache (if using a plugin like WP Super Cache).
- Check if your theme or another plugin is conflicting—try switching to a default theme like Twenty Twenty-Four temporarily.
Form Submits Without CAPTCHA
This means the CAPTCHA isn’t properly enforced. Ensure the [recaptcha] tag is in your form and that your keys are active in Google’s system.
“Invalid site key” Error
Your Site Key might be wrong or expired. Re-register your site in the reCAPTCHA admin console and update the keys in Contact Form 7.
JavaScript Errors
If your browser console shows errors, it could be due to ad blockers or security plugins. Try disabling them temporarily to test.
Bonus Tips for Better Security
CAPTCHA is great, but you can do more to protect your forms:
- Use honeypot fields: Contact Form 7 supports hidden fields that only bots fill out. Enable this in the form settings.
- Limit submissions: Use plugins like WP Limit Login Attempts to block repeated spam attempts.
- Keep plugins updated: Always update Contact Form 7 and WordPress core to patch security holes.
For advanced users, consider exploring Contact Form 7 Conditional Fields to show or hide fields based on user input—this can also reduce spam by making forms smarter.
Conclusion
Adding CAPTCHA to Contact Form 7 is a simple yet powerful way to protect your WordPress site from spam. With just a few clicks and free Google keys, you can keep your inbox clean and your visitors safe. Follow the steps above, test thoroughly, and enjoy peace of mind knowing your forms are secure.
Remember: a little prevention goes a long way. Don’t wait until spam takes over—set up CAPTCHA today!