Clearing cache in WordPress helps improve site performance and ensures visitors see the latest content. This guide covers multiple methods—plugin-based, browser, and server-side—so you can choose the best approach for your setup.
Key Takeaways
- Cache improves speed: Caching stores static versions of your pages to load them faster for visitors.
- Multiple cache layers exist: WordPress sites often have plugin, browser, and server-level caches that all need clearing.
- Use caching plugins wisely: Popular plugins like WP Super Cache and W3 Total Cache include built-in purge options.
- Browser cache affects previewing: Always clear your browser cache when testing design or content changes.
- Server cache requires admin access: If your host uses Varnish or Redis, you may need to clear cache via hosting dashboard or support.
- Clear after updates: Always clear cache after updating themes, plugins, or WordPress core to avoid display issues.
- Test after clearing: Use tools like GTmetrix or Google PageSpeed Insights to verify performance improvements.
How to Clear Cache in WordPress
If your WordPress site looks outdated after making changes—or loads slowly despite optimizations—you might need to clear the cache. Caching is a powerful tool that speeds up your website by storing static copies of pages. But when it’s not cleared properly, visitors (and even you!) might see old content.
In this guide, you’ll learn how to clear cache in WordPress using several reliable methods. Whether you’re using a caching plugin, relying on your browser, or managing server-level caching, we’ve got you covered. By the end, you’ll know exactly when and how to clear cache to keep your site fast and up to date.
Why Clearing Cache Matters
Caching saves time. Instead of rebuilding a page every time someone visits, WordPress serves a pre-saved version. This reduces server load and improves load times—great for SEO and user experience.
But here’s the catch: if you update your site (like changing a theme, editing a post, or installing a plugin), the cached version might still show the old content. That’s why clearing cache is essential after any major change.
Think of it like refreshing your browser after editing a document—you want to see the latest version, not a stale copy.
Method 1: Clear Cache Using a WordPress Plugin
Most WordPress sites use caching plugins to boost performance. If you’re using one, this is the easiest way to clear cache.
Step 1: Identify Your Caching Plugin
Common plugins include:
– WP Super Cache
– W3 Total Cache
– WP Rocket
– LiteSpeed Cache
– Autoptimize
Check your WordPress dashboard under Plugins > Installed Plugins to see which one you’re using.
Step 2: Clear Cache from the Plugin Dashboard
Each plugin has a slightly different interface, but the process is similar:
For WP Super Cache:
- Go to Settings > WP Super Cache.
- Click the Delete Cache button.
- Confirm the action.
For W3 Total Cache:
- Navigate to Performance > Dashboard.
- Click Empty All Caches.
- Wait a few seconds for the process to complete.
For WP Rocket:
- Go to Settings > WP Rocket.
- Click the Clear Cache button at the top.
- Optionally, clear minified files separately if needed.
Tip: Many plugins also let you clear cache for individual pages. Use this after editing a single post or page to avoid clearing the entire site.
Step 3: Verify the Cache Was Cleared
Visit your site in a private/incognito window or use a tool like GTmetrix to check load times and content freshness.
Method 2: Clear Browser Cache
Visual guide about How to Clear Cache in WordPress
Image source: wpengine.com
Sometimes, the issue isn’t your site—it’s your browser storing old files. This is especially common when testing design changes.
Step 1: Use Keyboard Shortcuts
On most browsers:
– Windows/Linux: Press Ctrl + Shift + R for a hard reload.
– Mac: Press Cmd + Shift + R.
This bypasses the cache and loads the latest version of the page.
Step 2: Clear Cache Manually
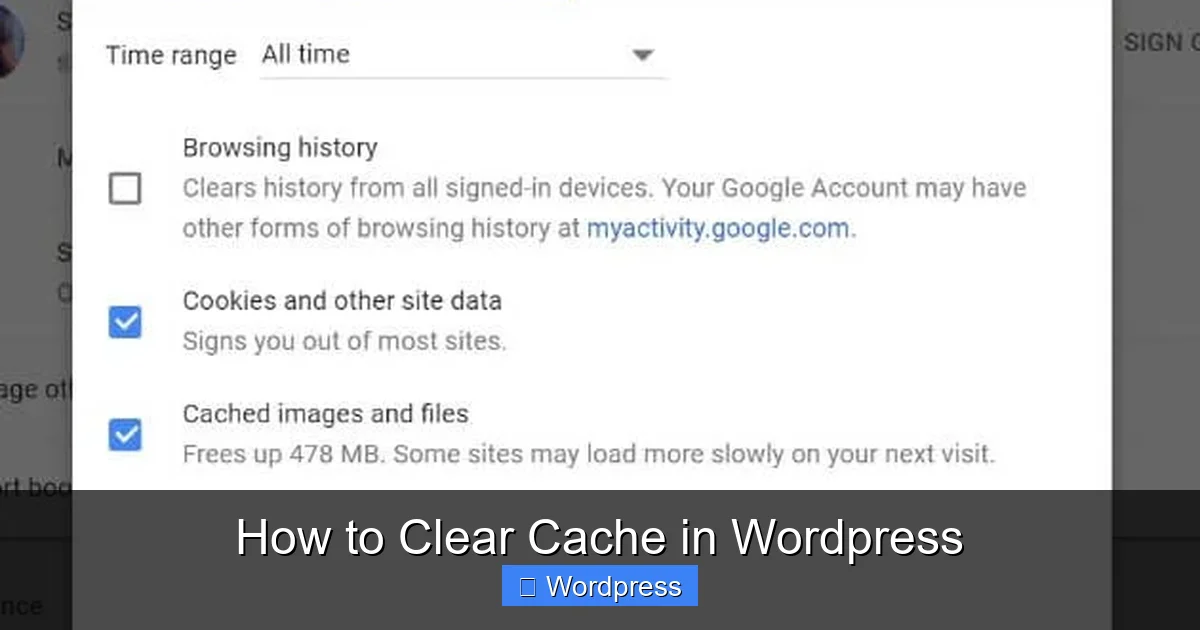
Google Chrome:
- Click the three dots in the top-right corner.
- Go to More tools > Clear browsing data.
- Select Cached images and files.
- Choose a time range (e.g., “Last hour” or “All time”).
- Click Clear data.
Mozilla Firefox:
- Click the menu button (three lines).
- Go to Settings > Privacy & Security.
- Scroll to Cookies and Site Data.
- Click Clear Data and check Cached Web Content.
- Click Clear.
Safari (Mac):
- Go to Safari > Settings > Advanced.
- Check Show Develop menu in menu bar.
- From the menu bar, click Develop > Empty Caches.
Pro Tip: Always test your site in incognito mode after clearing browser cache. This ensures no local data interferes with your view.
Method 3: Clear Server-Level Cache
Some hosting providers use server-side caching (like Varnish, Redis, or LiteSpeed) to speed up sites. This cache isn’t controlled by WordPress plugins.
Step 1: Check Your Hosting Dashboard
Many hosts offer a one-click cache clear option:
– SiteGround: Go to Site Tools > Speed > Caching and click Purge All.
– Bluehost: Use the Cache Manager in the control panel.
– Kinsta or WP Engine: Look for a Purge Cache button in the hosting dashboard.
Step 2: Use LiteSpeed Cache Plugin (If Applicable)
If your host uses LiteSpeed servers, install the LiteSpeed Cache plugin. It integrates directly with the server and lets you clear cache from WordPress:
- Go to LiteSpeed Cache > Cache.
- Click Purge All.
- Optionally, purge CSS/JS or image optimization caches separately.
Step 3: Contact Support if Needed
If you can’t find a cache purge option, contact your hosting provider. They can clear server cache manually or guide you to the right tool.
Method 4: Clear CDN Cache
If you use a Content Delivery Network (CDN) like Cloudflare, StackPath, or BunnyCDN, cached files may be stored on their servers.
Step 1: Log into Your CDN Dashboard
For Cloudflare:
- Go to the Caching tab.
- Click Configuration.
- Select Purge Cache and choose Purge Everything.
For other CDNs, look for a similar “Purge” or “Clear Cache” option.
Step 2: Use Cloudflare Plugin (Optional)
Install the Cloudflare plugin for WordPress. It lets you purge cache directly from your dashboard under Cloudflare > Purge Cache.
When Should You Clear Cache?
Clear cache in these situations:
– After updating your WordPress theme or plugins.
– When changing site design or layout.
– After fixing a bug or error (like a 404 error in WordPress).
– Before running speed tests or SEO audits.
– If visitors report seeing outdated content.
Troubleshooting Common Cache Issues
Problem: Changes Still Not Showing
Solution: Clear all cache layers—plugin, browser, server, and CDN. Then test in incognito mode.
Problem: Site Loads Slower After Clearing Cache
Solution: This is normal. The first visit rebuilds the cache. Wait a few minutes and test again.
Problem: Cache Keeps Reappearing
Solution: Check if your caching plugin is set to preload cache. Adjust settings under Preload or Scheduled Cache.
Problem: Can’t Find Cache Option in Plugin
Solution: Ensure the plugin is active and updated. Some plugins hide cache options under “Performance” or “Tools.”
Best Practices for Managing Cache
- Use a reliable caching plugin: WP Rocket and LiteSpeed Cache are user-friendly and effective.
- Set cache expiration wisely: Don’t set it too long (e.g., 1 week) if you update content frequently.
- Exclude dynamic pages: Avoid caching login pages, checkout pages, or user-specific content.
- Monitor performance: Use tools like Google PageSpeed Insights to track improvements.
- Keep plugins updated: Outdated caching plugins can cause conflicts or security issues.
Conclusion
Clearing cache in WordPress is a simple but essential task for maintaining a fast, up-to-date website. Whether you’re using a plugin, browser, or server-level cache, knowing how and when to clear it ensures your visitors always see the latest version of your site.
Start by identifying which caching methods your site uses. Then, follow the steps above to clear cache quickly and safely. Remember to test your site after clearing cache—especially after major updates like changing your WordPress theme or fixing broken links.
With these tips, you’ll keep your site running smoothly and your audience happy.