This guide walks you through how to create categories in WordPress using the admin dashboard. You’ll learn to organize posts, improve site structure, and enhance user experience with clear, actionable steps.
Key Takeaways
- Categories help organize content: They group related posts so visitors can easily find what they’re looking for.
- Use the WordPress dashboard: Creating categories is simple and done entirely within your site’s admin area.
- Assign categories when writing posts: You can select or create categories directly in the post editor.
- Limit categories per post: Stick to one or two main categories to avoid confusion and improve SEO.
- Edit or delete categories anytime: Manage your category structure as your site grows and changes.
- Improve navigation with category menus: Add category links to your menu for better user experience.
- Use categories wisely: Avoid too many categories—focus on clarity and relevance.
Introduction: Why Categories Matter in WordPress
When you start a blog or website on WordPress, one of the first things you’ll want to do is organize your content. That’s where categories come in. Think of them like folders on your computer—they help you sort and group related posts so your readers can easily navigate your site.
Whether you run a food blog, a tech review site, or a personal journal, using categories correctly makes a big difference. They improve user experience, help with search engine optimization (SEO), and keep your content structured as your site grows. In this guide, you’ll learn how to create categories in WordPress—step by step—and how to use them effectively.
What Are WordPress Categories?
Categories are a built-in WordPress feature that lets you group posts by topic. For example, if you run a travel blog, you might have categories like “Europe,” “Asia,” and “Travel Tips.” Each time you write a new post, you can assign it to one or more categories.
Categories are hierarchical, meaning you can create subcategories. For instance, under “Europe,” you could have “France,” “Italy,” and “Germany.” This helps you build a clean, logical structure for your content.
Unlike tags, which are more specific and non-hierarchical, categories should be broad and used consistently. A good rule of thumb: use categories for major topics and tags for details like locations, names, or events.
How to Create Categories in WordPress (Step-by-Step)
Creating categories in WordPress is quick and easy. You can do it from the admin dashboard. Here’s how:

Visual guide about How to Create Categories WordPress
Image source: brandglowup.com
Step 1: Log in to Your WordPress Dashboard
Go to your website’s login page (usually yoursite.com/wp-admin) and enter your username and password. Once logged in, you’ll see the WordPress dashboard.
Step 2: Navigate to Posts > Categories
In the left-hand menu, hover over Posts and click on Categories. This opens the Categories management page, where you can view, add, edit, or delete categories.
Step 3: Add a New Category
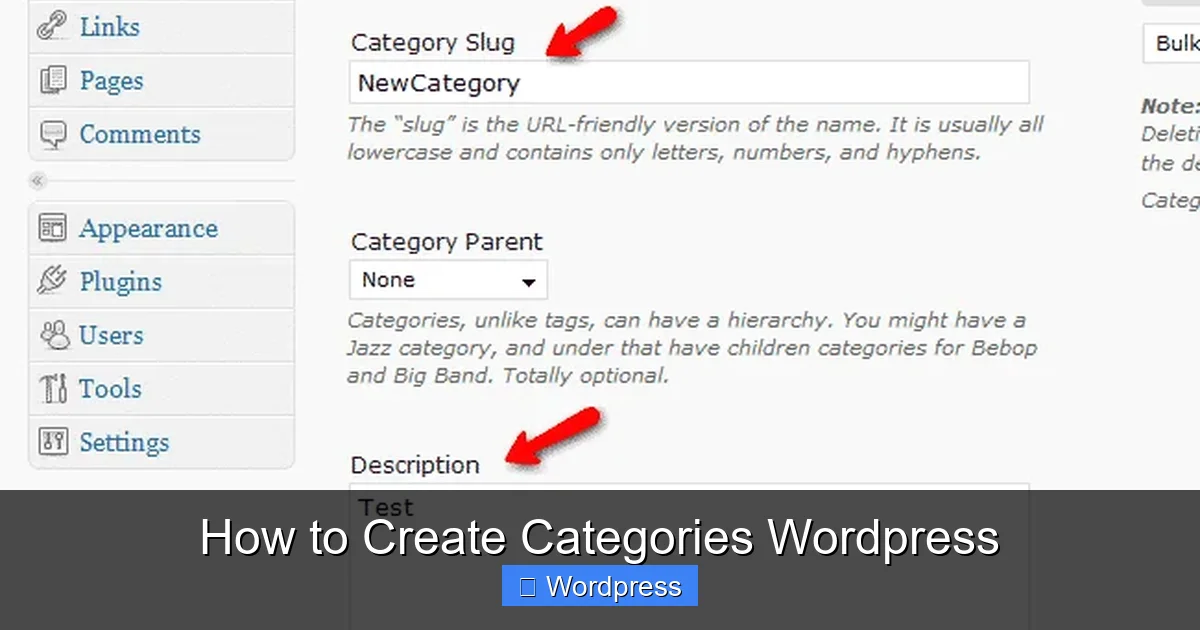
On the Categories page, you’ll see a form on the left side. Fill in the following fields:
- Name: Enter the name of your category (e.g., “Recipes,” “Tech News,” “DIY Projects”).
- Slug: This is the URL-friendly version of the name. WordPress usually fills this in automatically, but you can change it if needed (e.g., “healthy-recipes” instead of “Healthy Recipes”).
- Parent Category: If this is a subcategory, select the parent from the dropdown. Leave it as “None” if it’s a top-level category.
- Description: Optional. Add a short description that might appear on category archive pages, depending on your theme.
Once you’ve filled in the details, click the Add New Category button. Your new category will appear in the list on the right.
Step 4: Assign Categories to Your Posts
Now that your category is created, you can assign it to posts. Here’s how:
- Go to Posts > Add New to create a new post, or edit an existing one.
- In the post editor, look for the Categories panel on the right side (usually under “Document” settings).
- Check the box next to the category you want to assign. You can select multiple categories if needed.
- If you need to create a new category on the spot, click the + Add New Category link, type the name, and click Add New Category.
Once you publish or update the post, it will appear under the selected category.
Best Practices for Using Categories
Creating categories is simple, but using them wisely takes a little planning. Here are some tips to help you get the most out of your category structure:
Visual guide about How to Create Categories WordPress
Image source: tmdhosting.com
Keep It Simple
Don’t create too many categories. Aim for 5–10 main categories that cover your site’s core topics. Too many categories can confuse readers and make your site harder to navigate.
Use Consistent Naming
Choose clear, descriptive names. Avoid vague terms like “Stuff” or “Misc.” Instead, use specific labels like “Beginner Tips,” “Product Reviews,” or “Seasonal Recipes.”
Limit Categories Per Post
Assign only one or two categories per post. This keeps your content focused and helps search engines understand your site structure.
Use Subcategories Sparingly
Subcategories are great for organizing detailed content, but don’t go overboard. Too many levels can make navigation confusing. Stick to one level of subcategories if possible.
Update Categories as Needed
As your site grows, you may need to rename, merge, or delete categories. Regularly review your category list to keep it clean and relevant.
How to Edit or Delete Categories
Need to change a category name or remove an unused one? Here’s how:
Edit a Category
- Go to Posts > Categories.
- Hover over the category name and click Edit.
- Update the name, slug, parent, or description as needed.
- Click Update to save changes.
Delete a Category
- On the Categories page, hover over the category and click Delete.
- WordPress will ask if you want to assign the posts in that category to another category. Choose a replacement or select “Uncategorized” (the default category).
- Click OK to confirm.
Note: You cannot delete the “Uncategorized” category, but you can rename it.
Displaying Categories on Your Website
Once you’ve created categories, you’ll want visitors to see them. Most WordPress themes display category links in the menu, sidebar, or archive pages. Here’s how to make them more visible:
Add Categories to Your Menu
- Go to Appearance > Menus.
- On the left, find the Categories section.
- Check the boxes next to the categories you want to add.
- Click Add to Menu, then drag and drop to arrange the order.
- Save the menu.
Use a Category Widget
- Go to Appearance > Widgets.
- Drag the Categories widget to your sidebar or footer.
- Customize the title and display options (e.g., show post counts, show hierarchy).
- Click Save.
These steps help users browse your content by topic, improving engagement and time on site.
Troubleshooting Common Issues
Sometimes, category-related problems can arise. Here are a few common issues and how to fix them:
Categories Not Showing in the Menu
If you’ve added categories to your menu but they’re not appearing, check if your theme supports category menus. Some themes require you to enable certain menu locations. Go to Appearance > Menus and make sure you’ve selected the correct menu location (e.g., “Primary”).
Posts Still Showing as “Uncategorized”
If your posts are still labeled “Uncategorized” even after assigning a category, double-check the post editor. Make sure the correct category is selected and the post has been updated. Also, verify that the category wasn’t accidentally deleted.
Category Pages Not Loading
If clicking a category link leads to a 404 error, your permalinks may need to be refreshed. Go to Settings > Permalinks and click Save Changes (no need to change anything). This resets the URL structure and often fixes the issue.
Conclusion: Organize Your Content with Confidence
Learning how to create categories in WordPress is a fundamental skill for any website owner. Categories keep your content organized, improve navigation, and help both users and search engines understand your site’s structure.
By following the steps in this guide, you can create, manage, and display categories with ease. Remember to keep your category structure simple, consistent, and relevant to your audience. As your site grows, revisit your categories to ensure they still meet your needs.
Now that you know how to use categories effectively, consider exploring other ways to enhance your WordPress site. For example, you might want to create a custom WordPress theme with Elementor to match your branding, or choose a theme optimized for SEO and speed. If you’re managing multiple themes, learn how to deactivate a theme in WordPress safely.
With a well-organized site, you’ll create a better experience for your visitors—and set yourself up for long-term success.