This guide walks you through how to setup Contact Form 7 in WordPress from installation to embedding. You’ll learn to create custom forms, configure settings, and ensure messages are delivered smoothly.
Key Takeaways
- Easy Installation: Install Contact Form 7 directly from the WordPress plugin directory in just a few clicks.
- Form Customization: Use simple shortcodes and form tags to build contact forms tailored to your needs.
- Email Configuration: Set up the “To,” “From,” and “Subject” fields to ensure messages reach the right inbox.
- Spam Protection: Enable reCAPTCHA integration to reduce spam submissions and improve security.
- Form Embedding: Insert forms into pages or posts using shortcodes for seamless integration.
- Troubleshooting Tips: Fix common issues like emails not sending or forms not displaying correctly.
- Best Practices: Keep forms simple, test regularly, and maintain plugin updates for optimal performance.
Introduction: Why Use Contact Form 7?
If you’re running a WordPress website, having a reliable contact form is essential. Whether you’re a blogger, small business owner, or freelancer, you need a way for visitors to reach you easily. That’s where Contact Form 7 comes in—one of the most popular and trusted contact form plugins for WordPress.
In this guide, you’ll learn how to setup Contact Form 7 in WordPress from scratch. We’ll cover everything from installing the plugin to customizing your form, configuring email settings, adding spam protection, and embedding the form on your site. By the end, you’ll have a fully functional contact form that looks great and works reliably.
Step 1: Install Contact Form 7
The first step is to install the plugin. Contact Form 7 is free and available in the official WordPress plugin repository, so you don’t need to download it from a third-party site.
Visual guide about How to Setup Contact Form 7 in WordPress
Image source: kinsta.com
Go to Your WordPress Dashboard
Log in to your WordPress admin area. This is usually found at yoursite.com/wp-admin.
Navigate to Plugins
In the left-hand menu, click on Plugins, then select Add New.
Search for Contact Form 7
In the search bar, type “Contact Form 7.” The plugin should appear at the top of the results. It’s developed by Takayuki Miyoshi and has over 5 million active installations.
Install and Activate
Click the Install Now button, then once it’s installed, click Activate. The plugin is now ready to use.
Step 2: Create Your First Contact Form
After activation, Contact Form 7 automatically creates a default form. You can use this as a starting point or create a new one.
Access the Contact Form 7 Menu
In your WordPress dashboard, go to Contact in the left menu. Click on Contact Forms to see your existing forms.
Edit the Default Form
Click on the default form titled “Contact form 1.” This will open the form editor, where you can customize the fields.
Understand the Form Tags
Contact Form 7 uses shortcodes called “form tags” to define fields. Here’s what the default form includes:
[text* your-name]– A required text field for the visitor’s name.[email* your-email]– A required email field.[textarea your-message]– A text area for the message.[submit "Send"]– The submit button.
You can edit these tags or add new ones. For example, to add a phone number field, use: [tel your-phone].
Customize Labels and Placeholders
You can make your form more user-friendly by adding labels and placeholders. For example:
Your Name (required)
[text* your-name placeholder "Enter your full name"]
Your Email (required)
[email* your-email placeholder "example@email.com"]
This improves clarity and helps users fill out the form correctly.
Step 3: Configure Email Settings
Once the form is set up, you need to tell Contact Form 7 where to send the messages.
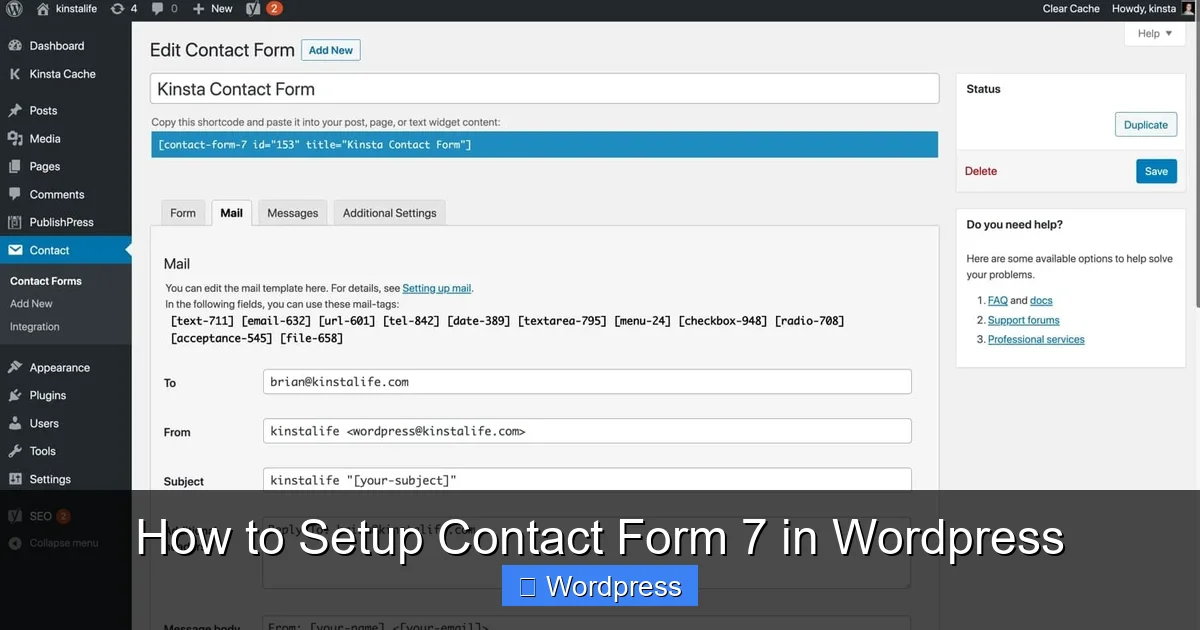
Go to the “Mail” Tab
In the form editor, click on the Mail tab. This is where you configure email delivery.
Set the “To” Field
In the To field, enter the email address where you want to receive messages. For example: yourname@yoursite.com.
Set the “From” Field
In the From field, use a dynamic tag to pull the sender’s email: [your-email]. This ensures replies go back to the person who filled out the form.
Customize the Subject Line
In the Subject field, you can use static text or include form data. For example: New message from [your-name].
Message Body
The Message body section defines what the email will contain. By default, it includes all form fields. You can customize it like this:
Name: [your-name]
Email: [your-email]
Phone: [your-phone]
Message:
[your-message]
This makes the email easy to read and organized.
Step 4: Add Spam Protection with reCAPTCHA
Spam submissions are a common issue with contact forms. Contact Form 7 supports Google reCAPTCHA to help block bots.
Enable reCAPTCHA in Contact Form 7
In the form editor, go to the Integration tab. Click on reCAPTCHA and then Generate API Key Pair.
Get Your Site and Secret Keys
You’ll be redirected to Google’s reCAPTCHA admin page. Sign in with your Google account, create a new site, and choose reCAPTCHA v2 (“I’m not a robot” checkbox).
Copy and Paste the Keys
Copy the Site Key and Secret Key and paste them into the corresponding fields in the Contact Form 7 integration tab. Save the settings.
Add reCAPTCHA to Your Form
In the form editor, add the following tag where you want the reCAPTCHA to appear: [recaptcha]. Place it above the submit button for best results.
Step 5: Embed the Form on Your Website
Now that your form is ready, it’s time to add it to a page or post.
Copy the Shortcode
In the Contact Forms list, hover over your form and click Copy next to the shortcode. It will look something like:
Paste the Shortcode
Go to the page or post where you want the form to appear. In the block editor, add a Shortcode block and paste the code inside.
Preview and Publish
Click Preview to see how the form looks. If everything looks good, publish or update the page.
Step 6: Test Your Contact Form
Never skip testing! A form that looks good but doesn’t send emails is useless.
Fill Out the Form
Visit the live page and fill out the form with test data. Make sure to use a real email address so you can check if the message arrives.
Check Your Inbox
Look for the test email in your inbox (and spam folder, just in case). Verify that all fields are included and the formatting is correct.
Test reCAPTCHA
Try submitting the form without checking the reCAPTCHA box. You should see an error message. This confirms spam protection is working.
Troubleshooting Common Issues
Even with careful setup, issues can arise. Here are solutions to the most common problems.
Emails Not Sending
If emails aren’t arriving, the issue is often with your hosting provider’s mail settings. Many shared hosts block PHP mail functions. Consider using an SMTP plugin like WP Mail SMTP to route emails through a reliable service like Gmail or SendGrid.
Form Not Displaying
If the form doesn’t appear, double-check the shortcode. Make sure it’s pasted correctly and hasn’t been altered. Also, ensure the form is published and not set to draft.
reCAPTCHA Not Loading
If reCAPTCHA doesn’t show up, verify that your API keys are correct and that your site URL matches the one registered with Google. Also, clear your browser cache.
Spam Submissions
If you’re still getting spam, consider adding a hidden honeypot field or upgrading to reCAPTCHA v3 for invisible protection.
Best Practices for Using Contact Form 7
To get the most out of Contact Form 7, follow these tips:
- Keep it simple: Only ask for essential information. Too many fields can reduce submissions.
- Use clear labels: Make it obvious what each field is for.
- Test regularly: Check your form periodically to ensure it’s working.
- Update the plugin: Keep Contact Form 7 updated to benefit from security patches and new features.
- Monitor submissions: Use a plugin like Flamingo (also by Takayuki Miyoshi) to save form entries in your WordPress database.
Conclusion
Setting up Contact Form 7 in WordPress is straightforward and highly effective. With just a few steps, you can create a professional contact form that enhances user experience and helps you stay connected with your audience.
From installation and customization to spam protection and troubleshooting, this guide covers everything you need to know. Now that you’ve learned how to setup Contact Form 7 in WordPress, you can confidently add forms to your site and start collecting inquiries, feedback, or leads.
For more WordPress tips and tools, visit our Contact page to get in touch or explore related guides on plugin management and website optimization.