This guide walks you through how to setup Google Analytics in WordPress using simple methods—no coding required. You’ll learn to install tracking codes, verify data, and start analyzing your site’s performance in minutes.
Key Takeaways
- Choose the right method: Use a plugin like Site Kit or insert the tracking code manually for full control.
- Create a Google Analytics 4 property: GA4 is the latest version and offers better insights than Universal Analytics.
- Install the tracking code correctly: Place it in your site’s header or via a plugin to ensure accurate data collection.
- Verify setup with real-time reports: Check if your site is sending data by viewing active users in Google Analytics.
- Use UTM parameters: Track marketing campaigns effectively by tagging your links.
- Respect user privacy: Enable IP anonymization and comply with GDPR if needed.
- Monitor and optimize: Regularly review reports to improve content, SEO, and user experience.
Why You Need Google Analytics on Your WordPress Site
If you run a WordPress website, understanding your visitors is key to growth. Google Analytics gives you powerful insights—like how many people visit your site, where they come from, and what pages they love. Without it, you’re flying blind.
Setting up Google Analytics in WordPress helps you:
– Track traffic sources (Google, social media, email)
– See which content performs best
– Measure conversion goals (newsletter signups, purchases)
– Improve SEO and user experience
The good news? You don’t need to be a tech expert. This guide shows you how to setup Google Analytics in WordPress in under 15 minutes—using free tools and simple steps.
Step 1: Create a Google Analytics Account
Visual guide about How to Setup Google Analytics in WordPress
Image source: websitesetup.org
Before adding anything to WordPress, you need a Google Analytics account. Here’s how:
Sign in to Google Analytics
Go to analytics.google.com and sign in with your Google account. If you don’t have one, create it first.
Start a New Property
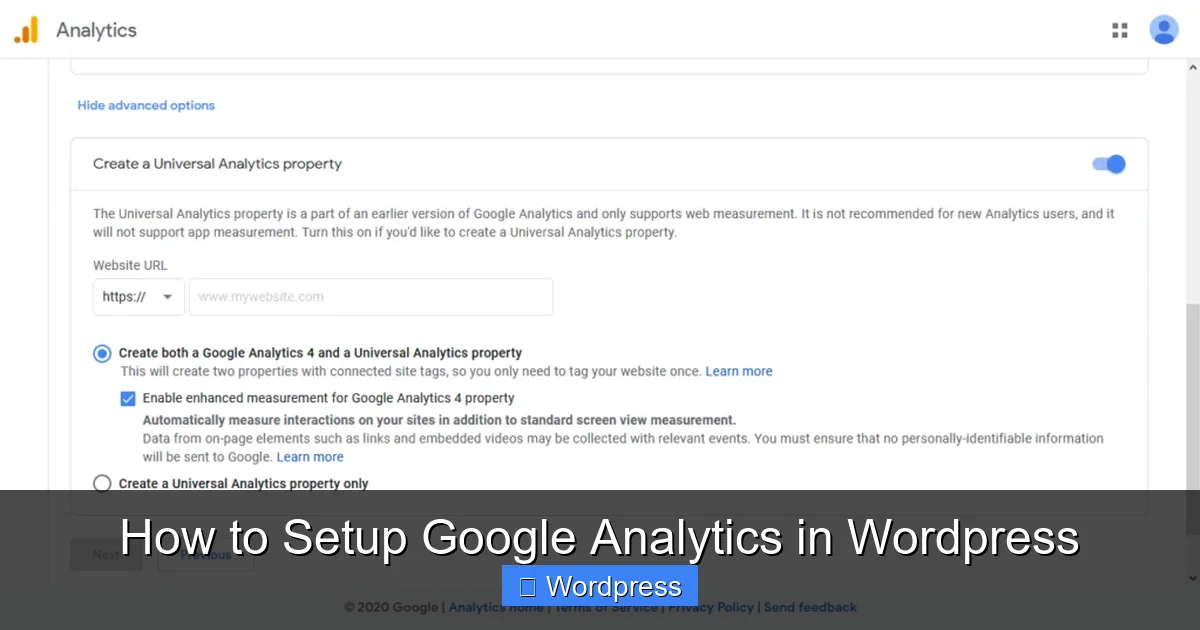
Click “Start measuring” and enter your account name (e.g., “My Business”). Then, create a property. Choose “Web” as the platform and enter your website’s URL and name.
Set Up Data Stream
After creating the property, click “Add stream” and select “Web.” Enter your website URL and give the stream a name. Google will generate a Measurement ID (starts with “G-”). Copy this ID—you’ll need it soon.
> 💡 Tip: Use Google Analytics 4 (GA4), not Universal Analytics. GA4 is smarter, works on mobile and web, and is the future of analytics.
Step 2: Choose Your Setup Method
There are two main ways to add Google Analytics to WordPress:
1. **Use a plugin (easiest for beginners)**
2. **Add the tracking code manually (more control)**
We’ll cover both.
Method 1: Setup Google Analytics Using a Plugin (Recommended)
Visual guide about How to Setup Google Analytics in WordPress
Image source: newsnit.com
Plugins make setup fast and error-free. The best free option is Google Site Kit, developed by Google itself.
Install Google Site Kit
1. In your WordPress dashboard, go to Plugins > Add New.
2. Search for “Google Site Kit.”
3. Click “Install Now” and then “Activate.”
Connect to Google
1. Go to Site Kit > Dashboard.
2. Click “Start Setup” and sign in with your Google account.
3. Grant permissions when prompted.
Enable Analytics
1. Site Kit will detect your website and ask if you want to connect Google Analytics.
2. Click “Enable Analytics” and follow the prompts.
3. If you already have a GA4 property, select it. If not, Site Kit can create one for you.
Verify Installation
Once connected, Site Kit shows a success message. You can also check your site’s front end:
– Right-click and select “View Page Source.”
– Search for “G-” — you should see your Measurement ID in the code.
> ✅ Pro Tip: Site Kit also connects Search Console, PageSpeed Insights, and AdSense—all in one place.
Method 2: Add Google Analytics Code Manually
If you prefer full control or don’t want another plugin, insert the tracking code yourself.
Get Your GA4 Tracking Code
1. In Google Analytics, go to Admin > Data Streams.
2. Click your web stream.
3. Under “Tagging Instructions,” click “Global site tag.”
4. Copy the entire code snippet (starts with <script async src=...).
Insert Code into WordPress
There are three ways to add the code:
Option A: Use the Theme’s Header (Not Recommended)
Go to Appearance > Theme File Editor, open header.php, and paste the code before </head>.
⚠️ Warning: This method breaks when you update your theme.
Option B: Use a Child Theme (Better)
If you use a child theme, edit its header.php file. Updates won’t overwrite your changes.
Option C: Use a Code Snippets Plugin (Best)
1. Install the free Code Snippets plugin.
2. Go to Snippets > Add New.
3. Paste the Google Analytics code.
4. Set “Run snippet everywhere” and click “Save and Activate.”
> 🔧 Alternative: Use Insert Headers and Footers plugin. Paste the code in the “Header” box and save.
Step 3: Verify Your Google Analytics Setup
Don’t assume it’s working—check it!
Use Real-Time Reports
1. Go to your Google Analytics dashboard.
2. Click “Real-time” in the left menu.
3. Open your website in another tab.
4. You should see “1 active user” (you!).
If you don’t see activity, wait 5–10 minutes. If still nothing, double-check your Measurement ID and code placement.
Check for Errors
– Ensure the code is in the <head> section.
– Confirm no typos in the Measurement ID.
– Clear your WordPress cache if using a caching plugin.
Step 4: Configure Important Settings
Now that tracking is live, optimize your setup.
Enable Enhanced Measurement
In Google Analytics:
1. Go to Admin > Data Streams.
2. Click your web stream.
3. Toggle on “Enhanced measurement.”
This tracks page views, scrolls, outbound clicks, and more—automatically.
Set Up Goals and Conversions
Go to Admin > Events and mark important actions as conversions:
– Newsletter signups
– Contact form submissions
– Purchases
You can also create custom events using Google Tag Manager (advanced).
Respect Privacy and Compliance
– Enable IP anonymization (in GA4, it’s on by default).
– Add a privacy policy that mentions Google Analytics.
– Use a cookie consent plugin (like Complianz) if you’re in the EU.
Troubleshooting Common Issues
No Data in Google Analytics?
– Check if the code is installed on all pages.
– Ensure you’re not using a VPN or ad blocker (they can block tracking).
– Verify your Measurement ID matches the one in GA4.
Duplicate Pageviews?
This happens if you use both a plugin and manual code. Remove one method.
Slow Website After Setup?
Google Analytics is lightweight, but too many plugins can slow things down. Use only one tracking method.
Best Practices for Using Google Analytics
– Check reports weekly: Look at “Acquisition” and “Behavior” to see what’s working.
– Use UTM tags: Add ?utm_source=twitter&utm_medium=social to links to track campaigns.
– Create custom dashboards: Save reports you check often.
– Set up alerts: Get emails when traffic drops or spikes.
Conclusion
Setting up Google Analytics in WordPress is a must for any website owner. Whether you use Google Site Kit or add the code manually, you’ll gain valuable insights to grow your audience and improve your content.
Now that you know how to setup Google Analytics in WordPress, take action today. In just 15 minutes, you can start tracking visitors, understanding behavior, and making data-driven decisions.
Don’t wait—your website’s success starts with knowing your audience.