The WooCommerce setup wizard simplifies launching your WordPress online store with guided steps for payments, shipping, and design. It’s perfect for beginners and saves hours of manual configuration.
So, you’ve decided to start an online store—congratulations! Whether you’re selling handmade jewelry, digital courses, or eco-friendly home goods, getting your shop up and running should be exciting, not overwhelming. That’s where the **WooCommerce setup wizard** comes in. Think of it as your personal store-launching assistant, built right into WordPress.
If you’ve installed WooCommerce on your WordPress site, you’ve probably already seen this friendly guide pop up. It appears automatically after activation and leads you through everything from choosing your store’s location to setting up payment methods. No need to dig through settings menus or guess which options matter most. The wizard handles the heavy lifting so you can focus on what really counts—your products and customers.
And the best part? It’s completely free, included with the core WooCommerce plugin, and designed for users of all skill levels. Whether you’re a tech-savvy entrepreneur or someone who just learned what “CMS” stands for yesterday, the WooCommerce setup wizard makes launching an online store feel achievable.
Key Takeaways
- Guided onboarding: The WooCommerce setup wizard walks you through essential store settings step by step.
- Time-saving tool: Automates initial configurations like tax, shipping, and payment gateways.
- Beginner-friendly: No coding or technical skills required—ideal for first-time store owners.
- Customizable options: Choose themes, add products, and set up regions during setup.
- Integration-ready: Connects seamlessly with popular plugins and third-party services.
- Reusable later: You can revisit the wizard anytime to update core store settings.
Quick Answers to Common Questions
Can I skip the WooCommerce setup wizard?
Yes, you can close the wizard and configure settings manually. However, skipping it may lead to missed steps like tax or shipping setup.
Does the wizard install themes automatically?
Yes, if you select a theme during setup, it installs and activates it for you—no extra steps needed.
Can I run the wizard more than once?
Absolutely. Go to WooCommerce > Home and click “Complete your store setup” to restart it anytime.
Is the setup wizard available in all countries?
Yes, but some features (like WooCommerce Payments) are limited to specific regions. Check availability during setup.
Do I need a domain and hosting before using the wizard?
Yes. You must have a WordPress site with hosting and a domain name installed before activating WooCommerce.
📑 Table of Contents
What Is the WooCommerce Setup Wizard?
The WooCommerce setup wizard is an interactive onboarding tool that guides new users through the essential steps of configuring their online store. Once you install and activate the WooCommerce plugin on your WordPress site, the wizard launches automatically in your admin dashboard.
Its purpose is simple: help you avoid common setup mistakes and ensure your store is ready to accept orders from day one. Instead of jumping between different settings pages, the wizard presents everything in a clean, step-by-step format. You’ll configure your store’s location, currency, payment options, shipping zones, tax settings, and even pick a theme—all within a single, intuitive flow.
This isn’t just a “nice-to-have” feature—it’s a game-changer for beginners. Without the wizard, setting up a functional eCommerce store can involve navigating dozens of settings, understanding tax rules, and connecting payment gateways manually. The wizard streamlines all of that into a 10-minute process.
How to Access the WooCommerce Setup Wizard
Accessing the wizard is straightforward. After installing WooCommerce via your WordPress dashboard (Plugins > Add New > Search “WooCommerce” > Install & Activate), the wizard will appear automatically.
If you accidentally closed it or want to revisit it later, don’t worry—you can restart it anytime. Simply go to **WooCommerce > Home** in your WordPress admin menu. Look for the “Let’s go!” button or a prompt that says “Complete your store setup.” Click it, and the wizard will resume where you left off.
This flexibility is great because your business needs might evolve. Maybe you expand to a new country, switch payment processors, or decide to offer local pickup. Revisiting the wizard lets you update these core settings without hunting through multiple menus.
Step-by-Step Walkthrough of the Setup Wizard
Visual guide about Woocommerce Setup Wizard
Image source: wpsolver.com
Let’s walk through each stage of the WooCommerce setup wizard so you know exactly what to expect.
1. Store Setup
You’ll start by entering basic details about your business:
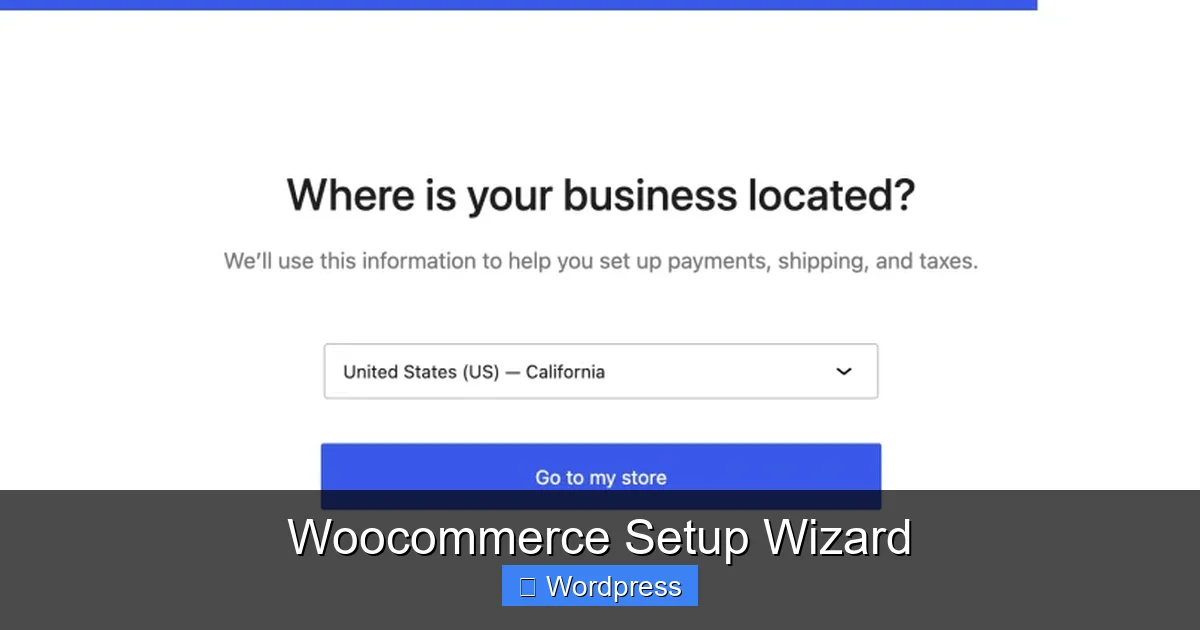
– **Store location:** Select your country. This affects tax calculations and shipping options.
– **What you sell:** Choose between physical products, digital downloads, or both.
– **Industry:** Pick categories like fashion, electronics, or food. This helps recommend relevant extensions.
– **Number of products:** Estimate how many items you’ll sell (e.g., 1–10, 10–100). This influences theme and plugin suggestions.
Tip: Be honest here—WooCommerce uses this info to tailor recommendations. If you plan to scale later, choose a higher range now.
2. Theme Selection
Next, you’ll pick a free theme optimized for WooCommerce. Options include Storefront (WooCommerce’s official theme), Astra, and Kadence. Each is mobile-friendly, fast-loading, and customizable.
You can preview themes before selecting one. Once chosen, it installs automatically. Don’t stress—you can switch themes later without losing your products or settings.
3. Payments
This is where you connect how you’ll get paid. The wizard supports major gateways:
– **WooCommerce Payments** (powered by Stripe) – available in select countries.
– **PayPal**
– **Stripe**
– **Bank transfers** (manual payments)
Enable at least one method to start accepting orders. You can add more later under **WooCommerce > Settings > Payments**.
Pro tip: If you’re in the U.S., U.K., Canada, or Australia, enable WooCommerce Payments for seamless integration and lower fees.
4. Shipping
Set up shipping zones and methods:
– **Shipping zones:** Define regions (e.g., “United States,” “Europe”).
– **Shipping methods:** Choose flat rate, free shipping, or local pickup.
– **Shipping classes:** Optional, but useful if you sell items with different weights or sizes.
Example: If you offer free shipping on orders over $50, set a flat rate of $0 with a minimum order condition.
5. Taxes
The wizard helps configure tax settings based on your location. In the U.S., it enables automatic tax calculations using WooCommerce Tax (powered by Automattic). In other regions, you may need to set tax rates manually.
Important: Tax laws vary by country and product type. If you sell digital goods or operate in multiple states/countries, consult a tax professional.
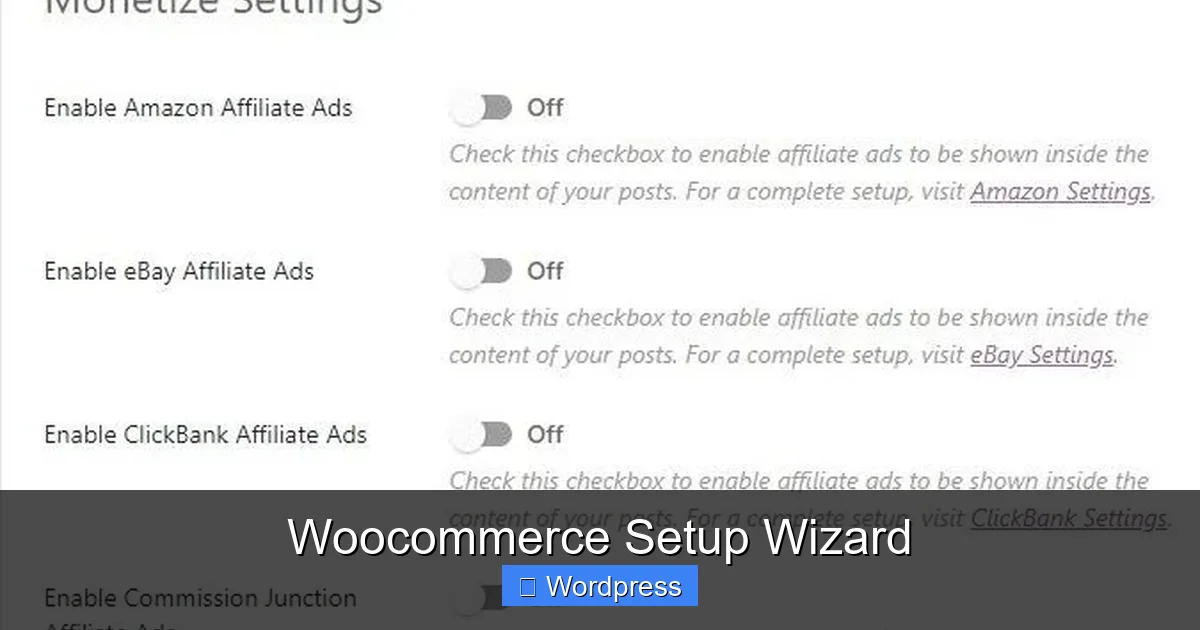
6. Recommended Extensions
WooCommerce suggests free and paid plugins to enhance your store:
– **Mailchimp for WooCommerce** – email marketing.
– **WooCommerce Subscriptions** – recurring payments.
– **WooCommerce Bookings** – appointment scheduling.
You can install these now or skip and add them later. Only install what you need to avoid plugin bloat.
7. Final Steps
The wizard wraps up by asking if you’d like to:
– Add your first product (you can do this later).
– Set up analytics (Google Analytics integration).
– Get marketing tips via email (optional).
Once complete, click “Let’s go!” and your store is live!
Tips for a Smooth Setup Experience
Visual guide about Woocommerce Setup Wizard
Image source: woocommerce.com
Even with a wizard, a few smart moves can make your setup even smoother.
Prepare Your Info in Advance
Gather details before starting:
– Business address and tax ID
– Bank account info for payouts
– Product categories and sample items
– Shipping policies (return window, delivery times)
This prevents mid-wizard pauses and keeps the process flowing.
Use a Staging Site for Testing
If you’re building a store for a client or testing major changes, use a staging environment. Many hosts (like those recommended in our guide to the best web hosting for WooCommerce) offer one-click staging sites. This lets you run the wizard risk-free.
Don’t Skip Extensions
While it’s tempting to rush through, take time to review recommended extensions. For example, if you sell subscriptions, installing WooCommerce Subscriptions during setup saves hours later.
Revisit After Launch
Your first setup doesn’t have to be perfect. Use the wizard as a foundation, then refine settings as your store grows. Add new shipping zones, enable additional payment methods, or adjust tax rules as needed.
Common Mistakes to Avoid
Even with a helpful wizard, pitfalls exist.
Ignoring Tax Settings
Assuming taxes are “handled automatically” can lead to compliance issues. Double-check your tax configuration, especially if selling internationally.
Overloading with Plugins
The wizard may suggest several extensions. Only install what you’ll use immediately. Too many plugins slow down your site and increase security risks.
Skipping Mobile Optimization
Always preview your store on a phone. A theme may look great on desktop but break on mobile. Test product pages, checkout, and navigation.
Not Setting Up Analytics
Without tracking, you won’t know where your traffic comes from or which products sell best. Connect Google Analytics early—even if just for basic insights.
Why the WooCommerce Setup Wizard Matters
The WooCommerce setup wizard isn’t just a convenience—it’s a strategic advantage. It reduces the learning curve, minimizes errors, and helps new store owners launch faster than ever.
For entrepreneurs, time is money. Every hour spent wrestling with settings is an hour not spent marketing, creating content, or improving products. The wizard turns a multi-day project into a single afternoon task.
It also promotes best practices. By guiding users through payments, shipping, and taxes in order, it ensures critical elements aren’t overlooked. This leads to fewer support tickets, fewer abandoned carts, and happier customers.
And because it’s built into WooCommerce—the world’s most popular eCommerce platform—it’s constantly updated. New features, security patches, and compatibility improvements are rolled out regularly, keeping your store modern and secure.
In short, the WooCommerce setup wizard is your shortcut to a professional, functional online store. Use it wisely, and you’ll spend less time configuring and more time growing.
Frequently Asked Questions
What happens if I close the setup wizard early?
You can return to it later via WooCommerce > Home. Any completed steps will be saved, and you can pick up where you left off.
Does the wizard support multi-currency stores?
The basic wizard sets one currency. For multi-currency support, you’ll need a plugin like WooCommerce Multi-Currency after setup.
Can I use the wizard on an existing WooCommerce store?
Yes, but it’s designed for new stores. Running it on an established shop may overwrite some settings, so back up first.
Is the WooCommerce setup wizard free?
Yes, it’s included with the free WooCommerce plugin. No additional cost or subscription required.
What if my country isn’t listed in the store location?
Select the closest available option. You can manually adjust tax and shipping settings later under WooCommerce > Settings.
Does the wizard help with SEO?
Not directly, but it ensures your store is properly structured. For advanced SEO, consider installing Yoast SEO or Rank Math afterward.