This guide shows you how to create a temporary WordPress login for clients, developers, or support staff without compromising security. You’ll learn manual methods, plugin options, and best practices to ensure access is time-limited and safe.
Key Takeaways
- Use temporary logins for short-term access: Ideal for developers, designers, or support teams who need limited-time access to your WordPress site.
- Manual user creation is simple and secure: You can create a temporary user directly in WordPress with a strong password and limited role.
- Plugins automate expiration: Tools like Temporary Login Without Password let you generate auto-expiring login links.
- Always assign the least privilege: Give temporary users only the permissions they need—avoid administrator roles unless absolutely necessary.
- Delete or deactivate after use: Remove temporary accounts promptly to reduce security risks.
- Enable two-factor authentication (2FA): Add an extra layer of security for all admin and temporary accounts.
- Monitor user activity: Use activity log plugins to track what temporary users do on your site.
Why Create a Temporary WordPress Login?
Sometimes, you need to give someone access to your WordPress site—but only for a short time. Maybe a developer is fixing a bug, a designer is updating your homepage, or a client wants to review content before launch. In these cases, creating a temporary WordPress login is smarter and safer than sharing your main admin credentials.
Temporary logins limit exposure. They reduce the risk of unauthorized changes, data breaches, or accidental damage. Plus, you can revoke access instantly when the job is done. This guide walks you through two reliable methods: creating a temporary user manually and using a dedicated plugin.
Method 1: Create a Temporary User Manually
Visual guide about How to Create a Temporary WordPress Login
Image source: quadlayers.com
This method uses WordPress’s built-in user system. It’s free, doesn’t require plugins, and gives you full control.
Step 1: Log in to Your WordPress Dashboard
Go to your site’s admin area by visiting yoursite.com/wp-admin. Enter your username and password to log in.
Step 2: Navigate to Users > Add New
In the left-hand menu, click Users, then select Add New. This opens the user creation form.
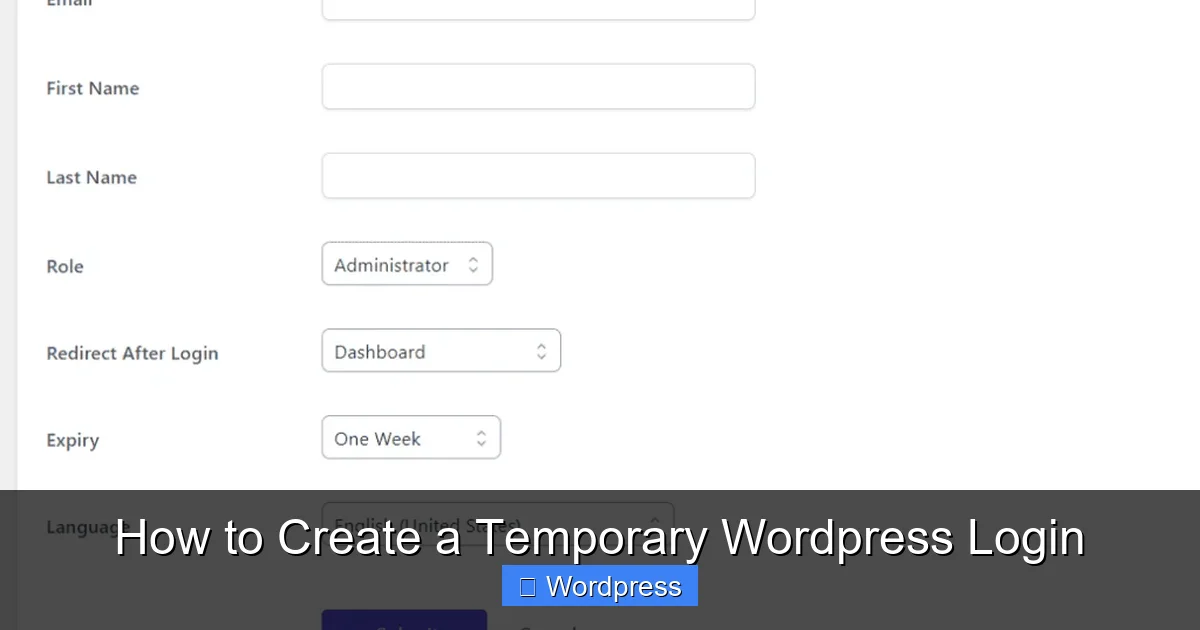
Step 3: Fill in User Details
Enter the following information:
- Username: Choose something clear but not personal, like
temp-dev-johnorclient-review-may2024. - Email: Use a valid email address. WordPress will send the login details here.
- First Name & Last Name: Optional, but helpful for identification.
- Password: Click Generate Password to create a strong, random password. Confirm it by checking Confirm use of weak password if needed.
Step 4: Set the User Role
This is critical for security. Never assign Administrator unless absolutely necessary. Instead, use:
- Editor: Can publish and manage posts, including others’ posts.
- Author: Can publish and manage only their own posts.
- Contributor: Can write but not publish; needs approval.
- Subscriber: Can only manage their profile—ideal for clients reviewing content.
For most temporary access, Editor or Author is sufficient.
Step 5: Send Login Details
Check the box Send User Notification if you want WordPress to email the login link and password automatically. Otherwise, copy the credentials and send them securely (e.g., via encrypted messaging or password manager).
Step 6: Set an Expiration Reminder
WordPress doesn’t auto-delete users, so set a calendar reminder to remove the account after the task is complete. For example, if a developer is working for three days, schedule deletion on day four.
Method 2: Use a Temporary Login Plugin
Visual guide about How to Create a Temporary WordPress Login
Image source: quadlayers.com
Plugins simplify the process by generating time-limited login links. These links expire automatically, reducing manual oversight.
Recommended Plugin: Temporary Login Without Password
This free plugin is popular, lightweight, and easy to use. It creates login URLs that work without a password and expire after a set time.
Step 1: Install and Activate the Plugin
Go to Plugins > Add New in your dashboard. Search for “Temporary Login Without Password.” Click Install Now, then Activate.
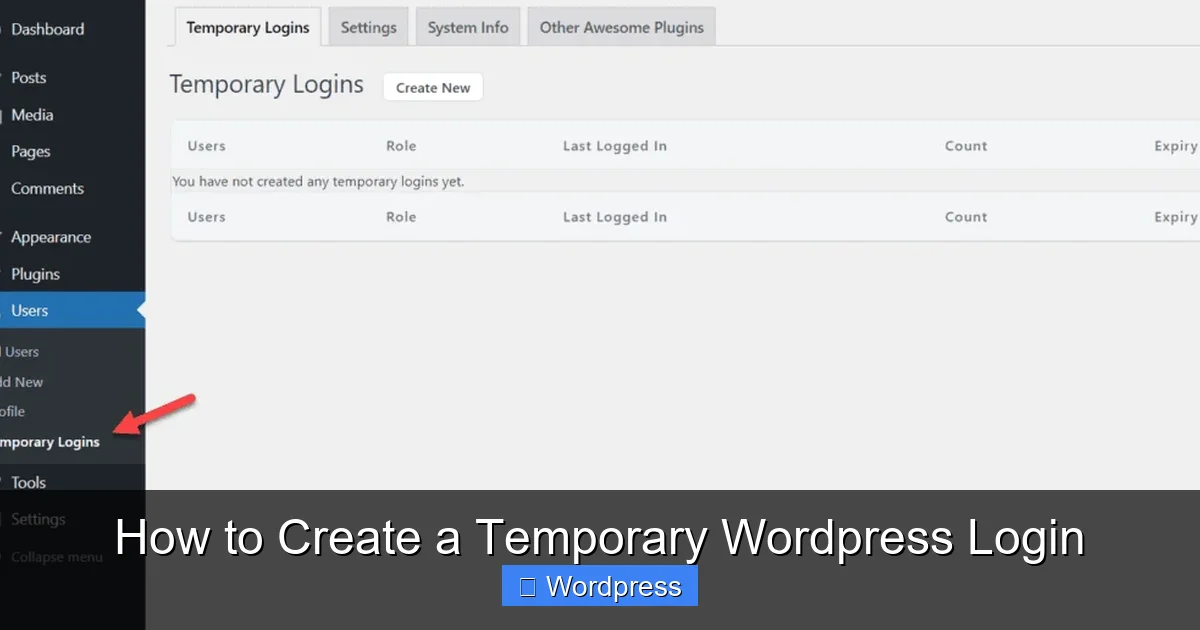
Step 2: Generate a Temporary Login Link
After activation, go to Users > Temporary Logins. Click Create New Temporary Login.
Fill in the form:
- User: Select an existing user or create a new one (e.g., “temp-support”).
- Role: Assign the appropriate role (e.g., Editor).
- Expiration: Choose how long the link should work—1 hour, 1 day, 1 week, or custom.
- Email: Optional. Send the link directly to the recipient.
Click Create Temporary Login. The plugin generates a unique URL like:
https://yoursite.com/wp-login.php?temp_login=abc123xyz
Step 3: Share the Link Securely
Copy the link and send it via a secure channel. The recipient can log in instantly—no password needed. Once the time expires, the link stops working.
Step 4: Monitor and Manage Active Logins
Return to Users > Temporary Logins to see all active links. You can revoke access early by clicking Delete next to any entry.
Best Practices for Temporary Logins
To keep your site secure, follow these guidelines:
1. Use Strong, Unique Usernames
Avoid generic names like “temp” or “guest.” Use descriptive names that include the purpose and date, such as designer-homepage-may2024. This makes it easier to identify and remove later.
2. Limit User Roles
Always follow the principle of least privilege. If someone only needs to edit pages, don’t give them plugin installation rights. For more on managing user roles, check out our guide on how to deactivate a theme in WordPress, which explains role-based access in practice.
3. Enable Two-Factor Authentication (2FA)
Even temporary accounts should use 2FA. Plugins like Google Authenticator or Wordfence add a second verification step, making unauthorized access much harder.
4. Monitor User Activity
Use plugins like WP Activity Log or Simple History to track what temporary users do. You’ll see who edited what, when, and from which IP address.
5. Delete Accounts Promptly
Once the task is complete, delete the user immediately. Go to Users > All Users, hover over the username, and click Delete. Confirm the action.
6. Avoid Sharing Admin Credentials
Never email your main admin password. If you must share access, use a temporary login instead. This protects your primary account from compromise.
Troubleshooting Common Issues
Temporary Login Link Not Working?
- Check if the link has expired.
- Ensure the plugin is active and compatible with your WordPress version.
- Clear your browser cache or try incognito mode.
User Can’t Access Certain Features?
This is likely a role permission issue. Double-check the user role and adjust it if needed. For example, an Author can’t edit others’ posts—upgrade to Editor if required.
Forgot to Delete a Temporary User?
Go to Users > All Users, find the account, and delete it. If you’re unsure which one it is, look for recently created users or check the activity log.
Plugin Conflicts?
Some security plugins may block temporary login URLs. Temporarily disable conflicting plugins (like login limiters) during setup, then re-enable them.
Conclusion
Creating a temporary WordPress login is a smart, secure way to grant short-term access without risking your site’s safety. Whether you use the manual method or a plugin like Temporary Login Without Password, always prioritize security: assign minimal roles, set expiration dates, and delete accounts promptly.
By following this guide, you’ll protect your WordPress site while enabling collaboration with developers, clients, or support teams. For more WordPress tips, explore our guide on how to update a theme on WordPress or learn what a child theme is in WordPress to safely customize your site.
Temporary logins aren’t just convenient—they’re essential for modern WordPress management. Start using them today to keep your site secure and your workflow efficient.