This guide shows you how to install Google Analytics in WordPress using easy methods—no coding required. You’ll learn plugin-based and manual setups, plus tips to verify your tracking works correctly.
Key Takeaways
- Google Analytics helps you track website visitors: See where traffic comes from, what pages perform best, and how users behave on your site.
- Use a plugin for the easiest setup: Tools like Site Kit or MonsterInsights let you connect Google Analytics in minutes without touching code.
- Manual installation gives more control: Adding the tracking code directly to your theme works if you prefer not to use plugins.
- Always verify your tracking is active: Use Google’s Real-Time reports or browser extensions to confirm data is flowing.
- Keep your WordPress theme updated: If you edit theme files directly, updates may overwrite your changes—consider using a child theme.
- Google Analytics 4 (GA4) is now the standard: Make sure you’re setting up GA4, not the older Universal Analytics, which will stop processing data soon.
Why Install Google Analytics in WordPress?
If you run a WordPress website, understanding your audience is key to growth. Google Analytics gives you powerful insights—like how many people visit your site, which pages they love, and where they drop off. With this data, you can improve content, boost conversions, and make smarter marketing decisions.
The good news? Installing Google Analytics in WordPress is simple, whether you’re a beginner or comfortable with code. In this guide, we’ll walk you through two reliable methods: using a plugin (the easiest way) and adding the tracking code manually. We’ll also cover how to check that everything’s working and troubleshoot common issues.
Method 1: Install Google Analytics Using a Plugin (Recommended)
Visual guide about How to Install Google Analytics in WordPress
Image source: blogtyrant.com
Plugins are the fastest and safest way to add Google Analytics to WordPress. They handle the technical details and often include extra features like dashboard reports and goal tracking.
Step 1: Choose a Google Analytics Plugin
Two top options are:
- Google Site Kit: Free, official plugin by Google. Integrates Analytics, Search Console, and more.
- MonsterInsights: User-friendly with a free version and premium upgrades for advanced tracking.
For this guide, we’ll use Google Site Kit—it’s reliable, lightweight, and fully supported by Google.
Step 2: Install and Activate Site Kit
- Log in to your WordPress admin dashboard.
- Go to Plugins > Add New.
- Search for “Google Site Kit.”
- Click Install Now, then Activate.
Step 3: Connect Your Google Account
- In your WordPress dashboard, go to Site Kit > Dashboard.
- Click Start Setup.
- Sign in with the Google account you want to use for Analytics.
- Grant permissions when prompted.
Step 4: Enable Google Analytics
- Site Kit will detect your website and suggest enabling services.
- Toggle on Google Analytics.
- If you don’t have a Google Analytics account yet, Site Kit can create one for you automatically.
- If you already have an account, select your property (make sure it’s a GA4 property).
- Click Allow to complete the connection.
Once done, Site Kit inserts the tracking code on every page. You’ll see a confirmation message and can view basic stats right in your WordPress dashboard.
Bonus Tip: Use MonsterInsights for Simpler Reports
If you prefer clearer reports inside WordPress, try MonsterInsights. It shows top posts, traffic sources, and conversion data without leaving your site. The free version works well for most blogs and small businesses.
Method 2: Manually Add Google Analytics Code to WordPress
Visual guide about How to Install Google Analytics in WordPress
Image source: businesscookhouse.com
If you’d rather not use a plugin—or need full control over the tracking code—you can add it manually. This method works on any WordPress site, regardless of theme or hosting.
Step 1: Get Your Google Analytics Tracking Code
- Go to Google Analytics and sign in.
- Click Admin (gear icon) > Create Property if you don’t have one.
- Make sure you’re creating a GA4 property (not Universal Analytics).
- After setup, go to Admin > Data Streams and select your web stream.
- Copy the Measurement ID (starts with “G-”) or the full JavaScript snippet.
Step 2: Add the Code to Your WordPress Site
There are two safe ways to do this:
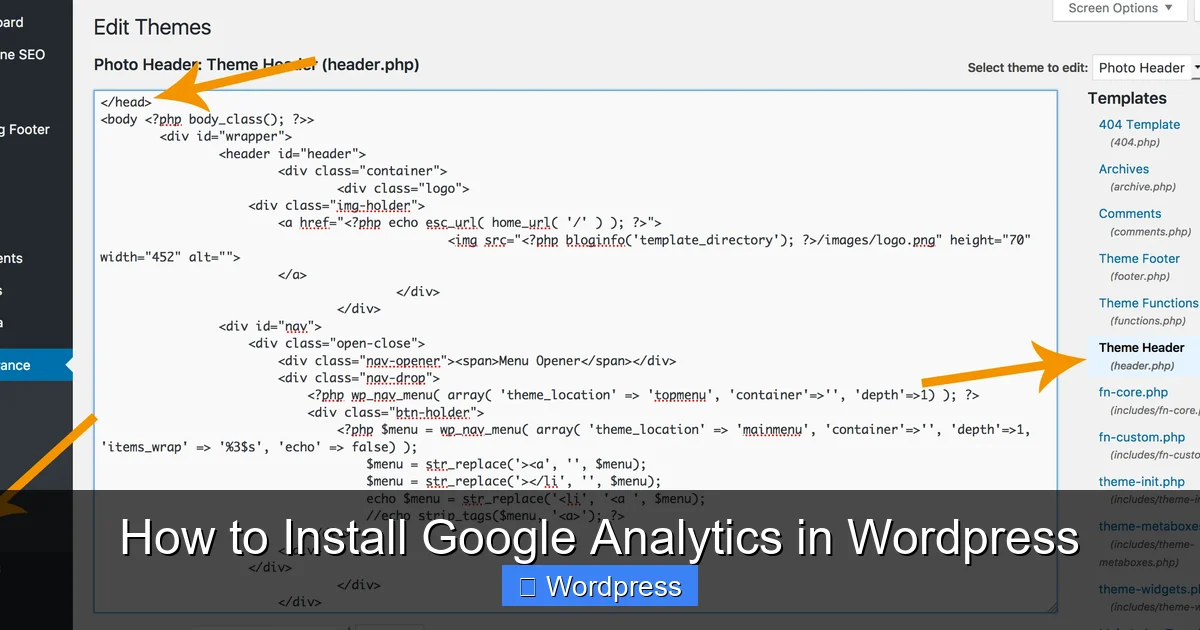
Option A: Use the Header.php File (Not Recommended for Beginners)
- In WordPress, go to Appearance > Theme File Editor.
- Open header.php.
- Paste the Google Analytics code just before the closing
</head>tag. - Click Update File.
⚠️ Warning: If you update your theme later, this change will be lost. Always use a child theme to avoid this.
Option B: Use a Code Snippets Plugin (Recommended)
- Install a plugin like Insert Headers and Footers or Code Snippets.
- Go to Settings > Insert Headers and Footers (or the plugin’s menu).
- Paste your Google Analytics code into the “Header” section.
- Save changes.
This method survives theme updates and keeps your code organized.
Step 3: Verify the Installation
To make sure it’s working:
- Visit your website in an incognito browser window.
- Go to Google Analytics > Real-Time reports.
- You should see at least one active user (you!).
Troubleshooting Common Issues

Visual guide about How to Install Google Analytics in WordPress
Image source: thewomanblogger.com
Even with careful setup, things can go wrong. Here’s how to fix the most common problems:
“No Data in Google Analytics”
- Double-check that you’re using a GA4 property—Universal Analytics won’t work long-term.
- Ensure the code is placed in the
<head>section, not the footer. - Clear your WordPress cache if you use a caching plugin.
“Tracking Code Disappears After Theme Update”
This happens when you edit header.php directly. The fix? Always use a child theme or a header/footer plugin.
“Duplicate Tracking Codes”
If you install multiple plugins or add the code twice, you’ll skew your data. Check your site’s source code (right-click > View Page Source) and search for “G-” to find duplicates. Remove extras.
Best Practices After Installation
Once Google Analytics is running, take these steps to get the most value:
- Set up goals: Track form submissions, downloads, or purchases.
- Enable enhanced measurement: In GA4, this auto-tracks page views, scrolls, and outbound clicks.
- Connect Google Search Console: See which keywords bring traffic (Site Kit does this automatically).
- Review reports weekly: Look at Audience, Acquisition, and Behavior tabs to spot trends.
Conclusion
Installing Google Analytics in WordPress doesn’t have to be complicated. Whether you choose a plugin like Site Kit or add the code manually, you’ll gain valuable insights to grow your site. Remember to use GA4, verify your setup, and protect your work with a child theme or snippet plugin. With analytics in place, you’re ready to make data-driven decisions and build a better website.