This guide walks you through the simple process of uploading a WordPress theme zip file directly from your dashboard. You’ll learn safe installation methods, troubleshooting tips, and best practices to keep your site running smoothly.
Key Takeaways
- Always back up your site first: Before uploading any new theme, create a full backup to prevent data loss in case something goes wrong.
- Use the built-in WordPress uploader: The easiest and safest way to install a theme is through Appearance > Themes > Add New > Upload Theme.
- Check file compatibility: Ensure your theme zip file is compatible with your current WordPress version and doesn’t contain malware.
- Activate after upload: Uploading a theme doesn’t activate it—you must click “Activate” to make it live on your site.
- Troubleshoot common errors: Issues like “broken stylesheet” or “missing stylesheet” usually mean an incorrect zip structure—double-check the folder inside.
- Consider using a child theme: If you plan to customize your theme, use a child theme to preserve changes during updates.
- Keep themes updated: Regularly update your theme for security, performance, and compatibility with the latest WordPress features.
How to Upload WordPress Theme Zip File: A Complete Step-by-Step Guide
Whether you’re building a blog, portfolio, or online store, choosing the right WordPress theme is crucial. Once you’ve found the perfect theme—maybe from a marketplace like ThemeForest, Elegant Themes, or even a free option from the WordPress directory—you’ll need to upload it to your site. The most common method is uploading a WordPress theme zip file directly through your WordPress dashboard.
In this guide, you’ll learn exactly how to upload a WordPress theme zip file safely and correctly. We’ll cover everything from preparation to activation, plus troubleshooting tips if things don’t go as planned. By the end, you’ll be confident installing themes like a pro—even if you’re a complete beginner.
Why Upload a Theme via Zip File?
While you can install free themes directly from the WordPress theme directory, many premium or custom themes come as downloadable zip files. These might include advanced features, demo content, or specialized designs not available in the official repository. Uploading via zip gives you full control over which theme you use and ensures you get the exact version you purchased or downloaded.
Visual guide about How to Upload WordPress Theme Zip File
Image source: programmersbank.com
Plus, this method works for both free and premium themes, making it a universal solution for theme installation.
Step 1: Prepare Your WordPress Theme Zip File
Before uploading, make sure your zip file is properly formatted. A common mistake is uploading a zip that contains another folder layer—this causes errors like “The package could not be installed. The theme is missing the style.css stylesheet.”
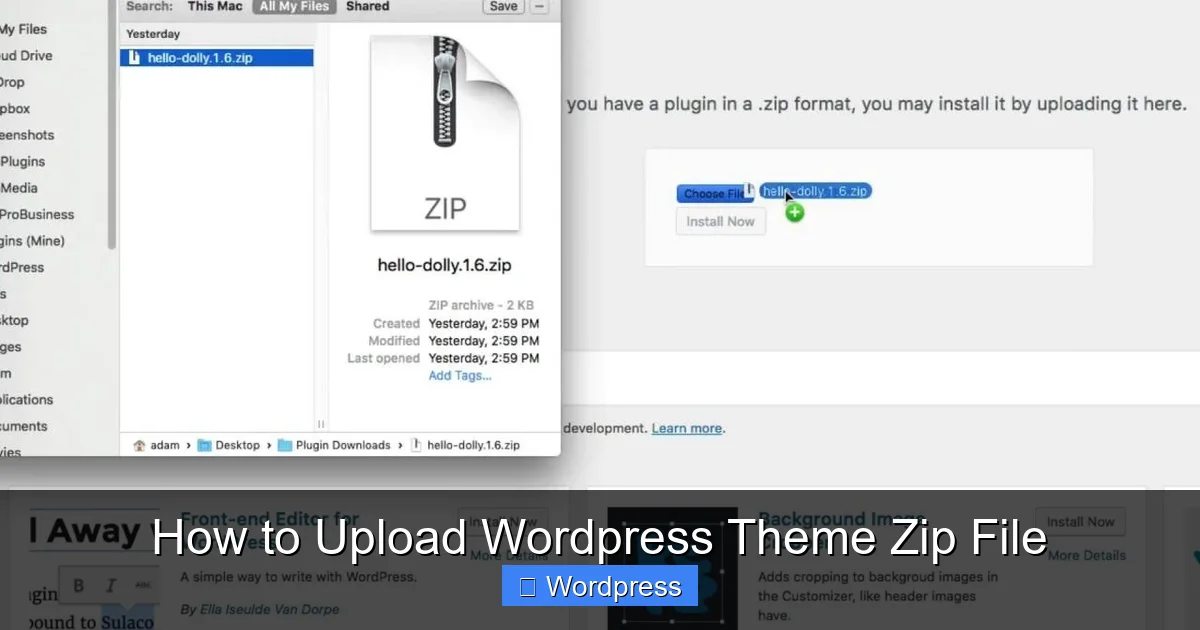
Visual guide about How to Upload WordPress Theme Zip File
Image source: westbankhobbies.com
Check the Zip Structure
Open your zip file (without extracting it) and look inside. You should see a single folder—usually named after the theme (e.g., astra, oceanwp, or my-custom-theme). Inside that folder should be files like style.css, functions.php, and folders like /inc or /template-parts.
If you see multiple folders or the theme files are nested two levels deep, you’ll need to repackage the zip. Extract the contents, locate the actual theme folder, and re-zip only that folder.
Verify Compatibility
Check the theme’s documentation to ensure it’s compatible with your current WordPress version. Most modern themes support WordPress 6.0+, but older themes may not work properly with newer updates.
Scan for Malware (Optional but Recommended)
If you downloaded the theme from a third-party site, scan the zip file with antivirus software or an online scanner like VirusTotal. This protects your site from potential security risks.
Step 2: Log Into Your WordPress Dashboard
Go to your website’s admin area by visiting yoursite.com/wp-admin and logging in with your username and password.
Visual guide about How to Upload WordPress Theme Zip File
Image source: lostinpress.com
Once logged in, you’ll see the WordPress dashboard—a control panel for managing your site.
Step 3: Navigate to the Theme Upload Section
From the left-hand menu, follow these steps:
- Hover over Appearance
- Click Themes
- Click the Add New button at the top of the page
- Click the Upload Theme button (located near the top-left)
You’ll now see a file upload field where you can select your zip file.
Step 4: Upload the Theme Zip File
Select and Upload
Click the Choose File button and browse your computer for the theme zip file. Select it and click Open.
Install the Theme
After selecting the file, click the Install Now button. WordPress will upload and extract the theme automatically. This may take a few seconds, depending on the file size and your server speed.
Once complete, you’ll see a success message with two options: Activate and Live Preview.
Step 5: Activate Your New Theme
To make your new theme live, click the Activate button. Your site will immediately switch to the new design.
Alternatively, you can click Live Preview to see how the theme looks before going live. This is useful if you want to customize settings first.
After activation, visit your website’s front end to confirm the theme is working correctly.
Step 6: Configure and Customize Your Theme
Most themes come with customization options. To access them:
- Go to Appearance > Customize
- Adjust colors, fonts, layouts, and other settings
- Click Publish to save changes
Some premium themes also include a setup wizard or demo importer. Look for a new menu item (like “Theme Options” or “Demo Import”) after activation.
Troubleshooting Common Upload Errors
Even with careful preparation, issues can arise. Here’s how to fix the most common problems:
“Broken Stylesheet” or “Missing Stylesheet” Error
This happens when the zip file doesn’t contain the theme folder at the root level. As mentioned earlier, your zip should contain one folder—not multiple or nested folders.
Solution: Extract the zip, locate the correct theme folder, and re-zip only that folder.
“Maximum Upload Size Exceeded”
Some themes are large (especially those with demo images), and your server may limit uploads to 2MB or 8MB.
Solution: Increase the upload limit by editing your php.ini file, .htaccess, or using a plugin like WP Maximum Execution Time Exceeded. Alternatively, use the manual FTP method to upload the theme.
White Screen or Site Crash After Activation
This usually means the theme has a conflict with your current plugins or PHP version.
Solution: Reactivate your previous theme by renaming the new theme folder via FTP (this disables it). Then check the theme’s requirements and update your PHP version if needed.
Theme Appears Broken or Unstyled
If your site looks like plain text after activation, the theme may not be loading CSS properly.
Solution: Clear your browser cache and WordPress cache (if using a caching plugin). Also, check that all theme files were uploaded correctly.
Best Practices for Theme Uploads
- Always back up your site before installing a new theme. Use a plugin like UpdraftPlus or your hosting provider’s backup tool.
- Test on a staging site first if possible. Many hosts offer one-click staging environments.
- Use a child theme for customizations. This protects your changes when the parent theme updates. Learn more about what a child theme is and why it matters.
- Keep themes updated to ensure security and compatibility. Check for updates regularly under Dashboard > Updates.
- Delete unused themes to reduce clutter and potential security risks. You can learn how to safely delete themes here.
Alternative: Manual Upload via FTP
If the dashboard upload fails, you can install the theme manually using FTP:
- Extract the theme zip file to your computer
- Connect to your site via FTP (using FileZilla or similar)
- Navigate to
/wp-content/themes/ - Upload the extracted theme folder
- Go to Appearance > Themes in WordPress and activate it
This method bypasses PHP upload limits and is useful for large themes.
Conclusion
Uploading a WordPress theme zip file is a straightforward process once you know the steps. From preparing your file to activating and customizing your new design, this guide covers everything you need for a smooth installation.
Remember to back up your site, check file structure, and test thoroughly. With the right theme, your WordPress site can look professional, load fast, and offer a great user experience.
Now that you’ve uploaded your theme, consider exploring how to apply and customize your WordPress theme for maximum impact. And if you ever need to switch back, you’ll know exactly how to manage your themes safely.