This guide walks you through setting up and using Google Analytics on your WordPress website. You’ll learn how to install the tracking code, navigate the dashboard, and interpret key reports to make smarter decisions.
Key Takeaways
- Google Analytics is free and powerful: It helps you understand who visits your site, where they come from, and what they do.
- Installation is simple: You can add Google Analytics to WordPress using a plugin or by pasting a tracking code.
- Real-time data is available: See live visitors, their locations, and the pages they’re viewing right now.
- Audience reports reveal user details: Learn about age, gender, interests, and device types of your visitors.
- Acquisition reports show traffic sources: Discover if visitors come from search, social media, or direct links.
- Behavior reports track page performance: Find out which pages get the most views and where users drop off.
- Use insights to improve your site: Apply data to boost content, SEO, and user experience.
Introduction: Why Use Google Analytics?
If you run a WordPress website, knowing your audience is key to success. Google Analytics gives you deep insights into your visitors—what they like, where they come from, and how they interact with your content. Whether you’re a blogger, small business owner, or marketer, this tool helps you make data-driven decisions.
In this guide, you’ll learn how to set up Google Analytics on your WordPress site, navigate the dashboard, and use reports to improve your website. We’ll keep it simple, practical, and jargon-free.
Step 1: Create a Google Analytics Account
Before you can track your site, you need an account.
Sign in to Google
Go to analytics.google.com and sign in with your Google account. If you don’t have one, create it first.
Set Up a New Property
Click “Start measuring” and enter your account name (e.g., your website name). Choose your business size and how you plan to use Analytics. Then, create a property for your website by entering your site name, URL, industry, and reporting time zone.
Choose Your Data Stream
Select “Web” as your platform. Enter your website URL and give your stream a name. Click “Create stream.” You’ll now see a Measurement ID (starts with “G-”). This is your tracking code.
Step 2: Add Google Analytics to Your WordPress Site

Visual guide about How to Use Google Analytics
Image source: media.ai-wordsmith.com
There are two main ways to install Google Analytics on WordPress: using a plugin or adding the code manually.
Option A: Use a Plugin (Recommended for Beginners)
Plugins make setup fast and easy. One popular choice is Site Kit by Google, which connects your site to Google services.
- Go to your WordPress dashboard.
- Navigate to Plugins > Add New.
- Search for “Site Kit by Google” and click “Install Now,” then “Activate.”
- Follow the setup wizard. It will ask you to sign in to Google and grant permissions.
- Site Kit will automatically detect your Google Analytics property and connect it.
This method is beginner-friendly and handles everything behind the scenes.
Option B: Add the Tracking Code Manually
If you prefer more control, paste the tracking code into your site’s header.
- Copy your Measurement ID from Google Analytics.
- In WordPress, go to Appearance > Theme File Editor.
- Open the
header.phpfile. - Paste the Google Analytics code just before the closing
</head>tag. - Save changes.
Tip: Editing theme files can break your site if done wrong. Always back up your site first. For safer updates, consider using a child theme.
Step 3: Verify Installation
Visual guide about How to Use Google Analytics
Image source: mangools.com
Make sure Google Analytics is working.
Check Real-Time Reports
In Google Analytics, go to Real-Time > Overview. Visit your website in another browser tab. You should see your visit appear within seconds.
Use Google Tag Assistant
Install the Google Tag Assistant Chrome extension. It confirms if your tracking code is installed correctly.
Step 4: Understand the Google Analytics Dashboard
The dashboard can feel overwhelming at first. Let’s break it down.
Home Overview
This shows a snapshot of your site’s performance: active users, sessions, pageviews, and bounce rate.
Reports Sections
The left menu has four main sections:
- Realtime: See live visitors and their actions.
- Audience: Learn about user demographics, devices, and behavior.
- Acquisition: Find out where your traffic comes from (Google, Facebook, direct, etc.).
- Behavior: Discover which pages perform best and where users leave.
Step 5: Use Key Reports to Improve Your Site
Now that you’re set up, use these reports to grow your website.
Audience Reports
Go to Audience > Overview. You’ll see:
- Number of users and sessions
- Average session duration
- Bounce rate (percentage of single-page visits)
- Top locations and languages
Example: If most visitors use mobile, ensure your site is mobile-friendly. If bounce rate is high, improve page speed or content.
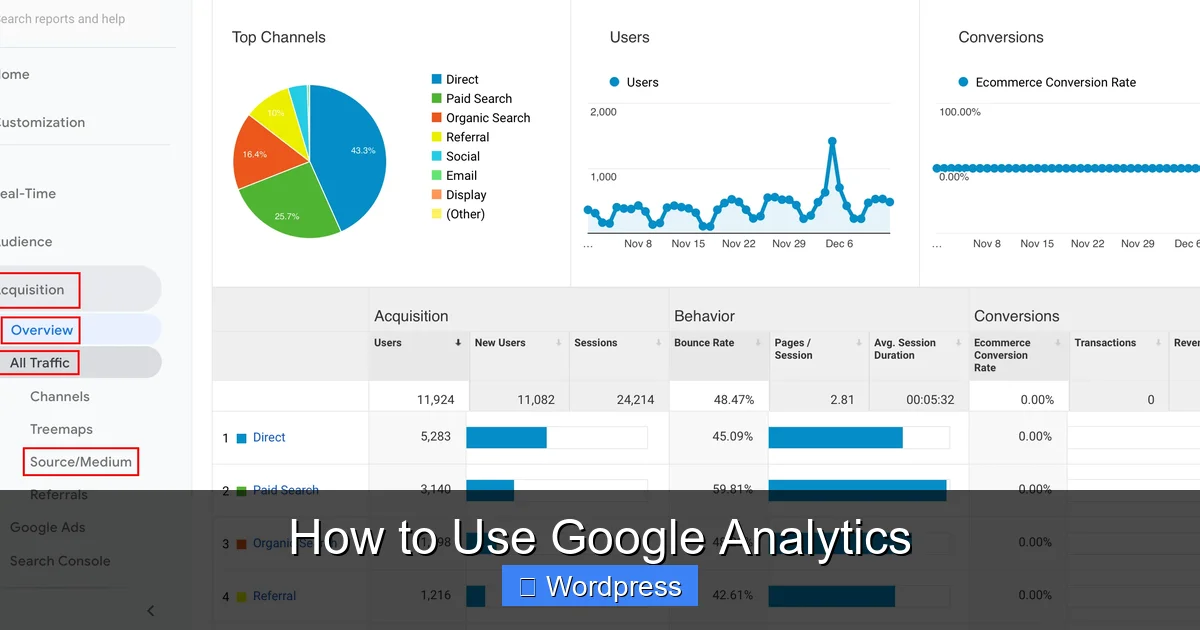
Acquisition Reports
Navigate to Acquisition > All Traffic > Channels. This shows:
- Organic search (Google results)
- Direct traffic (typed URL)
- Social media referrals
- Referral links from other sites
Tip: If organic search is low, focus on SEO improvements like better titles and keywords.
Behavior Reports
Go to Behavior > Site Content > All Pages. You’ll see:
- Pageviews per page
- Average time on page
- Exit rate (how often users leave from that page)
Example: If a blog post has high views but high exit rate, add internal links or a call-to-action to keep users engaged.
Step 6: Set Up Goals (Optional but Powerful)
Goals track important actions like form submissions, purchases, or newsletter signups.
Create a Goal
- In Google Analytics, go to Admin > Goals.
- Click “New Goal.”
- Choose a template (e.g., “Contact Us” for form submissions).
- Set the goal details: name, type (destination, duration, etc.), and value.
- Save.
Now, you’ll see conversion rates and track success over time.
Troubleshooting Common Issues
Sometimes Google Analytics doesn’t work as expected. Here’s how to fix common problems.
No Data in Reports
- Check if the tracking code is installed on all pages.
- Ensure you’re viewing the correct property and time zone.
- Wait 24–48 hours—new accounts may take time to populate data.
Duplicate Pageviews
This happens if the code is added twice (e.g., via plugin and manually). Remove one method.
Real-Time Shows No Users
- Verify the code is in the
<head>section. - Clear your browser cache and test in incognito mode.
- Use Tag Assistant to confirm the tag fires.
Privacy and GDPR Compliance
If you have European visitors, comply with GDPR:
- Enable IP anonymization in Google Analytics settings.
- Add a privacy policy explaining data collection.
- Use a cookie consent plugin on WordPress.
Conclusion: Start Making Data-Driven Decisions
Google Analytics is a must-have tool for any WordPress website. It’s free, easy to set up, and packed with insights. By following this guide, you’ve learned how to install it, navigate the dashboard, and use reports to understand your audience.
Start small: check your top pages, see where traffic comes from, and improve weak spots. Over time, you’ll build a smarter, more engaging website.
Remember, data doesn’t have to be complicated. With Google Analytics, you’re not just guessing—you’re knowing.