Installing WordPress is easier than you think, even if you’re new to websites. This guide walks you through every step—from picking a host to logging into your new site—so you can launch your blog or business fast and confidently.
Key Takeaways
- Choose reliable hosting: A good host ensures fast loading and uptime for your WordPress site.
- Use one-click installers: Most hosts offer tools like Softaculous to install WordPress in minutes.
- Set up a strong password: Protect your admin account with a unique, secure password from day one.
- Pick a domain name wisely: Choose something simple, memorable, and relevant to your content or brand.
- Install themes after setup: Customize your site’s look later using our guide on how to apply WordPress theme.
- Keep WordPress updated: Regular updates improve security and performance—never skip them.
- Back up early: Always back up your site before making major changes or updates.
Introduction
WordPress powers over 40% of all websites on the internet—and for good reason. It’s flexible, user-friendly, and perfect for blogs, portfolios, online stores, and business sites. Whether you’re starting your first website or building your tenth, knowing how to install WordPress correctly sets the foundation for everything that follows.
In this guide, we’ll walk you through the entire process—from choosing web hosting to logging into your new dashboard. You’ll learn both the quick method (using one-click installers) and the manual approach (for more control). By the end, you’ll have a fully functional WordPress site ready for customization.
Step 1: Choose a Web Hosting Provider
Before installing WordPress, you need a place to host your website. Think of hosting as your site’s home on the internet. Look for providers that offer:
Visual guide about How to Install WordPress
Image source: ddgpress.com
- One-click WordPress installation
- Free SSL certificate (for security)
- 24/7 customer support
- At least 99.9% uptime guarantee
Popular options include Bluehost, SiteGround, Hostinger, and DreamHost—all officially recommended by WordPress.org. Many offer starter plans under $5/month, often including a free domain for the first year.
Pro Tip
Don’t just go for the cheapest plan. Check reviews and test their support response time before signing up. A slow or unhelpful host can ruin your experience later.
Step 2: Register Your Domain Name
Your domain name is your website’s address (like yourwebsite.com). Most hosts let you register one during signup. Keep it short, easy to spell, and aligned with your brand or topic.
Visual guide about How to Install WordPress
Image source: themetrust.com
Avoid numbers, hyphens, or tricky spellings—they confuse visitors. If your preferred name is taken, try adding a relevant word (e.g., “get,” “go,” or “my”) or consider a .net or .co extension if .com isn’t available.
Example
Instead of “best-recipes-2024.com,” go for “tastybites.com” or “mytastybites.com.”
Step 3: Install WordPress (One-Click Method)
This is the fastest and easiest way—ideal for beginners. Most quality hosts include a one-click installer like Softaculous or Installatron in their control panel (usually cPanel).
How to do it:
- Log into your hosting account dashboard.
- Find the “WordPress” or “Website” section (often labeled “Softaculous Apps Installer”).
- Click “Install Now” or “Install WordPress.”
- Fill in the details:
- Choose domain: Select the domain you registered.
- Directory: Leave blank to install on the root (yourdomain.com). Only fill this if you want it in a subfolder (e.g., yourdomain.com/blog).
- Site name: Enter your website title (e.g., “My Travel Blog”).
- Admin username: Avoid “admin”—use something unique like “janeeditor.”
- Password: Use a strong, random password (your host may generate one for you).
- Email: Use a real email you check regularly.
- Uncheck any unnecessary add-ons (like extra plugins or themes you don’t need).
- Click “Install.”
Within seconds, WordPress will be installed! You’ll see a success message with links to your new site and admin login page.
Quick Access Tip
Your admin login URL will be: yourdomain.com/wp-admin. Bookmark this!
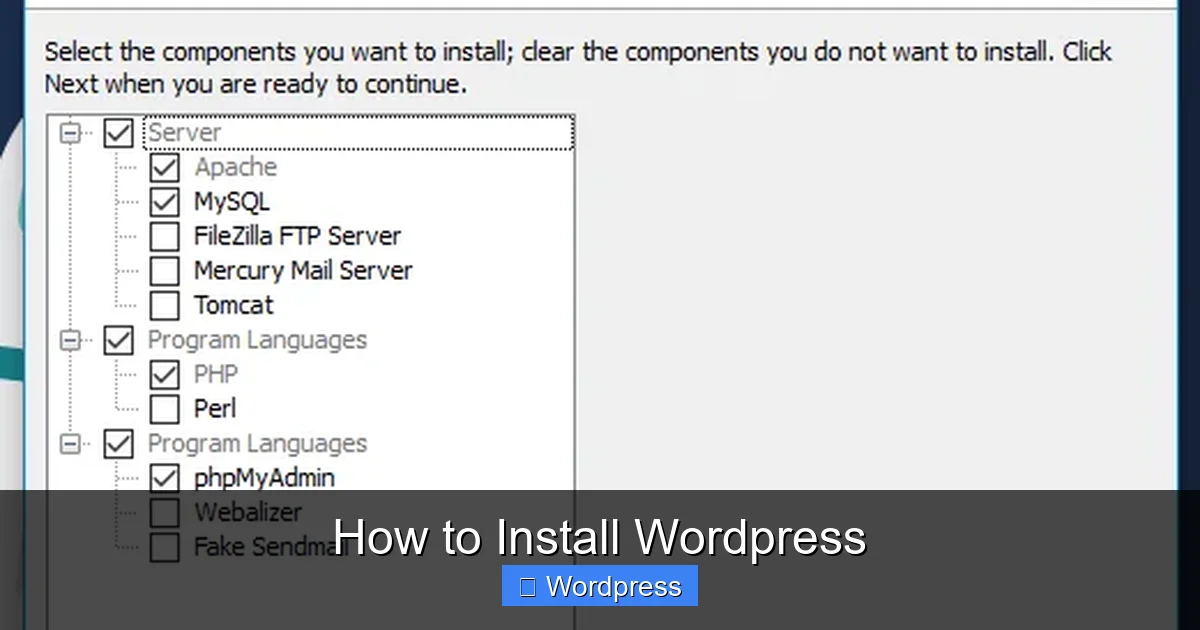
Step 4: Manual WordPress Installation (Advanced)
If your host doesn’t offer one-click install—or you prefer full control—you can install WordPress manually via FTP. This method takes about 10–15 minutes.
What you’ll need:
- FTP client (like FileZilla)
- MySQL database details (created in your hosting control panel)
- WordPress files (download from wordpress.org)
Step-by-step:
- Download WordPress: Go to wordpress.org/download and download the latest .zip file.
- Extract files: Unzip the folder on your computer.
- Create a database: In your hosting control panel (e.g., cPanel), go to “MySQL Databases,” create a new database, and note the name, username, and password.
- Upload files via FTP: Connect to your server using your FTP credentials. Upload all WordPress files to your public_html folder (or subfolder if needed).
- Run the installer: Visit your domain in a browser. You’ll see the WordPress setup screen.
- Enter database info: Input the database name, username, password, and leave “localhost” as the host.
- Complete setup: Follow the prompts to set your site title, admin username, password, and email.
That’s it! You’ve manually installed WordPress.
Step 5: Log In and Explore Your Dashboard
Go to yourdomain.com/wp-admin and log in with your admin credentials. Welcome to the WordPress dashboard—your site’s control center!
Here, you can:
- Write posts and pages
- Install themes and plugins
- Manage users and comments
- Adjust settings
Take a few minutes to explore the menu on the left. Don’t worry—you can’t break anything permanently.
Step 6: Install a Theme (Optional but Recommended)
WordPress comes with a default theme (like Twenty Twenty-Four), but you’ll likely want to change it. Themes control your site’s design and layout.
To install a new theme:
- In your dashboard, go to Appearance > Themes.
- Click “Add New.”
- Browse free themes or upload a premium one.
- Click “Install,” then “Activate.”
Need help choosing? Check out our guide on the best WordPress theme for SEO and speed to find a fast, mobile-friendly option.
Once activated, visit your site to see the new look. Want to customize it further? Learn how to apply WordPress theme settings for colors, fonts, and layouts.
Step 7: Install Essential Plugins
Plugins add functionality—like contact forms, SEO tools, or backups. Start with these essentials:
- Yoast SEO: Helps optimize your content for search engines.
- WP Super Cache: Speeds up your site.
- UpdraftPlus: Automates backups.
- Wordfence Security: Protects against hackers.
To install a plugin, go to Plugins > Add New, search by name, click “Install Now,” then “Activate.”
⚠️ Warning: Don’t install too many plugins. Stick to trusted, well-reviewed ones. For tips, read our article on how many plugins you should use.
Troubleshooting Common Issues
“Error establishing a database connection”: Double-check your database name, username, and password in wp-config.php (for manual installs).
White screen of death: Usually caused by a plugin or theme conflict. Rename the problematic plugin folder via FTP to disable it.
Can’t log in: Reset your password via the “Lost your password?” link on the login page.
Site loads slowly: Enable caching, optimize images, and consider upgrading your hosting plan.
Conclusion
Congratulations—you’ve successfully installed WordPress! Whether you used the one-click method or went manual, you now have a powerful platform to build your online presence. Remember to keep your site updated, use strong passwords, and back up regularly.
Next steps? Customize your theme, create your first post, and start sharing your content with the world. And if you ever need to change or update your theme later, we’ve got you covered with guides like how to update theme on WordPress.
Happy blogging!