This guide walks you through how to install WordPress from start to finish, whether you’re using a one-click installer or doing it manually. You’ll learn everything from choosing hosting to logging into your new site for the first time.
Key Takeaways
- Choose the right hosting: Most web hosts offer one-click WordPress installs, making setup quick and easy.
- Manual installation gives control: If your host doesn’t support auto-install, you can upload files via FTP and run the installer.
- Create a database first: WordPress needs a MySQL database—most hosts let you create one in your control panel.
- Use strong login details: Always change the default admin username and use a secure password during setup.
- Pick a theme after install: Once WordPress is live, explore themes to customize your site’s look and feel.
- Keep WordPress updated: Regular updates improve security and performance—enable auto-updates if possible.
- Troubleshoot common errors: Issues like “Error establishing database connection” usually stem from incorrect database credentials.
Introduction: Why Installing WordPress Is Easier Than You Think
If you’ve ever wondered how do you install WordPress, you’re not alone. Millions of people—from bloggers to business owners—use WordPress because it’s powerful, flexible, and surprisingly simple to set up. Whether you’re building a personal blog, an online store, or a company website, WordPress gives you the tools to get online fast.
In this guide, we’ll walk you through two main methods: using a one-click installer (the easiest way) and manual installation (for more control). By the end, you’ll have a fully functional WordPress site ready for content, themes, and plugins. No technical experience required!
Method 1: One-Click WordPress Installation (Recommended for Beginners)
Visual guide about How Do You Install WordPress
Image source: digmyride.com
Most quality web hosting providers—like Bluehost, SiteGround, or Hostinger—offer one-click WordPress installs. This method takes just minutes and requires no coding.
Step 1: Choose a Reliable Hosting Provider
Start by picking a hosting plan that supports WordPress. Look for providers that include free SSL, automatic backups, and 24/7 support. If you’re unsure which host to choose, check out our best web hosting for WordPress guide for top recommendations.
Step 2: Log Into Your Hosting Control Panel
After signing up, log into your hosting account. You’ll usually find a dashboard like cPanel, Plesk, or a custom interface.
Step 3: Find the WordPress Installer
Look for a section labeled “WordPress,” “Website,” or “Softaculous Apps Installer.” Click it—you’ll see an option to install WordPress with one click.
Step 4: Fill in the Installation Details
You’ll be asked to:
- Choose your domain (e.g., yoursite.com)
- Set an admin username (avoid “admin” for security)
- Create a strong password
- Enter your email address
Double-check everything before clicking “Install.”
Step 5: Wait and Access Your Site
The installer will set up WordPress in under a minute. Once done, you’ll get a confirmation message with links to your new site and the WordPress admin dashboard (usually yoursite.com/wp-admin).
Method 2: Manual WordPress Installation (For Full Control)
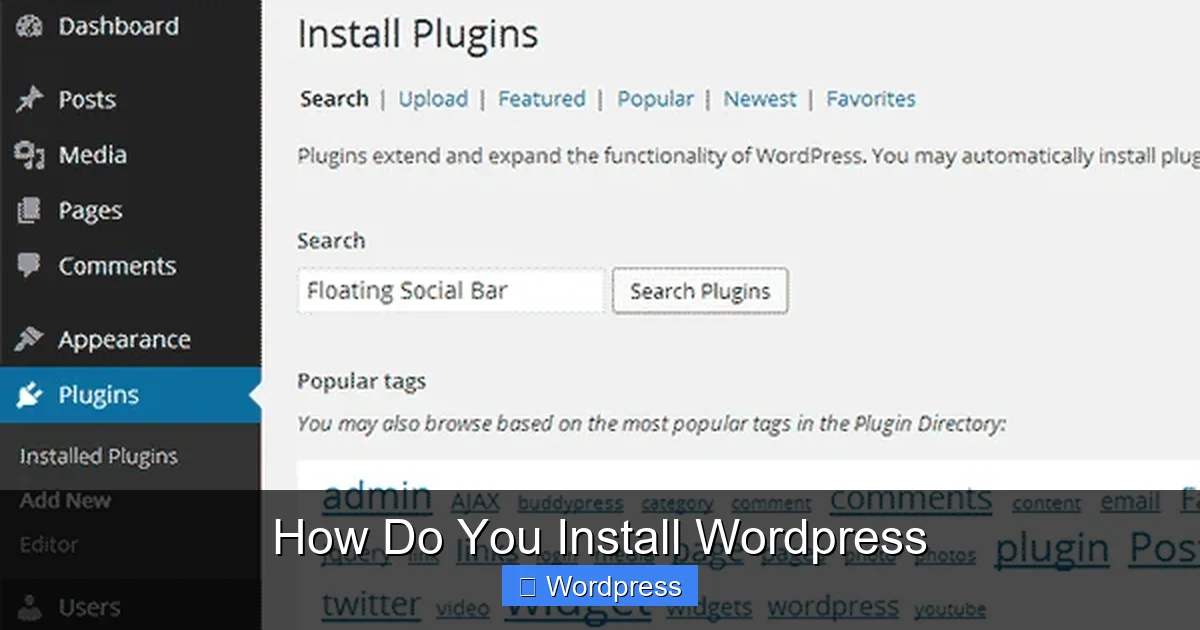
Visual guide about How Do You Install WordPress
Image source: isitwp.com
If your host doesn’t offer one-click installs—or if you prefer doing things yourself—manual installation gives you complete oversight.
Step 1: Download WordPress
Go to wordpress.org/download and download the latest version of WordPress as a .zip file.
Step 2: Create a Database and User
Log into your hosting control panel and navigate to “MySQL Databases” (in cPanel) or a similar tool.
- Create a new database (e.g., “wp_mysite”)
- Create a database user with a strong password
- Assign the user to the database with “All Privileges”
Write down the database name, username, and password—you’ll need them soon.
Step 3: Upload WordPress Files to Your Server
Use an FTP client like FileZilla or your host’s file manager to upload the unzipped WordPress files to your website’s root folder (usually public_html).
Step 4: Run the WordPress Installer
Visit your domain in a browser (e.g., yoursite.com). You’ll see the WordPress setup screen. Click “Let’s go!” and enter your database details:
- Database Name
- Username
- Password
- Database Host (usually “localhost”)
- Table Prefix (keep default unless you have a reason to change it)
Click “Submit,” then “Run the installation.”
Step 5: Complete Site Setup
Now you’ll enter your site information:
- Site Title
- Admin Username (again, avoid “admin”)
- Strong Password
- Your Email
Uncheck “Discourage search engines from indexing this site” if you want your site to be visible. Click “Install WordPress.”
What to Do After Installing WordPress
Congratulations! Your WordPress site is now live. Here’s what to do next:
Log Into the Dashboard
Go to yoursite.com/wp-admin and log in with your admin credentials. This is your WordPress control center.
Choose and Install a Theme
WordPress comes with a default theme, but you’ll likely want to customize your site’s appearance. Go to Appearance > Themes > Add New. Browse free themes or upload a premium one. Once installed, click “Activate.”
Need help picking the right theme? Read our guide on best WordPress theme for SEO and speed.
Install Essential Plugins
Plugins add functionality—like contact forms, SEO tools, or security features. Go to Plugins > Add New and search for essentials like:
- Yoast SEO (for search optimization)
- WPForms (for contact forms)
- Wordfence Security (for protection)
Be careful not to overload your site—too many plugins can slow it down. For tips, see our article on how many plugins should you use.
Set Up Permalinks
Go to Settings > Permalinks and choose “Post name” for clean, SEO-friendly URLs (e.g., yoursite.com/my-first-post).
Create Key Pages
Add essential pages like:
- Home
- About
- Contact
- Blog
You can do this under Pages > Add New.
Troubleshooting Common Installation Issues
Even with careful steps, problems can happen. Here’s how to fix the most common ones:
“Error Establishing a Database Connection”
This means WordPress can’t connect to your database. Double-check:
- Database name, username, and password
- That the database user has proper privileges
- That the database host is correct (usually “localhost”)
White Screen of Death
A blank white screen often means a PHP error. Try:
- Renaming your plugins folder via FTP to disable all plugins
- Switching to the default Twenty Twenty-Four theme
- Increasing PHP memory limit in wp-config.php
File Permission Errors
If WordPress can’t write files, check folder permissions. Most folders should be 755, files 644. Your host’s support team can help if you’re unsure.
Can’t Access wp-admin After Install
Clear your browser cache, try incognito mode, or reset your password via the database using phpMyAdmin.
Conclusion: You’ve Got This!
Installing WordPress doesn’t have to be scary. Whether you used a one-click installer or went the manual route, you now have a powerful platform to build your online presence. Remember: keep your site updated, use strong passwords, and back up regularly.
Once your site is live, explore themes and plugins to make it uniquely yours. And if you ever need to change or remove a theme later, we’ve got guides for that too—like how to delete a theme in WordPress.
WordPress is trusted by over 43% of all websites—and now, it’s powering yours. Happy building!