This guide walks you through installing and configuring Contact Form 7 on your WordPress site. You’ll learn how to create, customize, and embed forms with confidence—even if you’re a beginner.
Key Takeaways
- Contact Form 7 is free and widely used: It’s one of the most popular WordPress plugins for creating contact forms, trusted by millions of websites.
- Easy installation via WordPress dashboard: No coding required—install directly from the Plugins menu in just a few clicks.
- Customizable form fields: Add text boxes, dropdowns, checkboxes, and more using simple shortcodes and built-in tags.
- Email notifications work out of the box: Once configured, form submissions are sent directly to your inbox automatically.
- Shortcode embeds forms anywhere: Use the generated shortcode to place your form on pages, posts, or widgets.
- Styling requires extra CSS: While functional by default, forms look better with custom CSS—learn how to enhance appearance easily.
- Troubleshooting tips included: Fix common issues like emails not sending or forms not displaying correctly.
How to Add Contact Form 7 in WordPress
Adding a contact form to your WordPress website is essential for engaging visitors and collecting leads. One of the easiest and most reliable ways to do this is by using **Contact Form 7**, a free, lightweight, and highly customizable plugin. In this guide, you’ll learn how to install, configure, and embed Contact Form 7 on your WordPress site—even if you’ve never touched code before.
Whether you’re running a blog, business site, or portfolio, having a working contact form helps build trust and encourages communication. Contact Form 7 makes this process simple, flexible, and secure. By the end of this tutorial, you’ll have a fully functional contact form ready to go live.
Step 1: Install Contact Form 7 Plugin
The first step is installing the plugin from your WordPress dashboard.
Go to the Plugins Section
Log in to your WordPress admin panel. From the left-hand menu, click on Plugins, then select Add New.
Search for Contact Form 7
In the search bar at the top right, type “Contact Form 7”. You should see the plugin appear as the first result—it’s developed by Takayuki Miyoshi and has over 5 million active installations.
Install and Activate
Click the Install Now button next to the plugin. Once the installation is complete, click Activate. The plugin will now appear in your WordPress menu under Contact.
Tip: Always keep your plugins updated to ensure security and compatibility. You can learn more about managing themes and plugins safely in our guide on how to update a WordPress theme.
Step 2: Create Your First Contact Form
After activation, it’s time to create your form.
Access the Contact Form 7 Editor
In your WordPress dashboard, go to Contact > Contact Forms. You’ll see a default form called “Contact form 1” already created for you. Click on its title to edit it.
Visual guide about How to Add Contact Form 7 in WordPress
Image source: wpexplorer.com
Understand the Form Structure
The form editor has two main tabs: Form and Mail. The Form tab contains the HTML-like code that defines your form fields. By default, it includes fields for name, email, subject, and message.
Here’s what the default form code looks like:
[text* your-name]
[email* your-email]
[text your-subject]
[textarea your-message]
[submit "Send"]
Each line represents a form field. The asterisk (*) means the field is required. You can modify or add new fields as needed.
Customize Form Fields (Optional)
Want to add a phone number or dropdown? Use these tags:
[tel your-phone]– Adds a phone number field.[select your-service "Web Design" "SEO" "Consulting"]– Creates a dropdown menu.[checkbox your-interest "Newsletter" "Promotions"]– Adds checkboxes.
Always preview your changes by clicking the Preview button at the top.
Pro Tip: For advanced logic like showing fields based on user selection, check out our guide on Contact Form 7 conditional fields.
Step 3: Configure Email Settings
Now that your form is built, you need to tell WordPress where to send the submissions.
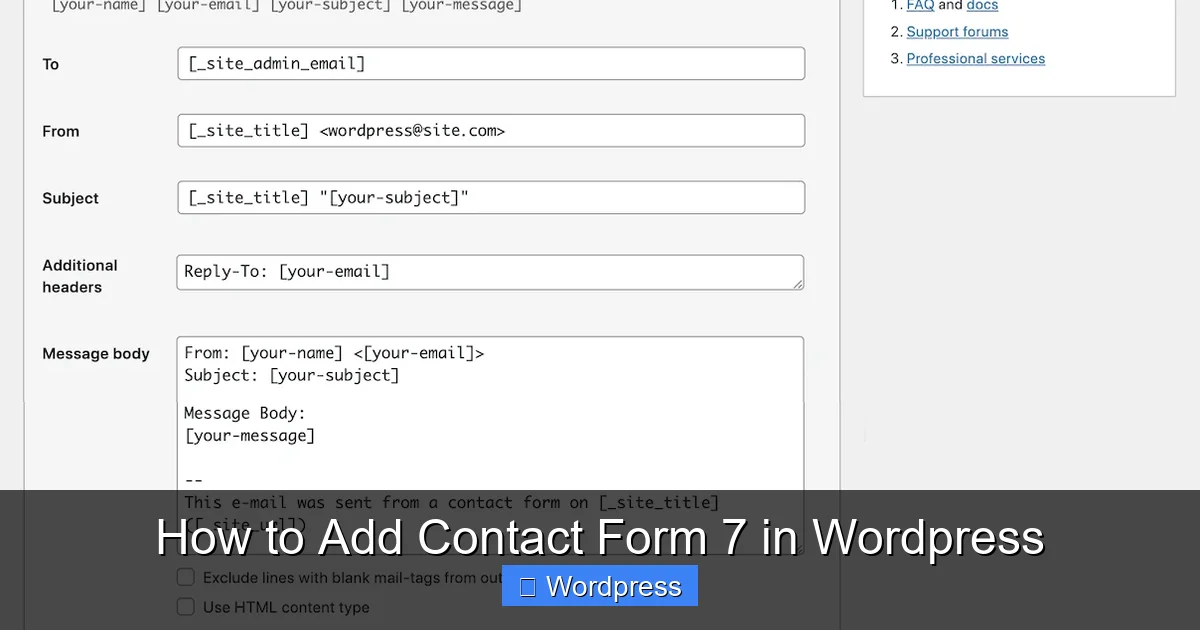
Go to the Mail Tab
In the form editor, click the Mail tab. This is where you set up email notifications.
Set the Recipient Email
In the To field, enter the email address where you want to receive messages. Use your site admin email or a dedicated support address (e.g., support@yoursite.com).
Customize Email Content
The From field usually includes the sender’s name and email (e.g., [your-name] <[your-email]>). The Subject can be static (“New Contact Request”) or dynamic (“Message from [your-name]”).
In the Message body, you’ll see placeholders like [your-name], [your-email], etc. These will be replaced with actual user input when the form is submitted.
Save Your Changes
Click Save at the top right to apply your settings.
Note: If emails aren’t arriving, your server might not be configured to send mail. See the troubleshooting section below for solutions.
Step 4: Embed the Form on Your Website
Your form is ready—now it’s time to display it on your site.
Copy the Shortcode
At the top of the form editor, you’ll see a shortcode like this:
Copy this shortcode.
Paste the Shortcode Where Needed
Go to the page or post where you want the form to appear (e.g., your Contact page). In the WordPress block editor, add a Shortcode block and paste the code inside.
Alternatively, if you’re using a classic editor or a widget area, paste the shortcode directly into the content area or a text widget.
Update or Publish the Page
Click Update or Publish to make the form live. Visit the page to test it—fill out the form and submit to confirm everything works.
Step 5: Style Your Form (Optional but Recommended)
By default, Contact Form 7 forms are functional but plain. To match your site’s design, you’ll need to add custom CSS.
Add Custom CSS
Go to Appearance > Customize > Additional CSS. Here, you can add styles to improve the look of your form.
Example CSS to style input fields:
.wpcf7 input[type="text"],
.wpcf7 input[type="email"],
.wpcf7 textarea {
  width: 100%;
  padding: 12px;
  border: 1px solid #ddd;
  border-radius: 4px;
  font-size: 16px;
}
This makes your form look clean and modern. You can also style buttons, labels, and error messages.
For detailed styling techniques, read our article on the best way to add CSS in WordPress.
Troubleshooting Common Issues
Even with perfect setup, issues can arise. Here’s how to fix the most common problems.
Form Not Sending Emails
If submissions aren’t reaching your inbox, your server may not support PHP mail(). Install an SMTP plugin like WP Mail SMTP to route emails through Gmail, Outlook, or your hosting provider.
Learn more in our guide: Contact Form 7 not sending email.
Form Not Displaying
If the shortcode shows as plain text instead of a form, make sure you’re using the correct block (Shortcode block in Gutenberg) or that your theme supports shortcodes in widgets.
Spam Submissions
Contact Form 7 supports reCAPTCHA. Go to Contact > Integration, connect your Google reCAPTCHA account, and enable it to reduce spam.
Conclusion
Adding Contact Form 7 to your WordPress site is a smart, simple way to connect with your audience. With just a few clicks, you can install the plugin, customize your form, set up email delivery, and embed it anywhere on your site. Even better, it’s free, reliable, and supported by a large community.
Remember to test your form after setup, keep your plugin updated, and consider styling it to match your brand. If you run into issues, the troubleshooting tips above will help you resolve them quickly.
Now that your contact form is live, you’re ready to start receiving messages, feedback, and leads. Happy connecting!