Adding Google Fonts to your WordPress theme enhances your website’s typography and visual appeal without slowing down performance. This guide walks you through multiple methods, including using plugins, editing theme files, and using the Customizer—perfect for beginners and advanced users alike.
Key Takeaways
- Google Fonts improve design and readability: They offer hundreds of free, high-quality fonts that make your site look professional.
- Multiple methods to add fonts: You can use plugins, edit theme files, or use the WordPress Customizer—choose the one that fits your skill level.
- Use a child theme for safety: Always modify themes via a child theme to prevent losing changes during updates.
- Optimize font loading for speed: Limit the number of font weights and styles to keep your site fast.
- Test across devices: Ensure your chosen fonts display correctly on mobile, tablet, and desktop screens.
- Troubleshoot common issues: Fix problems like fonts not loading or conflicts with plugins using simple debugging steps.
Introduction: Why Add Google Fonts to Your WordPress Theme?
Typography plays a huge role in how visitors perceive your website. The right font can make your content easier to read, boost brand identity, and improve user experience. That’s where Google Fonts come in—over 1,400 free, open-source fonts that you can easily integrate into your WordPress site.
In this guide, you’ll learn how to add Google Fonts to your WordPress theme using three reliable methods: a plugin, the WordPress Customizer, and manual code editing. Whether you’re a beginner or a developer, you’ll find a method that works for you. Plus, we’ll cover best practices to keep your site fast and your fonts looking great on all devices.
Method 1: Add Google Fonts Using a Plugin (Easiest for Beginners)
If you’re not comfortable editing code, using a plugin is the safest and simplest way to add Google Fonts. We recommend the Easy Google Fonts plugin—it’s free, lightweight, and integrates directly with the WordPress Customizer.
Step 1: Install and Activate the Plugin
- Go to your WordPress dashboard.
- Navigate to Plugins > Add New.
- Search for “Easy Google Fonts”.
- Click Install Now, then Activate.
Step 2: Configure Fonts in the Customizer
- Go to Appearance > Customize.
- Look for the Typography or Google Fonts section (it may appear under “Theme Options” depending on your theme).
- Select the text elements you want to style (e.g., headings, body text, buttons).
- Choose a Google Font from the dropdown menu.
- Adjust font weight, size, and style as needed.
- Click Publish to save your changes.
Tip: This method automatically enqueues the font files and applies them via CSS—no coding required. It’s perfect if you’re using a standard theme like Astra, GeneratePress, or Twenty Twenty-Four.
Method 2: Add Google Fonts via the WordPress Customizer (No Plugin Needed)
Many modern WordPress themes support Google Fonts directly in the Customizer. This method is great if you want to avoid extra plugins.
Step 1: Check Theme Support
- Go to Appearance > Customize.
- Look for a Typography or Fonts section.
- If available, your theme likely supports Google Fonts natively.
For example, themes like OceanWP or Neve include built-in font controls. If you see a font dropdown with Google Fonts listed, you’re all set.
Step 2: Select and Apply Your Font
- Click on the text element you want to change (e.g., “Heading Font” or “Body Font”).
- Choose a font from the list (e.g., “Roboto”, “Open Sans”, “Montserrat”).
- Preview the changes in real time.
- Click Publish when satisfied.
Note: If your theme doesn’t support Google Fonts in the Customizer, move to Method 3. You can also upgrade your WordPress theme to one with better typography options.
Method 3: Manually Add Google Fonts Using Code (For Developers)
If you prefer full control or your theme doesn’t support Google Fonts, you can add them manually by editing your theme’s files. Always use a child theme to avoid losing changes when the parent theme updates. Learn more about what a child theme is in WordPress if you’re unsure.
Visual guide about How to Add Google Fonts to WordPress Theme
Image source: wpblog.com
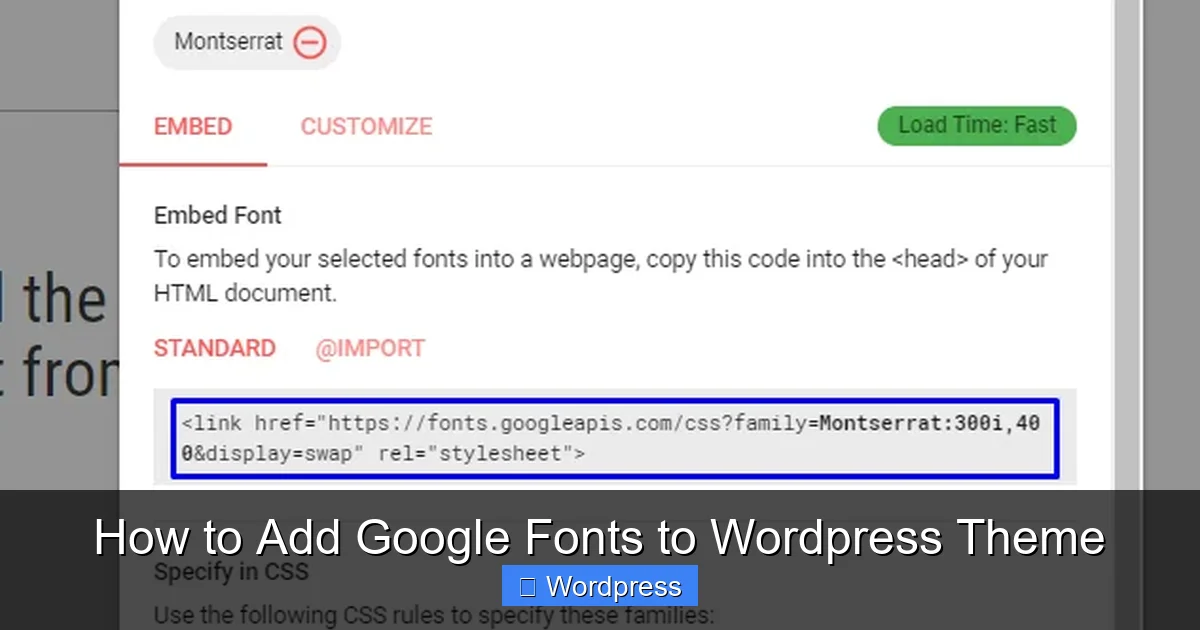
Step 1: Choose Your Font on Google Fonts
- Visit fonts.google.com.
- Browse and select a font (e.g., “Lato”).
- Click the “+ Select this style” button for the weights you need (e.g., Regular 400, Bold 700).
- Click the red “View your selected families” icon in the top right.
- Copy the Embed code under “Embed font family” (the
<link>tag).
Step 2: Add the Font Link to Your Theme
You have two options: add the link to your header.php or enqueue it properly in functions.php.
Option A: Add to header.php (Quick but Less Secure)
- Go to Appearance > Theme File Editor.
- Open
header.phpfrom your child theme. - Paste the Google Fonts
<link>code just before the closing</head>tag. - Save changes.
Option B: Enqueue in functions.php (Recommended)
- Go to Appearance > Theme File Editor.
- Open your child theme’s
functions.phpfile. - Add this code (replace the URL with your font’s link):
function add_google_fonts() {
    wp_enqueue_style( 'google-fonts', 'https://fonts.googleapis.com/css2?family=Lato:wght@400;700&display=swap', false );
}
add_action( 'wp_enqueue_scripts', 'add_google_fonts' );
This method is cleaner and follows WordPress best practices.
Step 3: Apply the Font with CSS
- Go to Appearance > Customize > Additional CSS.
- Add CSS rules to apply the font:
body {
    font-family: 'Lato', sans-serif;
}
h1, h2, h3 {
    font-family: 'Lato', sans-serif;
    font-weight: 700;
}
Click Publish to apply. Your site will now use the new font.
Best Practices for Using Google Fonts
To keep your site fast and your fonts looking great, follow these tips:
- Limit font varieties: Use no more than 2–3 fonts. Too many can slow down your site.
- Choose only needed weights: If you only use bold and regular, don’t load extra weights like 300 or 900.
- Use
display=swap: This ensures text remains visible while the font loads (prevents FOIT—Flash of Invisible Text). - Test on mobile: Some fonts look great on desktop but hard to read on small screens.
- Check performance: Use tools like Google PageSpeed Insights to ensure fonts don’t hurt loading speed.
Troubleshooting Common Issues
Sometimes Google Fonts don’t appear as expected. Here’s how to fix common problems:
Font Not Loading?
- Clear your browser and WordPress cache.
- Check if the font URL is correct and accessible.
- Ensure the font is properly enqueued in
functions.php.
Font Looks Different on Mobile?
- Test with responsive design tools in your browser.
- Adjust font size and line height for smaller screens using media queries.
Plugin Conflicts?
- Deactivate other font or optimization plugins temporarily.
- Check for JavaScript errors in the browser console.
If you’re using a page builder like Elementor, refer to our guide on how to create a WordPress theme with Elementor for font integration tips.
Conclusion: Make Your Site Stand Out with Google Fonts
Adding Google Fonts to your WordPress theme is a simple yet powerful way to elevate your site’s design. Whether you use a plugin, the Customizer, or custom code, you now have the tools to implement beautiful, readable typography with confidence.
Remember to use a child theme when editing code, limit font choices for performance, and test across devices. With these best practices, your website will not only look professional but also load quickly and impress visitors.
Ready to upgrade your theme? Check out our guide on the best WordPress theme for SEO and speed to find a fast, font-friendly option.