Clearing cache in WordPress via cPanel helps speed up your website and fix loading or display problems. This guide walks you through multiple methods—including plugin-based, browser, and server-level cache clearing—so your site stays fast and up to date.
Key Takeaways
- Clearing cache improves site performance: Removing old cached files reduces load times and ensures visitors see the latest content.
- Multiple cache layers exist: WordPress sites often use browser, plugin, and server-side caching—each may need clearing separately.
- cPanel offers built-in cache tools: Many hosting providers include caching options directly in cPanel, like “Cache Manager” or “OPcache.”
- Always clear cache after updates: Whether you’ve updated a theme, plugin, or content, clearing cache ensures changes appear instantly.
- Use reliable plugins for easier management: Tools like WP Super Cache or W3 Total Cache simplify cache clearing without touching cPanel.
- Test your site after clearing cache: Check pages, forms, and mobile views to confirm everything works correctly.
- Schedule regular cache maintenance: Set reminders to clear cache weekly or after major site changes to maintain optimal performance.
Why Clearing Cache in WordPress Matters
If your WordPress site suddenly looks outdated, loads slowly, or shows broken layouts after an update, chances are it’s a caching issue. Caching saves copies of your pages to serve them faster to visitors—but sometimes those copies become stale. That’s why knowing how to clear cache in WordPress cPanel is essential for any site owner.
Caching happens at multiple levels: your browser stores images and scripts, plugins like WP Rocket save static page versions, and your hosting server (managed via cPanel) may also cache data. When you make changes—like updating a WordPress theme, adding new content, or fixing a bug—those updates won’t show up until the cache is cleared.
In this guide, you’ll learn several reliable ways to clear cache, with a focus on using cPanel—the control panel most shared hosting providers use. Whether you’re a beginner or experienced user, these steps will help keep your site fast, fresh, and error-free.
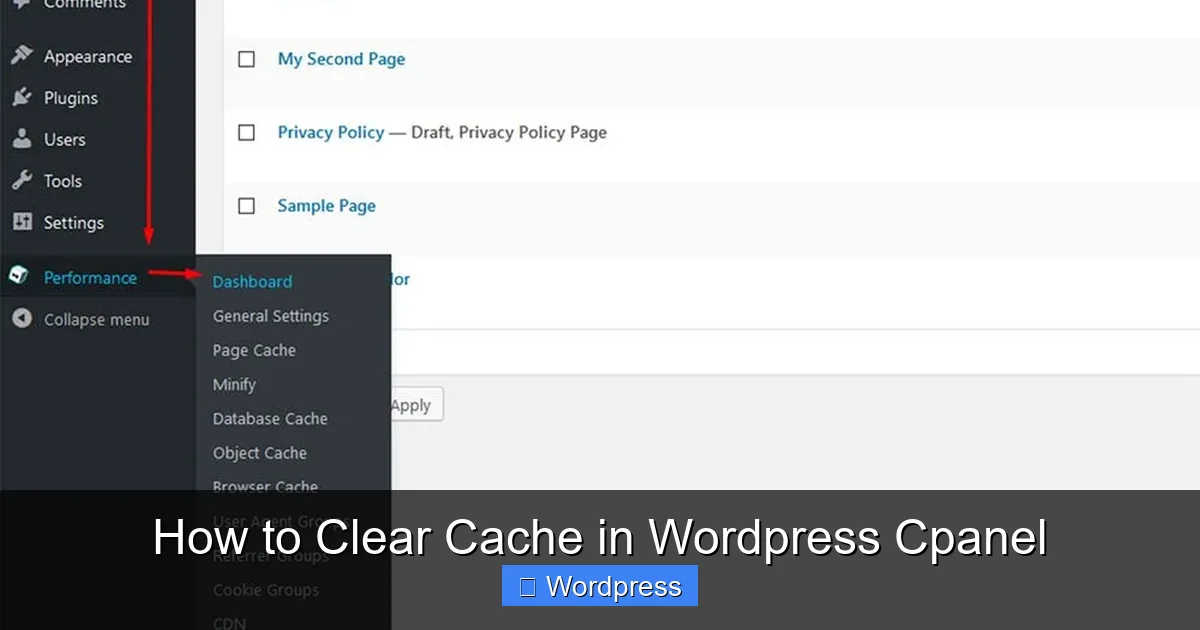
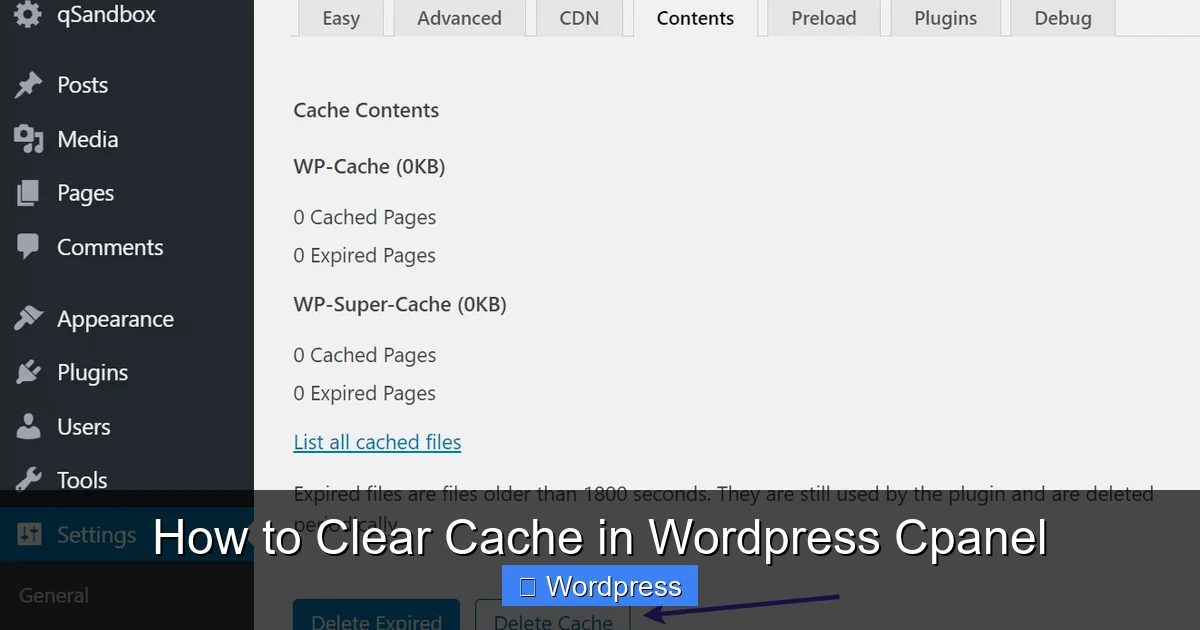
Method 1: Clear Cache Using a WordPress Plugin
Visual guide about How to Clear Cache in WordPress Cpanel
Image source: wpklik.com
The easiest way to clear cache is through a dedicated plugin. Most popular caching plugins include one-click purge options.
Step 1: Install a Caching Plugin
If you don’t already have one, go to Plugins > Add New in your WordPress dashboard. Search for “WP Super Cache” or “W3 Total Cache”—both are free and widely used. Click “Install Now” and then “Activate.”
Step 2: Clear Cache from the Dashboard
Once activated, look for the plugin’s menu in your WordPress sidebar. For example:
– In WP Super Cache, go to Settings > WP Super Cache, then click “Delete Cache.”
– In W3 Total Cache, navigate to Performance > Dashboard and click “Empty All Caches.”
This clears plugin-generated cache instantly. However, it won’t touch server-level cache stored in cPanel—so you may need the next method too.
Tip: Enable Automatic Cache Clearing
Many plugins let you auto-clear cache when you publish or update content. In W3 Total Cache, go to Performance > General Settings and check “Automatically clear all caches on post publish.” This prevents future confusion.
Method 2: Clear Browser Cache
Sometimes the problem isn’t your site—it’s your browser holding onto old files. Before diving into cPanel, try clearing your local browser cache.
How to Clear Browser Cache
– Chrome/Firefox/Edge: Press Ctrl + Shift + Delete (Windows) or Cmd + Shift + Delete (Mac). Select “Cached images and files” and click “Clear data.”
– Safari: Go to Safari > Preferences > Privacy, then click “Manage Website Data” and remove entries.
After clearing, reload your site with Ctrl + F5 (hard refresh) to force a full reload.
> Note: This only affects your view—not other visitors. But it’s a quick first step to rule out local issues.
Method 3: Clear Cache via cPanel (Server-Level)
Visual guide about How to Clear Cache in WordPress Cpanel
Image source: kinsta.com
Now for the main event: clearing cache directly in cPanel. This removes server-stored cache that plugins can’t always reach.
Step 1: Log Into Your cPanel Account
Go to yourdomain.com/cpanel and enter your username and password. If you’re unsure, check your hosting welcome email or contact support.
Step 2: Locate the Cache Management Tool
cPanel layouts vary by host, but look for sections like:
– Software → Optimize Website (common on cPanel hosts)
– Advanced → Cache Manager
– Metrics → OPcache (for PHP opcode cache)
If you see “Optimize Website,” click it. You’ll see options like “Web Cache” or “Turbo Cache” (on hosts like SiteGround or A2 Hosting).
Step 3: Clear the Cache
– In Optimize Website, select “Web Cache” and click “Clear Cache.”
– For OPcache, click “Reset OPcache” to flush PHP’s compiled script cache.
– Some hosts have a “Purge Cache” button under “File Manager” if they use LiteSpeed or Redis.
> 💡 Pro Tip: If you can’t find these options, your host might not enable them by default. Contact support and ask: “Do you offer server-side caching in cPanel? How do I clear it?”
Step 4: Verify the Cache Is Cleared
Visit your site in an incognito window or use a tool like GTmetrix to check load times and file versions. Look for updated timestamps in CSS/JS file URLs (e.g., style.css?ver=6.4).
Method 4: Clear Cache via File Manager (Manual Cleanup)
If your host uses custom caching (like Varnish or NGINX), you might need to delete cache folders manually.
Step 1: Open File Manager in cPanel
Go to Files > File Manager and navigate to your WordPress root folder (usually public_html).
Step 2: Locate Cache Folders
Look for directories named:
– wp-content/cache/ (used by many plugins)
– wp-content/w3tc/ (W3 Total Cache)
– wp-content/supercache/ (WP Super Cache)
Step 3: Delete Cache Files
Right-click each folder and select “Delete.” Don’t delete the folder itself—just its contents. WordPress will regenerate clean cache files on the next visit.
> ⚠️ Warning: Never delete wp-content, themes, or plugins folders—only cache subfolders.
Troubleshooting Common Cache Issues
Even after clearing cache, problems may persist. Here’s how to fix them:
Issue: Changes Still Not Showing
– Clear cache on all levels: plugin, browser, and cPanel.
– Disable CDN temporarily (if using Cloudflare or similar).
– Check if your child theme is active and properly enqueued.
Issue: Site Breaks After Clearing Cache
This is rare but can happen if a plugin misbehaves. Reactivate your caching plugin and check its settings. If issues continue, restore from a backup or disable the plugin temporarily.
Issue: No Cache Options in cPanel
Not all hosts expose cache tools in cPanel. In that case:
– Use a plugin-based solution.
– Ask your host about server caching.
– Consider upgrading to a host with built-in cache management (like Kinsta or WP Engine).
Best Practices for Managing WordPress Cache
To avoid constant cache headaches:
– Clear cache after every update—themes, plugins, or core.
– Use a consistent caching plugin instead of mixing multiple tools.
– Schedule weekly cache purges if you don’t update often.
– Monitor site speed with tools like Google PageSpeed Insights.
Remember: caching is your friend—it makes your site faster. But outdated cache is your enemy. Stay proactive!
Conclusion
Clearing cache in WordPress via cPanel doesn’t have to be confusing. Whether you use a plugin, browser reset, or dive into cPanel’s tools, keeping your cache fresh ensures your site loads quickly and displays correctly. By following the steps above, you’ll solve most “why isn’t my change showing?” problems in minutes.
Make cache clearing part of your regular site maintenance routine. Your visitors—and your search rankings—will thank you.