Clearing your WordPress cache helps improve site performance, fix design glitches, and ensure visitors see your latest content. This guide walks you through simple, step-by-step methods to clear cache no matter your setup.
Key Takeaways
- Cache improves speed: Storing static versions of pages helps your site load faster for returning visitors.
- Multiple cache layers exist: WordPress sites often use plugin cache, server cache, and browser cache—all may need clearing.
- Plugins make it easy: Tools like WP Super Cache or W3 Total Cache let you clear cache with one click from your dashboard.
- Hosting dashboards offer built-in tools: Many hosts like SiteGround or Bluehost include cache-clearing options in their control panels.
- Browser cache matters too: Sometimes the issue isn’t your site—it’s your browser holding onto old files.
- Clear after updates: Always clear cache after updating themes, plugins, or content to see changes immediately.
- Test after clearing: Use tools like GTmetrix or Google PageSpeed Insights to confirm performance improvements.
Why Clearing WordPress Cache Matters
WordPress cache stores copies of your website’s pages so they load faster for visitors. While this boosts performance, it can also cause problems—like showing outdated content or broken layouts after you’ve made updates. That’s why knowing how to clear WordPress cache is essential for any site owner.
Whether you’re tweaking your best WordPress theme for SEO and speed, installing a new plugin, or fixing a styling issue, clearing the cache ensures your changes go live instantly. In this guide, we’ll cover every method—from beginner-friendly plugin options to advanced server-level clearing—so you can keep your site fast and up-to-date.
Method 1: Clear Cache Using a WordPress Plugin
Most WordPress users rely on caching plugins to manage site speed. If you’re using one (and you should be!), clearing cache is usually just a button click away.
Step 1: Identify Your Caching Plugin
Popular options include WP Super Cache, W3 Total Cache, LiteSpeed Cache, and WP Rocket. Check your WordPress dashboard sidebar—these plugins typically add their own menu item.
Step 2: Access the Plugin’s Settings
Go to Settings > WP Super Cache (or the equivalent for your plugin). Look for a section labeled “Delete Cache,” “Purge Cache,” or “Clear All Cache.”
Step 3: Clear the Cache
Click the “Delete Cache” or “Purge All” button. Some plugins let you clear specific pages—choose “All” if you want a full reset. Wait a few seconds for the process to complete.
Pro Tip:
Many plugins also offer “Preload” or “Regenerate” options after clearing. Use these to rebuild your cache with fresh content, improving load times for first-time visitors.
Method 2: Clear Cache via Your Hosting Provider
Many web hosts now include built-in caching systems. Even if you use a plugin, your host might have its own cache layer—so you’ll need to clear both for full effect.
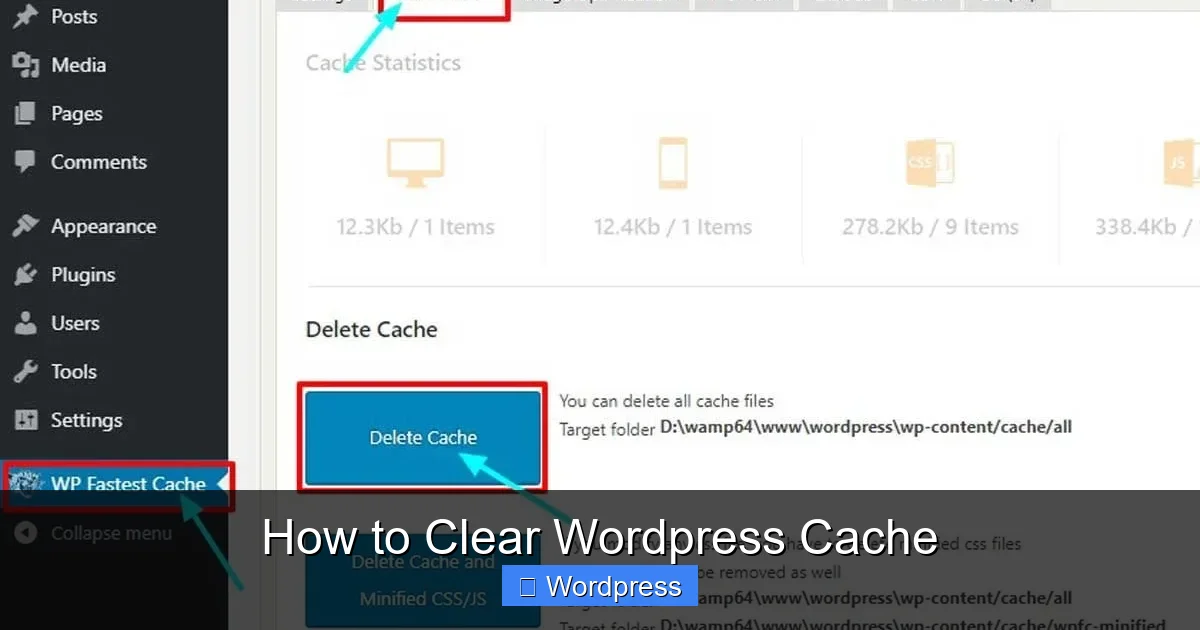
Visual guide about How to Clear WordPress Cache
Image source: wpallresources.com
Step 1: Log Into Your Hosting Control Panel
Common hosts like SiteGround, Bluehost, Kinsta, or WP Engine provide dashboards with cache management tools. Look for options like “SG Optimizer,” “Cache Manager,” or “Performance.”
Step 2: Find the Cache Clear Option
On SiteGround, go to Site Tools > Speed > Caching and click “Purge All.” On Bluehost, navigate to Advanced > Performance > Clear Cache. WP Engine users can click “Purge All Caches” in the WordPress admin bar.
Step 3: Confirm and Wait
After clicking, your host will clear server-level cache. This may take 10–30 seconds. Avoid making changes during this time to prevent conflicts.
Why This Matters:
Server cache often stores database queries and object data that plugins don’t touch. Clearing it ensures your site reflects the latest backend changes—like updated product prices or new blog posts.
Method 3: Clear Browser Cache (Yes, Really!)
Sometimes, the “problem” isn’t your WordPress site—it’s your own browser showing an old version. This is especially common when testing design changes or debugging issues.
Step 1: Use Keyboard Shortcuts
On Windows/Linux: Press Ctrl + Shift + R.
On Mac: Press Cmd + Shift + R.
This forces a hard reload, bypassing cached files.
Step 2: Clear Full Browser Cache
If shortcuts don’t work, manually clear your browser history. For Chrome:
Go to Settings > Privacy and Security > Clear Browsing Data.
Select “Cached images and files” and click “Clear data.”
Repeat for Firefox, Safari, or Edge using their respective settings.
Alternative: Use Incognito Mode
Open your site in a private/incognito window. This loads pages without using cached files—great for quick testing.
Note:
For detailed steps, check out our guide on how to clear browser history. It covers all major browsers and devices.
Method 4: Manual Cache Clearing (Advanced)
If you’re not using a plugin or your host lacks cache tools, you can delete cache files manually via FTP or your file manager.
Step 1: Access Your Site Files
Use an FTP client (like FileZilla) or your host’s file manager (e.g., cPanel’s File Manager). Navigate to your WordPress root directory—usually public_html or www.
Step 2: Locate Cache Folders
Common cache folder names include:
– wp-content/cache/ (used by many plugins)
– wp-content/w3tc/ (W3 Total Cache)
– wp-content/litespeed/ (LiteSpeed Cache)
Step 3: Delete Cache Files
Right-click the folder and select “Delete” or “Empty.” Warning: Only delete folders you recognize as cache-related. Avoid touching core WordPress files like wp-admin or wp-includes.
When to Use This Method:
Manual clearing is useful if your site crashes due to a corrupted cache or if you’ve uninstalled a plugin but leftover cache files remain.
Troubleshooting Common Cache Issues
Even after clearing cache, you might still see old content. Here’s how to fix it:
Issue: Changes Not Showing After Clearing
- Check all cache layers: Clear plugin, server, AND browser cache.
- Disable CDN temporarily: Services like Cloudflare cache content globally. Log into your CDN dashboard and purge its cache too.
- Wait a few minutes: Some hosts take time to propagate changes.
Issue: Site Breaks After Clearing Cache
- This usually means a plugin or theme conflict. Reactivate your caching plugin and check for updates. If problems persist, review recent changes—like a new plugin install or theme update.
- For theme-related issues, consider how to update theme on WordPress safely without breaking your site.
Issue: Can’t Find Cache Options
- Not all hosts or plugins label cache tools clearly. Search your dashboard for terms like “performance,” “speed,” or “optimization.”
- If you’re unsure which plugin you’re using, go to Plugins > Installed Plugins and look for names containing “cache,” “speed,” or “optimize.”
Best Practices for Managing WordPress Cache
Clearing cache is reactive—but smart site owners stay proactive. Follow these tips to minimize issues:
- Clear cache after every major update: Whether it’s a plugin, theme, or WordPress core update, always purge cache afterward.
- Use staging sites for testing: Make changes on a duplicate site first, then push to live—and clear cache immediately.
- Monitor performance regularly: Tools like Google PageSpeed Insights help you spot slowdowns before visitors do.
- Limit plugin bloat: Too many plugins can overload your cache system. Learn how many plugins should you use for optimal performance.
- Schedule regular cache clearing: Some plugins let you auto-clear cache daily or weekly—ideal for high-traffic sites.
Conclusion
Learning how to clear WordPress cache isn’t just a troubleshooting step—it’s a core skill for maintaining a fast, reliable website. Whether you’re using a plugin, your host’s tools, or manual methods, clearing cache ensures your visitors always see the latest version of your site.
Remember: cache exists to help you, not hinder you. By following the steps above and adopting smart caching habits, you’ll keep your WordPress site running smoothly—no matter how often you update your content, themes, or plugins. And when in doubt, clear everything: plugin, server, and browser. Your future self (and your visitors) will thank you.