This guide walks you through installing and configuring Contact Form 7 in WordPress, from plugin setup to form customization and email delivery. You’ll learn how to create professional contact forms quickly, even if you’re a beginner.
Key Takeaways
- Install Contact Form 7 easily: Use the WordPress plugin directory to add and activate the plugin in minutes.
- Create your first form: Use the built-in form editor to add fields like name, email, and message with simple shortcodes.
- Customize form appearance: Style your form using CSS to match your site’s design and improve user experience.
- Ensure emails are sent correctly: Configure mail settings and test delivery to avoid missing inquiries.
- Use conditional logic (optional): Enhance forms with dynamic fields using add-ons like Conditional Fields.
- Troubleshoot common issues: Fix problems like emails not sending or forms not displaying properly.
- Embed forms anywhere: Use shortcodes to add forms to pages, posts, or widgets.
Introduction
Creating a contact form is one of the most important steps in building a professional WordPress website. Whether you run a blog, business site, or portfolio, a contact form helps visitors reach you easily. Contact Form 7 is one of the most popular and trusted plugins for this job—it’s free, flexible, and beginner-friendly.
In this guide, you’ll learn how to create Contact Form 7 in WordPress from scratch. We’ll cover installation, form setup, customization, email configuration, and troubleshooting. By the end, you’ll have a fully working contact form that looks great and delivers messages reliably.
Step 1: Install Contact Form 7 Plugin
The first step is installing the plugin. Contact Form 7 is available in the official WordPress plugin directory, so you don’t need to download it from external sites.
Go to Your WordPress Dashboard
Log in to your WordPress admin area. This is usually found at yoursite.com/wp-admin.
Navigate to Plugins
In the left-hand menu, click Plugins, then select Add New.
Search for Contact Form 7
In the search bar, type “Contact Form 7”. The plugin by Takayuki Miyoshi should appear at the top of the results.
Install and Activate
Click Install Now, then once installed, click Activate. The plugin is now ready to use.
Tip: Always keep your plugins updated for security and performance. Learn how to update your WordPress theme and plugins safely by visiting our guide on how to update themes on WordPress.
Step 2: Create Your First Contact Form
Once activated, Contact Form 7 adds a new menu item to your dashboard. Let’s create your first form.
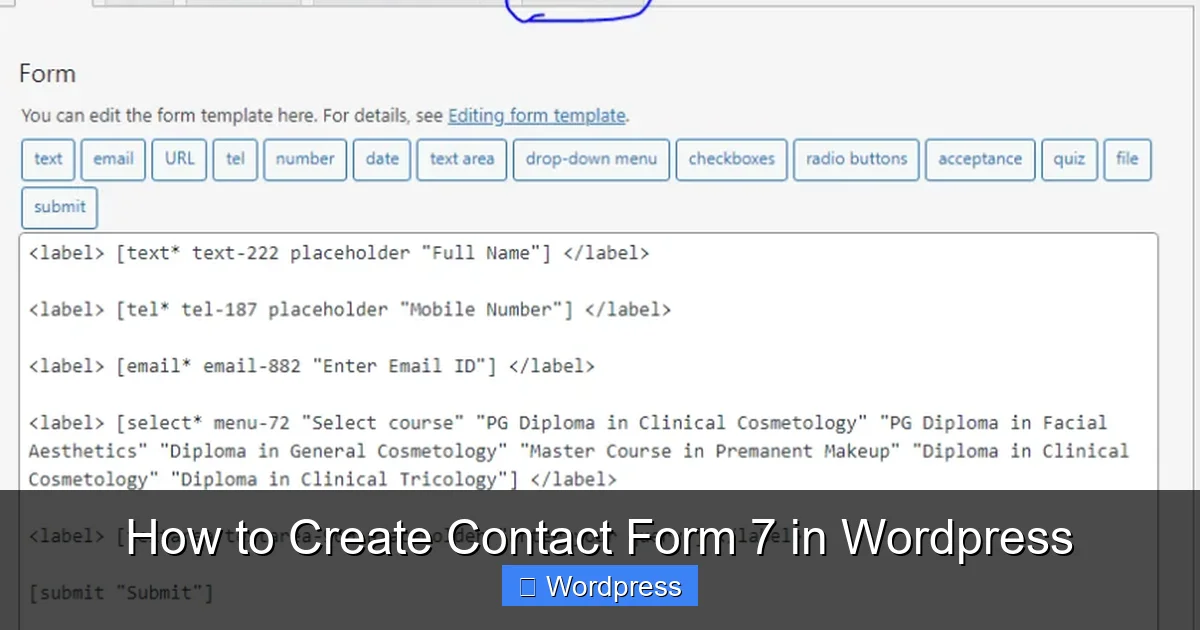
Visual guide about How to Create Contact Form 7 in WordPress
Image source: btechiot.com
Access the Contact Form 7 Editor
In the left menu, click Contact > Contact Forms. You’ll see a default form called “Contact form 1”. You can edit this or create a new one.
Edit Form Fields
The form editor has four tabs: Form, Mail, Messages, and Additional Settings. Start with the Form tab.
You’ll see a default form code like this:
[text* your-name placeholder "Your Name"]
[email* your-email placeholder "Your Email"]
[textarea your-message placeholder "Your Message"]
[submit "Send"]
This creates fields for name, email, message, and a submit button. You can customize these or add new ones.
Add or Modify Fields
To add a phone number field, insert:
[tel your-phone placeholder "Your Phone"]
To make a field required, add an asterisk (*) after the field type, like [email* your-email].
You can also use dropdowns, checkboxes, and file uploads. For example:
[select* subject "General Inquiry" "Support" "Sales"]
[checkbox interests "Newsletter" "Updates" "Promotions"]
[file your-file filetypes:jpg|png limit:2mb]
Pro Tip: Use placeholders to guide users. They disappear when the user starts typing, making forms cleaner.
Step 3: Configure Email Settings
Now that your form is ready, you need to set up where the messages go.
Visual guide about How to Create Contact Form 7 in WordPress
Image source: tablesomewp.com
Go to the Mail Tab
Click the Mail tab in the form editor.
Set the Recipient Email
In the To field, enter the email address where you want to receive messages. For example:
yourname@yoursite.com
You can also use a dynamic email from the form, like [your-email], but this is less common for contact forms.
Customize the Subject Line
In the Subject field, add a subject like:
New message from [your-name]
This will show the sender’s name in the email subject.
Set the Sender Information
In the From field, use:
[your-name] <[your-email]>
This ensures replies go directly to the person who filled out the form.
Message Body
The Message body section contains the email content. It usually includes all form fields. You can customize it, but the default is fine for most uses.
Important: Always test your form after setting up the mail settings. See the troubleshooting section below if emails aren’t sending.
Step 4: Embed the Form on Your Website
Now it’s time to add the form to a page or post.
Copy the Form Shortcode
In the Contact Forms list, hover over your form and click Copy next to the shortcode. It looks like:
Paste the Shortcode
Go to Pages > Add New (or edit an existing page). Paste the shortcode into the content area.
Publish or update the page. Your form will now appear on the front end.
Tip: You can also add the form to a widget area using the Text or Shortcode widget in Appearance > Widgets.
Step 5: Customize the Form’s Appearance
Contact Form 7 forms are functional by default, but they may not match your site’s design. You can style them with CSS.
Add Custom CSS
Go to Appearance > Customize > Additional CSS.
Add styles like this to improve appearance:
.wpcf7 input, .wpcf7 textarea {
  width: 100%;
  padding: 10px;
  margin: 10px 0;
  border: 1px solid #ccc;
  border-radius: 4px;
}

.wpcf7-submit {
  background-color: #0073aa;
  color: white;
  padding: 12px 24px;
  border: none;
  border-radius: 4px;
  cursor: pointer;
}

.wpcf7-submit:hover {
  background-color: #005177;
}
This makes the form look modern and consistent with most WordPress themes.
Learn more about styling WordPress elements in our guide on the best way to add CSS in WordPress.
Step 6: Test and Troubleshoot
Always test your form before going live.
Submit a Test Message
Fill out the form on your site and click Send. Check your inbox (and spam folder) for the email.
Common Issues and Fixes
- Emails not sending: This is often due to incorrect mail settings or server issues. Check the Mail tab and ensure your hosting supports PHP mail. Consider using an SMTP plugin for better delivery.
- Form not displaying: Make sure the shortcode is correctly pasted and not inside a comment or code block.
- Spam submissions: Enable reCAPTCHA in the Integration tab to block bots.
- Fields not working: Ensure required fields have the
*symbol and field names are unique.
For advanced features like conditional fields (showing/hiding fields based on user input), check out our guide on Contact Form 7 conditional fields.
Conclusion
Creating a contact form with Contact Form 7 in WordPress is simple and effective. You’ve learned how to install the plugin, build a form, configure email delivery, style it with CSS, and troubleshoot common problems. With this knowledge, you can create professional contact forms that improve communication and user experience on your site.
Remember to keep your forms clean, secure, and user-friendly. Regularly test them and update your plugins to maintain performance and security. If you’re using a custom theme, ensure it’s compatible—learn how to apply a WordPress theme correctly for the best results.