This guide teaches you how to create a custom WordPress template using basic PHP, HTML, and CSS. You’ll build a fully functional theme that’s fast, secure, and tailored to your needs.
Key Takeaways
- Understand WordPress theme structure: Learn the essential files like style.css, index.php, and functions.php that make up a theme.
- Create a child theme safely: Always build on top of an existing theme to preserve updates and avoid breaking changes.
- Use template hierarchy: WordPress uses a specific order to load templates—knowing this helps you customize pages effectively.
- Add custom styles and scripts: Enqueue CSS and JavaScript properly using wp_enqueue_style and wp_enqueue_script.
- Implement dynamic content: Use WordPress loops and template tags to display posts, pages, and menus dynamically.
- Test and debug your template: Use tools like Query Monitor and browser dev tools to catch errors early.
- Optimize for performance and SEO: Clean code, fast loading, and semantic HTML improve user experience and search rankings.
Introduction: Why Create a Custom WordPress Template?
WordPress powers over 40% of the web, but default themes often don’t match your brand or functionality needs. That’s where custom WordPress templates come in. Whether you’re a developer or a site owner, creating your own template gives you full control over design, layout, and features.
In this guide, you’ll learn how to create a custom WordPress template from scratch. We’ll cover everything from setting up your development environment to uploading your finished theme. By the end, you’ll have a lightweight, responsive, and fully functional theme ready for your site.
Step 1: Set Up Your Development Environment
Before writing code, make sure your setup supports safe testing.
Visual guide about How to Create Custom WordPress Template
Image source: belovdigital.agency
Install a Local Server
Use tools like Local by Flywheel, XAMPP, or MAMP to run WordPress on your computer. This lets you test changes without affecting a live site.
Install WordPress Locally
Download the latest version of WordPress from wordpress.org and install it on your local server. Create a new database and complete the setup wizard.
Access Your Theme Folder
Navigate to wp-content/themes/ in your WordPress installation. This is where all themes live. You’ll create your custom template here.
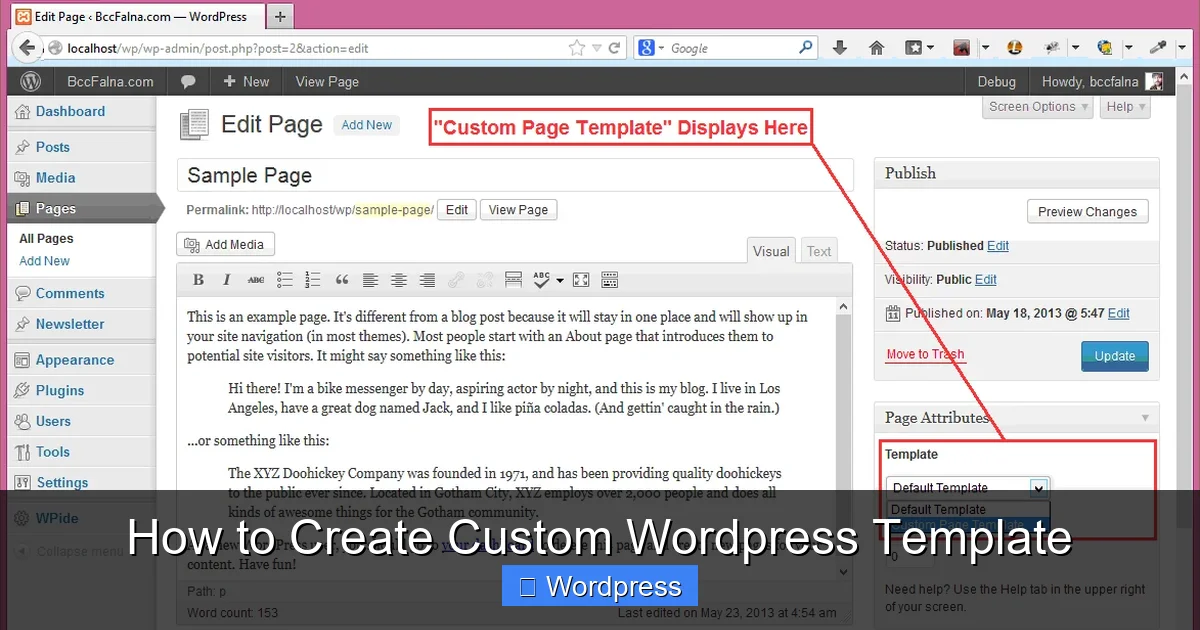
Step 2: Create Your Theme Folder and Files
Every WordPress theme needs at least two files: style.css and index.php.
Visual guide about How to Create Custom WordPress Template
Image source: bccfalna.com
Create the Theme Folder
In the themes directory, create a new folder named my-custom-theme (use lowercase, no spaces).
Add the style.css File
Inside your theme folder, create a file called style.css. Add this header at the top:
/*
Theme Name: My Custom Theme
Theme URI: https://yourwebsite.com/
Author: Your Name
Author URI: https://yourwebsite.com/
Description: A custom WordPress template built from scratch.
Version: 1.0
License: GNU General Public License v2 or later
License URI: http://www.gnu.org/licenses/gpl-2.0.html
Text Domain: my-custom-theme
*/
This metadata tells WordPress your theme exists. Without it, your theme won’t appear in the dashboard.
Create the index.php File
Now create index.php. This is the main template file. Start with basic HTML structure:
<!DOCTYPE html>
<html >
<head>
<meta charset="">
<meta name="viewport" content="width=device-width, initial-scale=1">
<title></title>
>
<header>
<h1><a href=""></a></h1>
<p></p>
</header>
<main>
<article>
<h2><a href=""></a></h2>
<div></div>
</article>
</main>
<footer>
<p>© </p>
</footer>
This template displays your site title, description, and a list of posts. The wp_head() and wp_footer() functions are required for plugins and scripts to work.
Step 3: Add Functions.php for Theme Support
The functions.php file enables features like menus, thumbnails, and widget areas.

Visual guide about How to Create Custom WordPress Template
Image source: assets.hongkiat.com
Create functions.php
In your theme folder, create functions.php and add this code:
__('Primary Menu', 'my-custom-theme')
));
}
add_action('init', 'my_custom_theme_menus');
// Enqueue styles and scripts
function my_custom_theme_scripts() {
wp_enqueue_style('main-style', get_stylesheet_uri());
}
add_action('wp_enqueue_scripts', 'my_custom_theme_scripts');
?>
This code adds support for post thumbnails, dynamic titles, a custom menu, and loads your CSS file.
Step 4: Create Template Parts for Better Organization
Break your theme into reusable parts like header, footer, and sidebar.
Create header.php
Move the header section from index.php into a new file called header.php:
<!DOCTYPE html>
<html >
<head>
<meta charset="">
<meta name="viewport" content="width=device-width, initial-scale=1">
>
<header>
<h1><a href=""></a></h1>
<p></p>
<nav>
'primary')); ?>
</nav>
</header>
Create footer.php
Move the footer into footer.php:
<footer>
<p>© </p>
</footer>
Update index.php
Now simplify index.php by including these parts:
<main>
<article>
<h2><a href=""></a></h2>
<div></div>
</article>
</main>
This makes your code cleaner and easier to maintain.
Step 5: Add Custom Styles
Now let’s make your template look good.
Edit style.css
Add basic CSS to style.css after the header:
body {
font-family: Arial, sans-serif;
line-height: 1.6;
margin: 0;
padding: 0;
background: #f4f4f4;
color: #333;
}
header {
background: #333;
color: #fff;
padding: 1rem 0;
text-align: center;
}
header a {
color: #fff;
text-decoration: none;
}
nav ul {
list-style: none;
padding: 0;
}
nav ul li {
display: inline;
margin: 0 10px;
}
main {
max-width: 800px;
margin: 20px auto;
padding: 20px;
background: #fff;
}
footer {
text-align: center;
padding: 10px;
background: #333;
color: #fff;
margin-top: 20px;
}
This gives your site a clean, readable layout. You can expand this with responsive design using media queries.
Step 6: Activate Your Custom Template
Now it’s time to see your work in action.
Go to the WordPress Dashboard
Log in to your local WordPress site and go to Appearance > Themes.
Activate Your Theme
You should see “My Custom Theme” listed. Click Activate.
Visit your site to see your custom template live. You’ve just created a working WordPress theme!
Step 7: Expand with More Templates
WordPress uses a template hierarchy to decide which file to load. You can create specific templates for different pages.
Create single.php for Blog Posts
Copy index.php and rename it single.php. Replace the_excerpt() with the_content() to show full posts.
Create page.php for Static Pages
Create page.php for custom page layouts. Use the_content() to display page content.
Create archive.php for Category Pages
Use archive.php to style category, tag, and date archives.
These files give you more control over how different content types appear.
Troubleshooting Common Issues
Even experienced developers run into problems. Here’s how to fix common ones.
Theme Not Showing in Dashboard
Double-check your style.css header. Missing or incorrect info prevents WordPress from recognizing your theme.
Styles Not Loading
Make sure wp_enqueue_style() is in functions.php and wp_head() is in header.php.
Menu Not Appearing
Go to Appearance > Menus, create a menu, and assign it to the “Primary Menu” location.
White Screen of Death
This usually means a PHP error. Enable debugging by adding this to wp-config.php:
define('WP_DEBUG', true);
Check the error log to find the issue.
Best Practices for Custom Templates
Follow these tips to keep your theme secure and scalable.
- Use a child theme: If modifying an existing theme, always use a child theme. Learn how to create a WordPress theme with Elementor for a visual approach.
- Sanitize all inputs: Use functions like
esc_html()andesc_url()to prevent security issues. - Optimize images: Use proper sizes and compression to improve load times.
- Test on mobile: Use Chrome DevTools to simulate mobile devices.
- Keep it lightweight: Avoid unnecessary plugins. See how many plugins you should use for guidance.
Conclusion: You’ve Built a Custom WordPress Template!
Congratulations! You now know how to create a custom WordPress template from scratch. You’ve set up a local environment, built core theme files, added styles, and activated your theme. This foundation lets you create unique, high-performing websites tailored to any need.
From here, you can add custom post types, widget areas, or even integrate with page builders. Remember to keep your code clean, test regularly, and follow WordPress best practices. Your custom template is ready to go live—just upload it to your server and activate it.
Want to take it further? Explore best WordPress themes for SEO and speed to see how top themes optimize performance.