This guide walks you through how to create a Google Analytics account and connect it to your WordPress website. You’ll learn how to set up tracking, install the code, and start analyzing visitor data in minutes.
Key Takeaways
- Google Analytics is free and powerful: It helps you track website traffic, user behavior, conversions, and more at no cost.
- You need a Google account: Before creating Google Analytics, ensure you have an active Gmail or Google account.
- Universal Analytics is being replaced: Google now uses Google Analytics 4 (GA4), which offers better insights and mobile tracking.
- Installation can be done manually or via plugin: You can add the tracking code directly to your WordPress theme or use a plugin like MonsterInsights.
- Real-time data is available immediately: Once set up, you can see live visitors on your site within seconds.
- Use UTM parameters for campaign tracking: Tag your links to measure the effectiveness of ads, emails, and social media.
- Regular review improves performance: Check your reports weekly to understand what’s working and what needs improvement.
Introduction: Why You Need Google Analytics for Your WordPress Site
If you run a WordPress website—whether it’s a blog, online store, or business site—you need to understand your audience. That’s where Google Analytics comes in. It’s a free tool that shows you who visits your site, where they come from, what they do, and how long they stay. By learning how to create a Google Analytics account, you unlock powerful insights that help you grow your traffic, improve user experience, and increase conversions.
In this guide, we’ll walk you through every step—from signing up to installing the tracking code on your WordPress site. Whether you’re a beginner or have some tech experience, this guide is designed to be simple, clear, and actionable. By the end, you’ll have Google Analytics up and running, giving you real-time data about your website’s performance.
Step 1: Sign In to Your Google Account
Before you can create a Google Analytics account, you need a Google account. If you already have a Gmail address, you’re all set. If not, it’s quick and easy to create one.

Visual guide about How to Create Google Analytics Account
Image source: bringseo.com
How to Create a Google Account (If You Don’t Have One)
- Go to accounts.google.com/signup.
- Fill in your name, choose a username (this becomes your email), and create a strong password.
- Follow the prompts to verify your phone number and complete setup.
Once your account is ready, go to analytics.google.com and click Start for free.
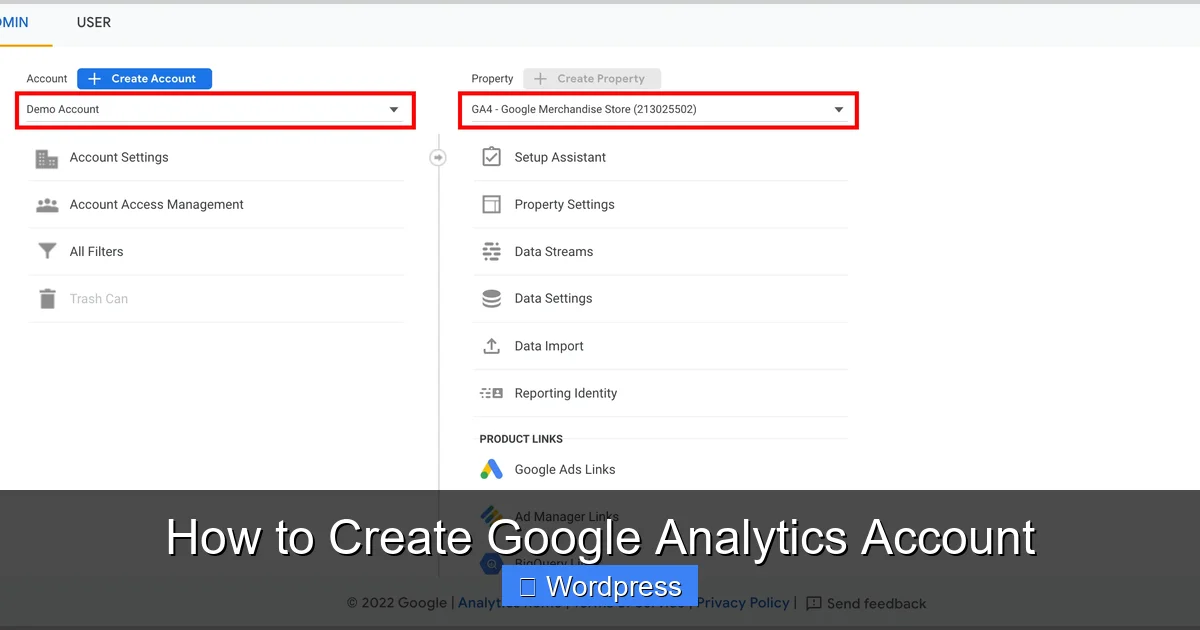
Step 2: Set Up a New Google Analytics Account
Google Analytics uses a structure called “Accounts,” “Properties,” and “Data Streams.” Here’s what that means:
Visual guide about How to Create Google Analytics Account
Image source: storage.googleapis.com
- Account: Your main Google Analytics profile (you can have multiple).
- Property: Represents your website or app (e.g., your WordPress site).
- Data Stream: The source of your data (web, iOS, or Android).
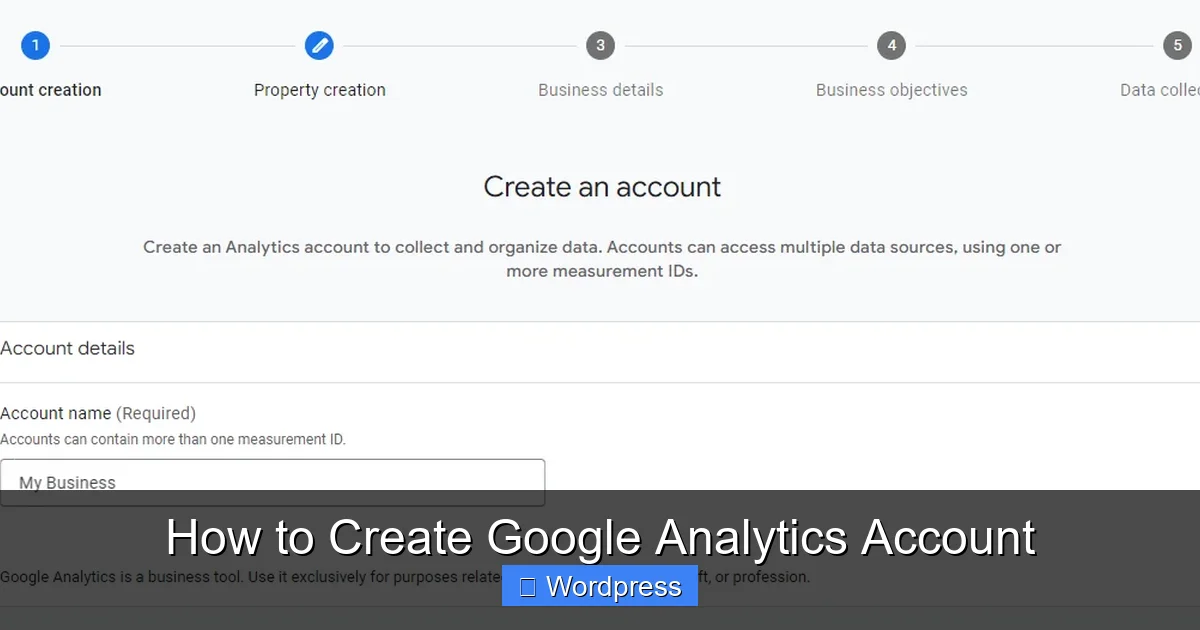
Creating Your First Account and Property
- On the Google Analytics homepage, click Start measuring.
- Enter an Account name (e.g., “My Business Website”). You can create multiple accounts later if needed.
- Click Next.
- Enter a Property name (e.g., “My WordPress Site”). This is your website’s name in Analytics.
- Select your Reporting time zone and Currency (e.g., UTC, USD).
- Click Next.
Set Up Your Data Stream
- Choose Web as your platform (since you’re tracking a WordPress website).
- Enter your website’s URL (e.g., https://yourwebsite.com).
- Give your stream a name (e.g., “Main Website”).
- Toggle on Enhanced measurement (recommended—it tracks page views, scrolls, and more automatically).
- Click Create stream.
Great! You’ve now created your Google Analytics account and property. Next, you’ll get your tracking code.
Step 3: Get Your Google Analytics Tracking Code
After creating your data stream, Google will generate a Measurement ID (starts with “G-”) and a Global Site Tag (a snippet of JavaScript code). This code tells Google Analytics to start collecting data from your site.
Visual guide about How to Create Google Analytics Account
Image source: whop.com
Copy the Measurement ID or Global Site Tag
- On the data stream page, you’ll see your Measurement ID (e.g., G-ABC123DEF).
- Below that, there’s a toggle: Global Site Tag. Click it to reveal the full tracking code.
- Copy the entire code block or just the Measurement ID—you’ll need it for the next step.
Now, let’s install this on your WordPress site.
Step 4: Install Google Analytics on Your WordPress Site
There are two main ways to add Google Analytics to WordPress: manually (by editing your theme) or using a plugin. We recommend using a plugin—it’s easier and safer.
Option A: Install via Plugin (Recommended)
The best plugin for this is MonsterInsights. It’s user-friendly, reliable, and offers a free version.
- In your WordPress dashboard, go to Plugins > Add New.
- Search for “MonsterInsights” and click Install Now, then Activate.
- Go to Insights > Settings in your WordPress menu.
- Click Connect MonsterInsights.
- Choose Connect with Google and sign in with your Google account.
- Grant permissions when prompted.
- Select your Google Analytics property from the dropdown.
- Click Complete Connection.
That’s it! MonsterInsights will automatically insert the tracking code into your site. You can verify it’s working by checking the Google Analytics dashboard—go to Realtime > Overview and see if your visit appears.
Option B: Install Manually (Advanced)
If you prefer not to use a plugin, you can add the code manually to your theme’s header.php file.
- Go to Appearance > Theme File Editor in WordPress.
- Open
header.php. - Paste the Global Site Tag code just before the closing
</head>tag. - Click Update File.
Warning: Editing theme files can break your site if done incorrectly. Always back up your site first. Also, if you update your theme, the code may be overwritten. That’s why plugins are safer.
Step 5: Verify Your Google Analytics Setup
Once installed, you should verify that data is being collected.
Check Real-Time Reports
- Go to your Google Analytics dashboard.
- Click Realtime in the left menu.
- Visit your website in another browser tab.
- You should see your visit appear under Active Users within seconds.
Use Google Tag Assistant (Optional)
For extra confirmation, install the Google Tag Assistant Chrome extension. It checks if your tracking code is installed correctly.
Troubleshooting Common Issues
Sometimes, Google Analytics doesn’t work as expected. Here’s how to fix common problems.
No Data in Reports
- Make sure the tracking code is installed on all pages.
- Check that you’re using the correct Measurement ID.
- Clear your browser cache and test again.
- Ensure your site isn’t blocking Google Analytics (some ad blockers do this).
Duplicate Tracking
If you see inflated numbers, you might have installed the code twice—once via plugin and once manually. Remove one method to fix this.
GA4 vs. Universal Analytics
Google has phased out Universal Analytics. If you’re setting up a new account, you’ll automatically get GA4. Don’t worry—it’s more advanced and mobile-friendly. For more details, read our guide on Is Google Analytics Free? to understand the differences.
Best Practices for Using Google Analytics
Now that your account is live, here’s how to get the most out of it:
Set Up Goals
Goals track conversions—like form submissions, purchases, or newsletter signups. In GA4, go to Admin > Goals and create new ones based on events.
Use UTM Parameters
Tag your links with UTM codes (e.g., ?utm_source=facebook&utm_medium=social) to track where traffic comes from. This helps measure ad and social media performance.
Review Reports Weekly
Check Acquisition > Traffic Acquisition to see top sources. Look at Engagement > Pages and Screens to find popular content. Use this data to improve your SEO and content strategy.
Connect to Google Search Console
Link your Google Analytics and Search Console accounts to see which keywords bring traffic and how your pages rank.
Conclusion: Start Tracking Your WordPress Success
Creating a Google Analytics account is one of the smartest things you can do for your WordPress website. It’s free, powerful, and gives you deep insights into your audience. By following this guide, you’ve learned how to create a Google Analytics account, install it on WordPress, and start analyzing real-time data.
Whether you use a plugin like MonsterInsights or install the code manually, the key is consistency. Check your reports regularly, set up goals, and use the data to make smarter decisions. Over time, you’ll see what content works, where your visitors come from, and how to grow your site effectively.
Ready to go further? Explore advanced features like custom events, audience segmentation, and integration with Google Ads. And if you’re managing multiple sites, consider organizing them under different accounts for better clarity.
Now that you’re set up, start exploring your dashboard. Your first visitor is probably already there!