This guide walks you through the complete process of manually installing the WooCommerce plugin in WordPress. You’ll learn how to download, upload, and activate WooCommerce safely—even if your site has limited plugin installation access.
Key Takeaways
- Manual installation gives you full control over plugin files and versions, ideal when automatic install fails.
- Always back up your site first to avoid data loss during plugin installation or configuration.
- Download WooCommerce only from the official source (WordPress.org) to ensure security and compatibility.
- Proper file permissions are essential—incorrect settings can prevent plugin activation or cause errors.
- After activation, run the WooCommerce setup wizard to configure your store settings quickly and correctly.
- Keep your plugin updated to benefit from new features, bug fixes, and security patches.
- Troubleshooting is simple—common issues like white screens or missing styles often stem from file corruption or theme conflicts.
Why Install WooCommerce Manually?
Installing WooCommerce manually might seem like an extra step—especially when WordPress offers one-click plugin installation—but it’s a valuable skill. Sometimes, your hosting provider restricts automatic plugin uploads due to security policies. Other times, your site may be in maintenance mode, or you might need a specific version of WooCommerce not available in the repository.
Manual installation ensures you have complete control over the process. It’s also useful if you’re working on a local development environment or restoring a site after a crash. Plus, understanding how plugins are installed helps you troubleshoot issues faster down the line.
What You’ll Need Before Starting
Visual guide about How to Install Woocommerce Plugin in WordPress Manually
Image source: wonderplugin.com
Before diving into the installation, make sure you have the following ready:
- Access to your WordPress admin dashboard – You’ll need administrator privileges.
- FTP access or file manager credentials – Most hosts provide this via cPanel, Plesk, or a similar control panel.
- A reliable internet connection – To download the plugin file without interruptions.
- A backup of your website – Always create a full backup before making changes. Use a plugin like UpdraftPlus or your host’s backup tool.
Taking these precautions minimizes risk and ensures a smooth installation.
Step 1: Download the WooCommerce Plugin
The first step is getting the official WooCommerce plugin file.
Visit the Official WordPress Plugin Directory
Go to wordpress.org/plugins/woocommerce. This is the only trusted source for the free version of WooCommerce. Avoid third-party sites—they may bundle malware or outdated code.
Download the ZIP File
On the plugin page, click the “Download” button. This will save a file named something like woocommerce.x.x.x.zip (the numbers represent the version) to your computer. Do not extract this file—WordPress needs it in ZIP format for upload.
Step 2: Access Your WordPress Site Files
Visual guide about How to Install Woocommerce Plugin in WordPress Manually
Image source: wonderplugin.com
Now you’ll upload the plugin to your server.
Use FTP or Your Host’s File Manager
If you’re using FTP, connect to your site using an FTP client like FileZilla. Enter your hostname, username, and password (usually found in your hosting account dashboard).
Alternatively, log into your hosting control panel (like cPanel) and open the File Manager. Navigate to your WordPress installation directory—typically public_html or a subfolder like public_html/your-site.
Locate the Plugins Folder
Inside your WordPress root folder, find the wp-content directory. Then open the plugins folder. This is where all your plugins live.
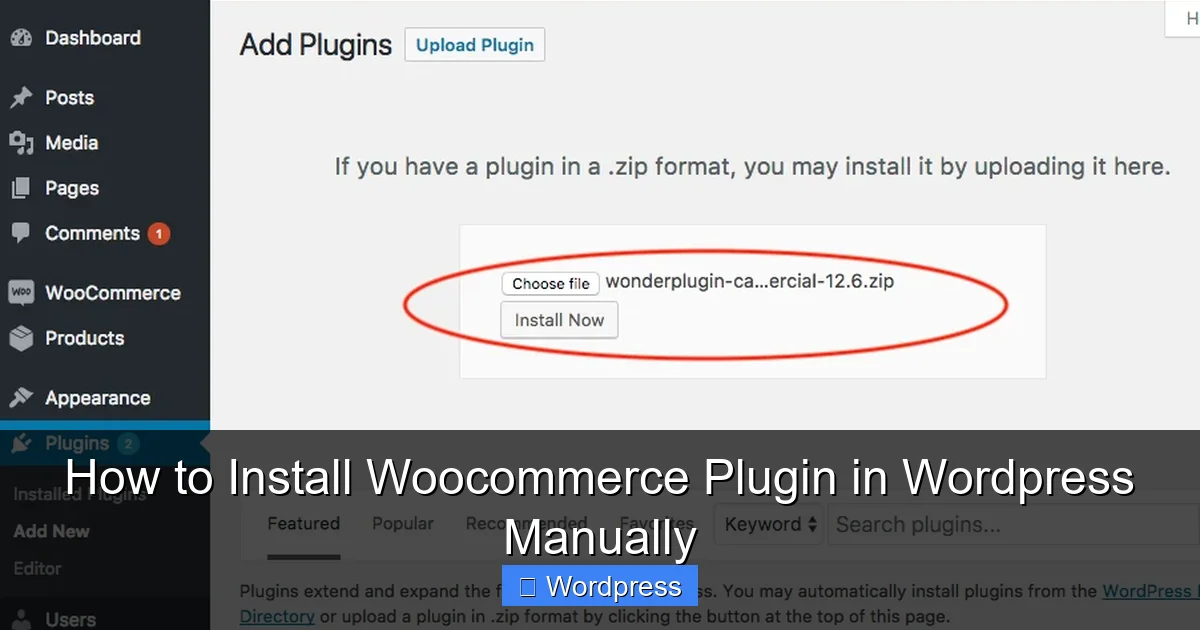
Step 3: Upload the WooCommerce ZIP File
Now it’s time to add WooCommerce to your site.
Upload via File Manager (Recommended for Beginners)
In your host’s File Manager:
- Click the “Upload” button.
- Select the WooCommerce ZIP file from your computer.
- Wait for the upload to complete.
Upload via FTP
If using FTP:
- Drag the ZIP file from your local machine into the
pluginsfolder on the server. - Ensure the transfer mode is set to “Binary” to avoid file corruption.
Extract the ZIP File
After uploading, right-click the ZIP file in your file manager and select “Extract” or “Unzip.” This will create a new folder named woocommerce inside your plugins directory. Delete the ZIP file afterward to keep things tidy.
> 💡 Pro Tip: Never leave ZIP files in your plugins folder—they’re unnecessary and could pose a security risk.
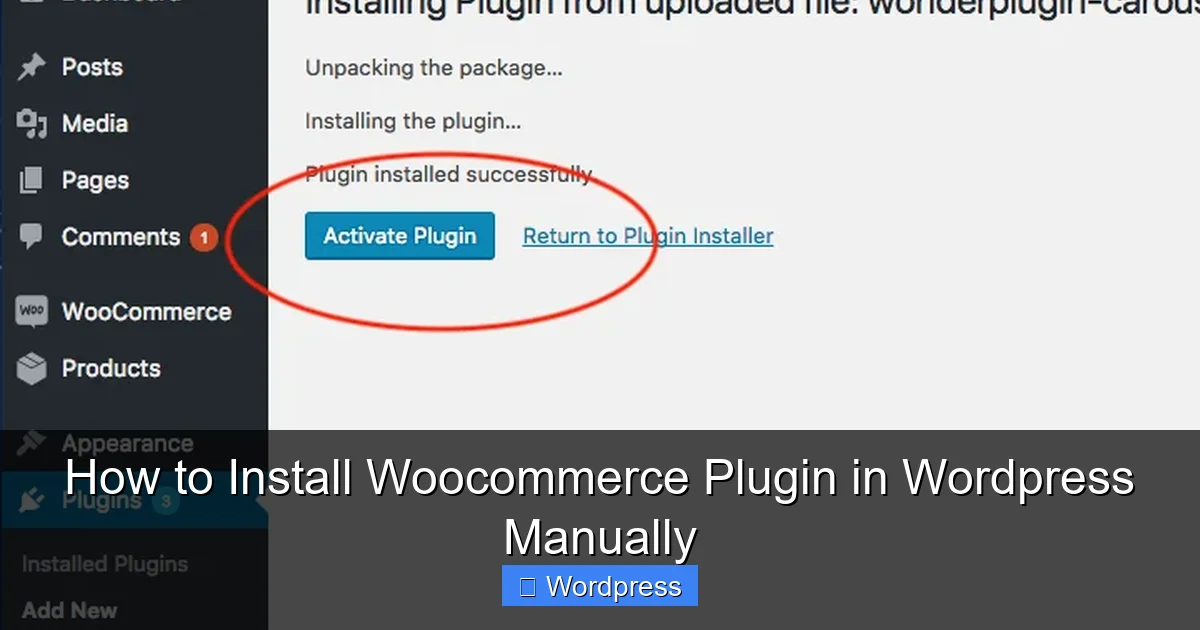
Step 4: Activate WooCommerce in WordPress
With the files in place, it’s time to activate the plugin.
Log Into Your WordPress Dashboard
Go to yoursite.com/wp-admin and log in with your admin credentials.
Navigate to the Plugins Page
In the left-hand menu, click Plugins > Installed Plugins. You should now see “WooCommerce” listed among your plugins.
Click “Activate”
Find WooCommerce in the list and click the Activate link below its name. Once activated, you’ll see a success message and a new “WooCommerce” menu item appear in your dashboard.
Step 5: Run the WooCommerce Setup Wizard
WooCommerce includes a helpful setup wizard to get your store running fast.
Launch the Wizard
After activation, you’ll usually see a prompt to “Run the Setup Wizard.” Click it. If you miss it, go to WooCommerce > Home in your dashboard and click “Let’s go!”
Follow the On-Screen Steps
The wizard will guide you through:
- Store setup (country, currency, product types)
- Shipping and tax options
- Payment gateways (like PayPal or Stripe)
- Recommended plugins (optional)
Take your time here—these settings affect how your store functions. You can always change them later under WooCommerce > Settings.
Troubleshooting Common Issues
Even with careful steps, problems can occur. Here’s how to fix the most common ones.
“Plugin Could Not Be Activated” Error
This usually means the plugin files weren’t uploaded correctly or are corrupted. Double-check that:
- The
woocommercefolder exists inwp-content/plugins - All files inside the folder are present (there should be dozens)
- File permissions are set to 644 for files and 755 for folders
If unsure, re-upload the plugin from scratch.
White Screen After Activation (White Screen of Death)
This often indicates a PHP error or memory limit issue. Try:
- Increasing your PHP memory limit in
wp-config.phpby adding:define('WP_MEMORY_LIMIT', '256M'); - Switching to a default WordPress theme (like Twenty Twenty-Four) to rule out theme conflicts
- Deactivating other plugins to check for compatibility issues
For more on managing themes, see our guide on how to deactivate a theme in WordPress.
Styles Look Broken or Missing
WooCommerce relies on CSS files. If your store looks unstyled:
- Clear your browser cache and WordPress cache (if using a caching plugin)
- Ensure your theme supports WooCommerce (most modern themes do)
- Check that no security plugins are blocking asset loading
You can learn more about adding custom CSS in our article on the best way to add CSS in WordPress.
Keeping WooCommerce Updated
Manual installation doesn’t mean you’re stuck with one version. WordPress will still notify you when updates are available. However, since you installed it manually, you may need to repeat the process for major updates—or switch to automatic updates later.
To update safely:
- Back up your site.
- Download the latest WooCommerce ZIP from WordPress.org.
- Deactivate and delete the old version (don’t worry—your products and settings are stored in the database).
- Upload and activate the new version.
Alternatively, once WooCommerce is active, you can enable auto-updates under Plugins > Installed Plugins by clicking “Enable auto-updates” next to WooCommerce.
Final Thoughts
Manually installing WooCommerce gives you flexibility and control—especially useful in restricted hosting environments or during site recovery. While the automatic installer is convenient, knowing the manual method empowers you to solve problems independently and understand how WordPress plugins work under the hood.
Remember: always back up first, download from official sources, and test your site after installation. With WooCommerce active, you’re ready to start building your online store, adding products, and accepting payments.
And if you ever need to manage other parts of your WordPress site—like themes—check out our guide on how to install WP themes manually for a similar step-by-step approach.