This guide walks you through how to install WooCommerce plugin in WordPress from start to finish. You’ll learn two simple methods—using the WordPress dashboard or uploading manually—and get tips to avoid common mistakes.
Key Takeaways
- WooCommerce is free and easy to install: It’s the most popular eCommerce plugin for WordPress, trusted by millions of online stores worldwide.
- Two installation methods available: Use the built-in plugin directory for quick setup or upload a ZIP file if you have a custom version.
- Always back up your site first: Prevent data loss by creating a full backup before making any major changes.
- Choose a WooCommerce-ready theme: Not all themes support WooCommerce features—pick one that’s compatible for the best experience.
- Complete the setup wizard after install: WooCommerce guides you through store settings like currency, shipping, and payments.
- Test your store before going live: Add sample products and run test orders to ensure everything works smoothly.
- Keep WooCommerce updated: Regular updates improve security, performance, and compatibility with WordPress.
Introduction: Why Install WooCommerce on WordPress?
If you’re building an online store, WooCommerce is your best friend. It’s a free, open-source plugin that turns your WordPress website into a fully functional eCommerce platform. Whether you’re selling physical products, digital downloads, or services, WooCommerce gives you full control over your store’s design, inventory, payments, and shipping.
In this guide, you’ll learn how to install WooCommerce plugin in WordPress using two reliable methods. We’ll also cover essential post-installation steps, troubleshooting tips, and best practices to help you launch your store with confidence. No coding required—just follow along!
Prerequisites Before Installing WooCommerce
Before you begin, make sure your WordPress site meets these basic requirements:
- WordPress installed and updated: WooCommerce works best on the latest version of WordPress. Check your dashboard under Dashboard > Updates.
- PHP version 7.4 or higher: WooCommerce requires modern PHP for security and performance. Most hosts support this by default.
- MySQL 5.6 or MariaDB 10.1+: These database systems ensure smooth data handling for your store.
- A compatible theme: While WooCommerce works with most themes, using a WooCommerce-ready theme (like Storefront, Astra, or Flatsome) ensures better integration. You can learn how to install WP themes manually if you need to switch.
- SSL certificate (recommended): For secure transactions, especially if accepting payments online.
Pro Tip: Always back up your site before installing new plugins. Use a plugin like UpdraftPlus or your hosting provider’s backup tool to save your current setup.
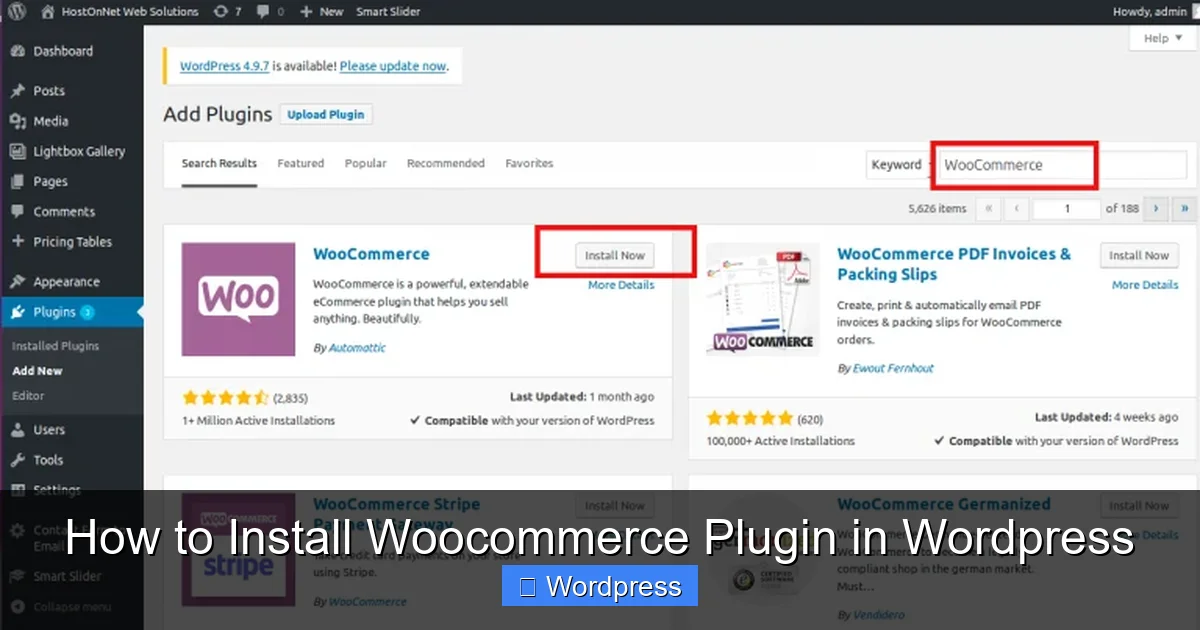
Method 1: Install WooCommerce via WordPress Dashboard (Recommended)
This is the easiest and most common way to install WooCommerce. It’s perfect for beginners and takes less than 5 minutes.
Visual guide about How to Install Woocommerce Plugin in WordPress
Image source: cdn.learnwoo.com
Step 1: Log in to Your WordPress Admin
Go to yoursite.com/wp-admin and log in with your username and password. Once inside, you’ll see the WordPress dashboard.
Step 2: Navigate to the Plugins Section
In the left-hand menu, click on Plugins, then select Add New. This opens the plugin repository where you can search and install thousands of free plugins.
Step 3: Search for WooCommerce
In the search bar (top right), type “WooCommerce” and press Enter. The official WooCommerce plugin by Automattic should appear at the top of the results.
Step 4: Install and Activate
Click the “Install Now” button next to WooCommerce. WordPress will download and install the plugin automatically. Once done, click “Activate” to enable it on your site.
Note: After activation, WooCommerce may prompt you to install additional recommended plugins (like Jetpack or WooCommerce Services). You can skip these for now or install them later.
Method 2: Upload WooCommerce Manually (ZIP File)
If you downloaded WooCommerce from the official website or received a custom version, use this method to upload it manually.
Visual guide about How to Install Woocommerce Plugin in WordPress
Image source: blog.hostonnet.com
Step 1: Download the WooCommerce ZIP File
Go to wordpress.org/plugins/woocommerce and click “Download”. Save the ZIP file to your computer.
Step 2: Go to Plugin Upload Page
In your WordPress dashboard, go to Plugins > Add New. At the top of the page, click the “Upload Plugin” button.
Step 3: Choose File and Install
Click “Choose File”, select the WooCommerce ZIP file from your computer, and click “Install Now”. WordPress will upload and extract the files automatically.
Step 4: Activate the Plugin
Once installation is complete, click “Activate Plugin” to enable WooCommerce on your site.
Tip: Manual upload is useful if your server has restrictions on plugin installations or if you’re using a modified version of WooCommerce.
Setting Up WooCommerce: The Setup Wizard
After activating WooCommerce, a setup wizard will launch automatically. This guided process helps you configure your store quickly.
Step 1: Store Setup
Enter your store’s address, currency, and product types (physical, digital, or both). These settings affect taxes, shipping, and payment options.
Step 2: Industry and Product Types
Select your business category (e.g., fashion, electronics, food) and the types of products you’ll sell. WooCommerce uses this info to suggest relevant features.
Step 3: Shipping and Tax
Set up shipping zones and rates. You can start with flat rates or free shipping and adjust later. Tax settings can be configured based on your region.
Step 4: Payments
Choose payment gateways like PayPal, Stripe, or bank transfers. WooCommerce supports many popular options. Enable the ones you plan to use.
Step 5: Recommended Plugins (Optional)
WooCommerce may suggest plugins for analytics, marketing, or security. You can install them now or skip and add them later.
Step 6: Finalize and Launch
Review your settings and click “Let’s go!” to complete the setup. Your store is now ready for products!
Pro Tip: You can always return to WooCommerce > Settings to adjust these options later.
Adding Your First Product
Now that WooCommerce is installed, it’s time to add products. Here’s how:
- Go to Products > Add New in your dashboard.
- Enter the product name, description, price, and images.
- Set inventory, shipping, and product categories.
- Click “Publish” to make it live.
Test your product page by visiting your site and clicking on the product. Make sure the “Add to Cart” button works and the checkout process flows smoothly.
Troubleshooting Common Installation Issues
Even with simple steps, issues can happen. Here’s how to fix the most common problems:
“Plugin Could Not Be Activated” Error
This usually means a conflict with another plugin or theme. Try deactivating all plugins except WooCommerce. If it works, reactivate them one by one to find the culprit. Also, switch to a default theme like Twenty Twenty-Four to test.
White Screen After Installation
This is often due to a memory limit. Increase your PHP memory limit by adding this line to your wp-config.php file:
define('WP_MEMORY_LIMIT', '256M');
WooCommerce Pages Not Created
WooCommerce should automatically create pages like Shop, Cart, and Checkout. If they’re missing, go to WooCommerce > Status > Tools and click “Create default WooCommerce pages”.
Theme Compatibility Issues
If your theme doesn’t display WooCommerce elements correctly, check if it’s compatible. You can learn how to check WordPress theme compatibility or switch to a WooCommerce-ready theme. For help applying a new theme, see how to apply WordPress theme.
Best Practices After Installation
To keep your store running smoothly, follow these tips:
- Update regularly: Keep WooCommerce, WordPress, and your theme updated to avoid security risks.
- Use a child theme: If customizing your theme, use a child theme to preserve changes during updates.
- Install essential plugins: Add tools for SEO, backups, security, and performance (like Yoast SEO or WP Rocket).
- Optimize images: Large product images slow down your site. Use compression tools like Smush.
- Test on mobile: Over 60% of shoppers use mobile devices. Ensure your store looks great on all screens.
Conclusion: Your Store Is Ready to Grow
Congratulations! You’ve successfully learned how to install WooCommerce plugin in WordPress and set up your online store. Whether you used the dashboard method or manual upload, you now have a powerful eCommerce platform at your fingertips.
Remember, installing WooCommerce is just the beginning. Focus on adding quality products, optimizing your site for speed and SEO, and providing excellent customer service. With the right strategy, your store can grow into a thriving business.
For ongoing success, keep learning. Explore advanced features like subscriptions, bookings, or multilingual support. And if you ever need to update or change your theme, check out our guide on how to update theme on WordPress to do it safely.