This guide walks you through how to install a WordPress theme using three easy methods: directly from the WordPress theme directory, uploading a ZIP file, or manual FTP installation. Whether you’re a beginner or experienced user, you’ll learn best practices, avoid common pitfalls, and keep your site running smoothly.
Key Takeaways
- Choose the right theme: Pick a lightweight, well-coded theme that matches your site’s purpose and is regularly updated.
- Install via dashboard (easiest): Use the built-in theme browser to search, preview, and install free themes in seconds.
- Upload premium themes safely: Always upload .zip files through the WordPress admin—never extract them first.
- Manual FTP install for advanced users: Use this method when auto-install fails or for custom themes not available in the repository.
- Always back up first: Create a full site backup before installing or switching themes to prevent data loss.
- Test after activation: Check your homepage, menus, widgets, and plugins to ensure everything works correctly.
- Use child themes for customization: Avoid losing changes during updates by using a child theme for modifications.
Introduction
Installing a WordPress theme is one of the first steps to building a beautiful, functional website. Whether you’re launching a blog, business site, or online store, the right theme sets the foundation for your design and user experience. The good news? It’s surprisingly simple—even if you’re new to WordPress.
In this guide, you’ll learn how to install a WordPress theme using three reliable methods: through the WordPress dashboard, by uploading a ZIP file, or manually via FTP. We’ll also cover essential tips, common mistakes to avoid, and what to do if things go wrong. By the end, you’ll be able to confidently change your site’s look and feel without breaking anything.
Method 1: Install a Theme from the WordPress Directory
The easiest and safest way to install a theme is directly from the official WordPress theme directory. This method works for thousands of free, vetted themes—no downloads or external files needed.
Visual guide about How to Install WordPress Theme
Image source: wpallresources.com
Step 1: Log in to Your WordPress Dashboard
Go to your website’s admin area by visiting yoursite.com/wp-admin and logging in with your username and password.
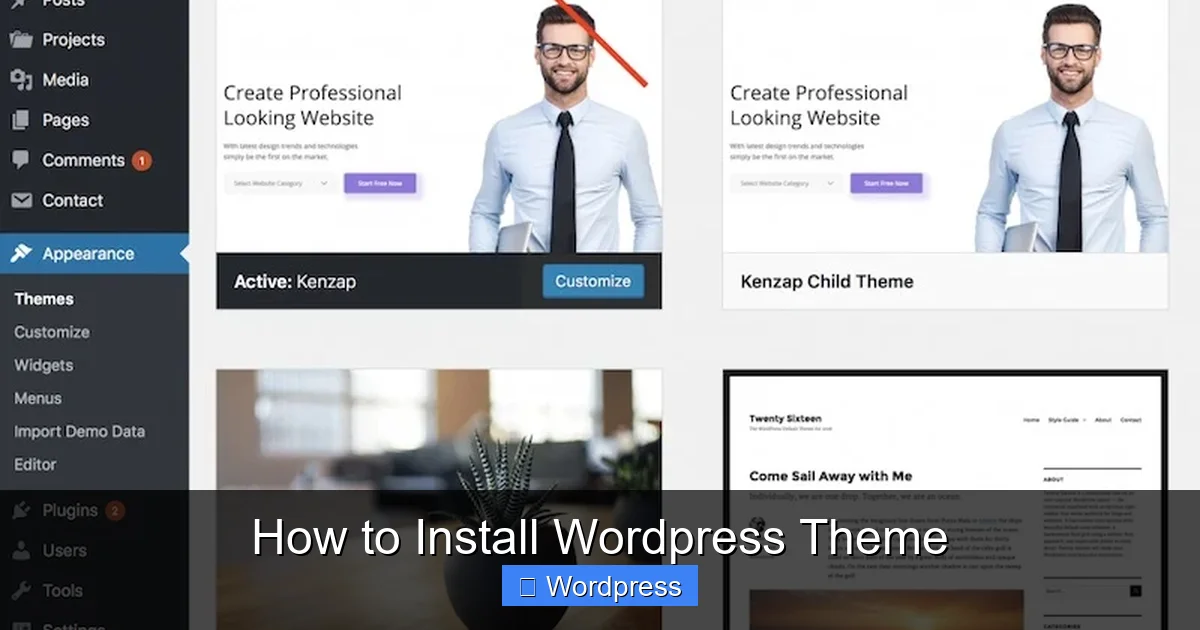
Step 2: Navigate to Appearance > Themes
In the left-hand menu, click Appearance, then select Themes. You’ll see a gallery of currently installed themes.
Step 3: Click “Add New”
At the top of the page, click the blue Add New button. This opens the theme browser with access to over 9,000 free themes.
Step 4: Search or Browse Themes
Use the search bar to find themes by name, feature (like “responsive” or “e-commerce”), or popularity. You can also filter by layout, subject, or color scheme. For example, searching “blog” will show themes optimized for content sites.
Step 5: Preview and Install
Hover over any theme and click Preview to see how it looks on your site. When you find one you like, click Install. WordPress will download and install it automatically—usually in under 10 seconds.
Step 6: Activate the Theme
After installation, click Activate to make it live on your site. Your homepage will instantly reflect the new design.
Pro Tip: Always check the theme’s ratings, number of installations, and last update date. A theme updated within the last 6 months is more likely to be secure and compatible with the latest WordPress version.
Method 2: Upload a Theme (ZIP File)
Most premium themes (like those from ThemeForest or Elegant Themes) come as a downloadable .zip file. Here’s how to install them safely.
Visual guide about How to Install WordPress Theme
Image source: kenzap.blog
Step 1: Download the Theme File
Purchase or download your theme from a trusted provider. Make sure you get the installable WordPress theme file—not the full package with documentation or plugins. It should be a single .zip file named something like mytheme.zip.
Step 2: Go to Appearance > Themes > Add New
In your WordPress dashboard, navigate to Appearance > Themes, then click Add New.
Step 3: Click “Upload Theme”
At the top of the page, click the Upload Theme button. A file picker will appear.
Step 4: Choose and Upload the ZIP File
Click Choose File, select your .zip theme file from your computer, then click Install Now. WordPress will extract and install the theme automatically.
Step 5: Activate the Theme
Once installed, click Activate to apply it to your site.
Important: Never extract the .zip file before uploading. WordPress needs the compressed file to install correctly. Also, ensure your hosting supports file uploads—most do, but some free hosts restrict this.
Method 3: Manual Installation via FTP
If the above methods fail—or you’re working with a custom theme—manual installation via FTP gives you full control. This method requires a bit more technical know-how but is reliable when auto-install doesn’t work.
Step 1: Download and Extract the Theme
Download your theme .zip file to your computer, then extract it using software like WinZip or 7-Zip. You should see a folder named after your theme (e.g., astra or neve).
Step 2: Connect to Your Site via FTP
Use an FTP client like FileZilla to connect to your website. You’ll need your FTP credentials (usually found in your hosting control panel).
Step 3: Navigate to the Themes Folder
Go to /wp-content/themes/ on your server. This is where all themes are stored.
Step 4: Upload the Theme Folder
Drag and drop the extracted theme folder into the themes directory. Wait for the upload to complete—larger themes may take a few minutes.
Step 5: Activate in WordPress
Return to your WordPress dashboard, go to Appearance > Themes, and you’ll see your new theme listed. Click Activate to use it.
Note: Manual installation bypasses WordPress’s security checks, so only use themes from trusted sources. Also, ensure file permissions are set correctly (usually 755 for folders, 644 for files).
What to Do After Installing a Theme
Installing a theme is just the beginning. Here’s how to ensure everything works smoothly.
Check Your Site Immediately
Visit your homepage and browse key pages (About, Contact, Blog). Look for broken images, missing menus, or layout issues.
Reconfigure Menus and Widgets
Some themes use different widget areas or menu locations. Go to Appearance > Menus and Appearance > Widgets to adjust them.
Install Required Plugins
Many themes recommend or require plugins (like page builders or sliders). WordPress will often prompt you to install them after activation.
Customize the Theme
Use the Customizer (Appearance > Customize) to change colors, fonts, logos, and layouts. Changes are previewed in real time.
Set a Homepage and Blog Page
If your theme supports static front pages, go to Settings > Reading and assign your homepage and posts page.
Troubleshooting Common Issues
Even with careful installation, problems can happen. Here’s how to fix the most common ones.
“Broken Theme” or White Screen
If your site shows a white screen or error after activation, it’s likely a compatibility issue. Switch back to a default theme (like Twenty Twenty-Four) via FTP by renaming the problematic theme folder. Then investigate plugin conflicts or PHP errors.
Missing Styles or Layouts
This often happens if the theme wasn’t fully uploaded or extracted. Reinstall the theme using the correct method. Also, clear your browser and WordPress cache.
“Style.css Missing” Error
This means WordPress can’t find the theme’s main stylesheet. Ensure the theme folder contains a style.css file in the root directory—not inside a subfolder.
Theme Not Appearing in Dashboard
If a manually uploaded theme doesn’t show up, double-check the folder name and structure. The theme folder should contain style.css and functions.php at the top level.
Performance Issues
Some themes are bloated with unnecessary features. Use tools like GTmetrix or PageSpeed Insights to test speed. Consider switching to a lightweight alternative like Astra or GeneratePress if performance lags.
Best Practices for Theme Installation
- Always back up your site before installing or switching themes. Use plugins like UpdraftPlus or your host’s backup tool.
- Use a child theme if you plan to customize code. This protects your changes during updates. Learn more about child themes here.
- Test on a staging site first if possible. Many hosts offer staging environments to preview changes safely.
- Keep themes updated to ensure security and compatibility. Check how to update themes safely.
- Delete unused themes to reduce clutter and potential security risks. See how to delete themes properly.
Conclusion
Learning how to install a WordPress theme opens up endless possibilities for your website’s design and functionality. Whether you choose a free theme from the directory, upload a premium design, or install manually via FTP, the process is straightforward when you follow the right steps.
Remember to prioritize security, performance, and compatibility. Always back up your site, test thoroughly, and use child themes for customizations. With these practices, you’ll keep your WordPress site looking great and running smoothly for years to come.