This guide walks you through how to install a WooCommerce theme in WordPress using the built-in theme installer or manual upload. You’ll also learn how to activate, customize, and troubleshoot your new theme for a smooth online store setup.
Key Takeaways
- Choose a WooCommerce-compatible theme: Not all WordPress themes support WooCommerce, so pick one designed for eCommerce.
- Install via WordPress dashboard or manually: You can upload a theme directly from the admin panel or use FTP for manual installation.
- Activate and configure the theme: After installation, activate it and adjust settings to match your brand.
- Use a child theme for customizations: Protect your changes from being overwritten during updates by using a child theme.
- Test your store after setup: Always check product pages, checkout, and mobile responsiveness before going live.
- Keep themes updated: Regular updates improve security, performance, and compatibility with WooCommerce.
Introduction
If you’re building an online store with WordPress and WooCommerce, choosing the right theme is crucial. A good WooCommerce theme enhances your site’s design, improves user experience, and supports essential eCommerce features like product galleries, cart functionality, and checkout pages. In this guide, you’ll learn how to install a WooCommerce theme in WordPress—whether you’re using a free theme from the WordPress directory or a premium one you’ve purchased.
We’ll cover two main methods: installing via the WordPress dashboard and uploading manually. You’ll also get practical tips for activating, customizing, and troubleshooting your new theme. By the end, your store will look professional and be ready to sell.
Step 1: Choose a WooCommerce-Compatible Theme
Before installing, make sure your theme supports WooCommerce. Many modern themes are built with eCommerce in mind, but not all. Look for themes labeled “WooCommerce Ready” or “eCommerce Optimized.” Popular options include Astra, Storefront (WooCommerce’s official theme), Flatsome, and OceanWP.
Visual guide about How to Install Woocommerce Theme in WordPress
Image source: ddgpress.com
You can find free themes in the WordPress Theme Directory or buy premium themes from marketplaces like ThemeForest or Elegant Themes. Always check reviews, update frequency, and support availability.
Step 2: Install WooCommerce (If Not Already Installed)
WooCommerce must be installed and activated before your theme can display store features. If you haven’t done this yet:
Go to Plugins > Add New
In your WordPress dashboard, navigate to Plugins > Add New. Search for “WooCommerce,” then click Install Now and Activate.
Run the Setup Wizard
After activation, WooCommerce will launch a setup wizard. Follow the prompts to configure your store’s location, currency, payment methods, and shipping options. This ensures your theme displays products correctly.
Step 3: Install the WooCommerce Theme via WordPress Dashboard
The easiest way to install a theme is through the WordPress admin panel. This method works for free themes available in the WordPress repository.
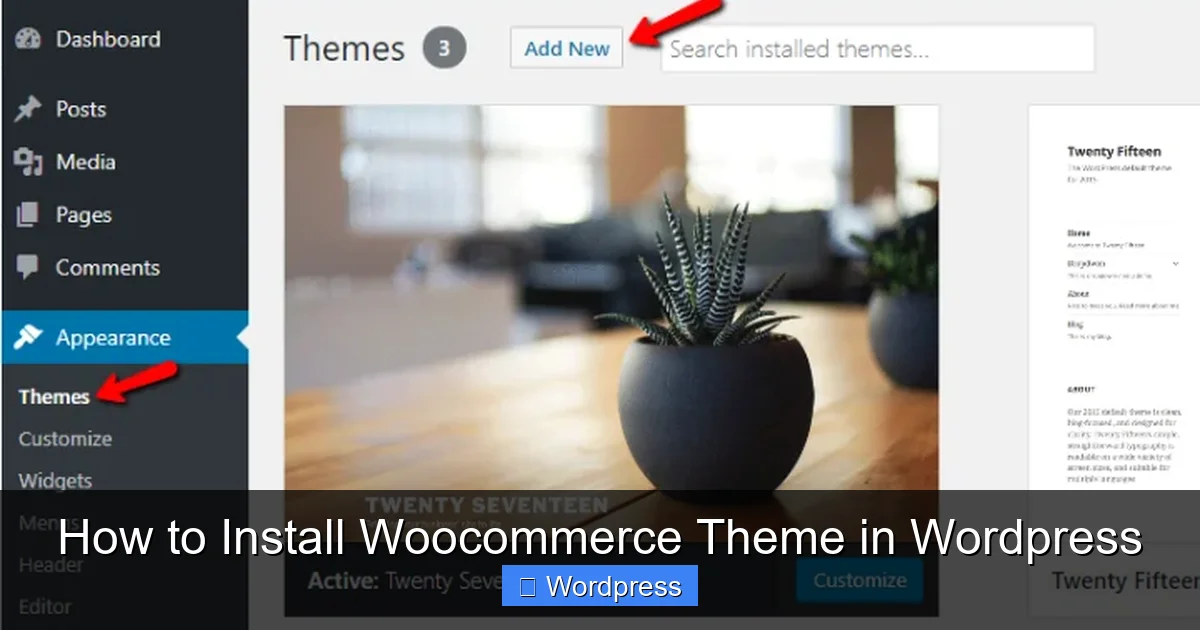
Visual guide about How to Install Woocommerce Theme in WordPress
Image source: wpkube.com
Navigate to Appearance > Themes
Go to Appearance > Themes in your dashboard. Click the Add New button at the top.
Search for Your Theme
Use the search bar to find your desired theme. For example, type “Astra” or “Storefront.” You can also filter by features like “eCommerce” or “WooCommerce.”
Install and Activate
Click Install on the theme you want. Once installed, click Activate. Your new theme is now live on your site.
Tip: Some themes offer demo content. You can often import this later via the theme’s customizer or a one-click demo importer plugin.
Step 4: Install a Premium WooCommerce Theme Manually
If you’ve purchased a premium theme, it usually comes as a .zip file. You’ll need to upload it manually.
Download the Theme File
After purchase, download the theme .zip file to your computer. Do not extract it—WordPress needs the .zip format.
Go to Appearance > Themes > Add New
In your WordPress dashboard, go to Appearance > Themes > Add New. Click the Upload Theme button at the top.
Choose File and Install
Click Choose File, select the .zip file from your computer, and click Install Now. WordPress will upload and install the theme.
Activate the Theme
Once installed, click Activate. Your premium WooCommerce theme is now ready to use.
Note: If you get an error about “destination folder already exists,” it means a theme with the same name is already installed. You may need to delete the old theme first or rename the folder via FTP.
Step 5: Configure and Customize Your Theme
After activation, your theme may look different from your previous one. Here’s how to make it work for your store.
Access the Customizer
Go to Appearance > Customize. Here, you can change colors, fonts, layouts, and header/footer settings. Most WooCommerce themes include customizer options for shop pages, product displays, and buttons.
Set Up Your Homepage
By default, WordPress shows your latest posts. To set a static homepage:
- Go to Settings > Reading.
- Under “Your homepage displays,” select “A static page.”
- Choose or create a page (e.g., “Home”) and assign it as your homepage.
Import Demo Content (Optional)
Many premium themes include demo content that mimics the theme’s live preview. Look for a “Demo Import” or “One-Click Install” option in the theme settings or customizer. This speeds up setup by adding sample products, pages, and menus.
Step 6: Install Required Plugins
Some WooCommerce themes require additional plugins for full functionality. After activation, you may see a notice like “This theme recommends the following plugin: WooCommerce Blocks.”
Install Recommended Plugins
Go to Appearance > Install Plugins (or look for a notification in the dashboard). Install and activate any recommended plugins. These often include page builders, slider tools, or custom widgets.
Tip: Avoid installing too many plugins. Only use what’s necessary to keep your site fast and secure.
Step 7: Test Your Store
Before launching, test your store thoroughly.
Check Product Pages
Visit a product page to ensure images, descriptions, prices, and the “Add to Cart” button display correctly.
Test the Checkout Process
Add a product to your cart and go through the checkout. Make sure payment and shipping options work.
Mobile Responsiveness
Use your phone or browser’s developer tools to check how your site looks on mobile. A good WooCommerce theme should be fully responsive.
Speed and Performance
Use tools like Google PageSpeed Insights to check load times. If your site is slow, consider optimizing images or using a caching plugin.
Troubleshooting Common Issues
Even with careful setup, you might run into problems. Here are solutions to common issues.
Theme Not Displaying WooCommerce Pages Correctly
If your shop or product pages look broken, the theme may not fully support WooCommerce. Check the theme documentation or contact support. You can also try switching to a known-compatible theme like Storefront to test.
White Screen After Activation
This “white screen of death” usually means a PHP error. Deactivate the theme by renaming its folder via FTP, then reactivate your previous theme. Check for plugin conflicts by disabling all plugins and re-enabling them one by one.
Missing Styles or Layouts
If your site looks unstyled, clear your browser cache and WordPress cache (if using a caching plugin). Also, ensure your theme’s CSS files are loading. You can learn how to add custom CSS if needed.
Theme Updates Overwrite Customizations
Never edit theme files directly. Instead, use a child theme to make changes. This protects your work when the parent theme updates.
Conclusion
Installing a WooCommerce theme in WordPress is a straightforward process that can transform your online store. Whether you’re using a free theme from the WordPress directory or a premium one, the key steps are: choose a compatible theme, install it via the dashboard or manually, activate it, and customize it to fit your brand. Always test your store before going live and use a child theme for safe customizations.
With the right theme, your WooCommerce store will not only look great but also provide a smooth shopping experience for your customers. Keep your theme updated, monitor performance, and don’t hesitate to seek support if issues arise. Now you’re ready to start selling!