This guide shows you how to disable comments in WordPress using built-in settings, plugins, or code. Whether you want to turn off comments site-wide or on specific posts, you’ll find clear, beginner-friendly instructions to help you manage your site effectively.
Key Takeaways
- Disable comments globally: Turn off comments for all new posts and pages using WordPress settings.
- Remove comments from existing content: Bulk edit or delete comments on old posts and pages.
- Use plugins for advanced control: Plugins like Disable Comments offer flexible options to disable comments by post type.
- Hide the comment section with CSS: Use custom CSS to visually remove the comment area if needed.
- Prevent spam effectively: Disabling comments reduces spam and improves site security.
- Check theme compatibility: Some themes may override default comment settings—verify after making changes.
- Re-enable comments anytime: All methods are reversible, so you can restore commenting later if desired.
Why Disable Comments in WordPress?
Comments can boost engagement, but they’re not always welcome. Spam, off-topic replies, or simply wanting a cleaner look might lead you to disable comments. WordPress makes it easy to turn off comments—either for your entire site or just specific posts.
In this guide, you’ll learn how to disable comments in WordPress using three proven methods: through the dashboard settings, with a plugin, or by editing code. Each method is safe, reversible, and perfect for beginners. Whether you run a blog, business site, or portfolio, controlling comments helps keep your content focused and your site secure.
Method 1: Disable Comments Globally via WordPress Settings
Visual guide about How to Disable Comments in WordPress
Image source: webprotime.com
The easiest way to stop new comments is through WordPress’s built-in settings. This method turns off commenting for all future posts and pages.
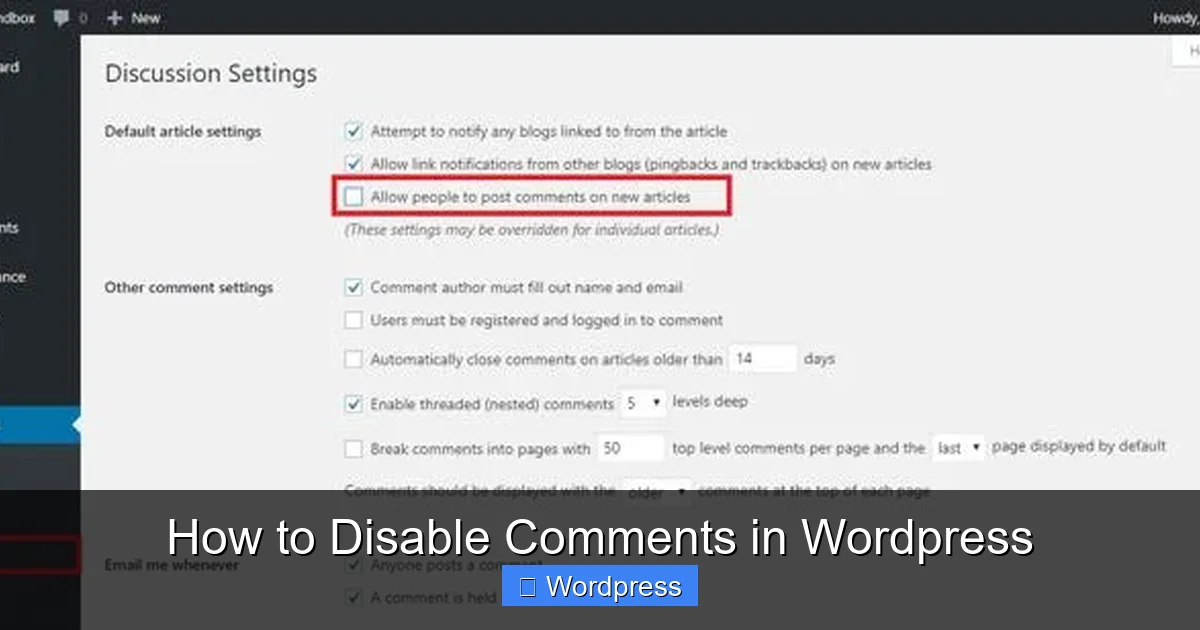
Step 1: Access Discussion Settings
Log in to your WordPress admin dashboard. From the left menu, go to Settings > Discussion. This page controls how comments behave across your site.
Step 2: Uncheck Default Comment Settings
Scroll down to the Default post settings section. You’ll see three checkboxes:
– Allow people to submit comments on new posts
– Allow link notifications from other blogs (pingbacks and trackbacks)
– Allow users to submit comments on new pages
Uncheck the first box: “Allow people to submit comments on new posts.”
For extra cleanliness, also uncheck the pingback and page comment options. This stops all new comment forms from appearing.
Step 3: Save Changes
Click the Save Changes button at the bottom of the page. Now, any new post or page you create won’t allow comments by default.
Pro Tip: This only affects future content. Existing posts may still show comment forms unless you disable them individually or in bulk (we’ll cover that next).
Method 2: Disable Comments on Existing Posts and Pages
Visual guide about How to Disable Comments in WordPress
Image source: webstick.blog
Even after disabling comments globally, older content might still accept comments. Here’s how to close them all at once.
Step 1: Go to Posts or Pages
In your dashboard, click Posts > All Posts or Pages > All Pages, depending on what you want to edit.
Step 2: Select All Items
Check the box at the top of the list to select all posts or pages. Alternatively, use the dropdown to select “All” and then check the box.
Step 3: Bulk Edit Comment Status
From the Bulk Actions dropdown, choose Edit and click Apply. A new panel will appear.
Under Comments, select Do not allow. This closes comments on every selected item.
Step 4: Update
Click Update to apply the changes. Now, all your existing content will no longer accept new comments.
Note: This doesn’t delete existing comments—it just stops new ones. To remove old comments, go to Comments in the dashboard and delete or spam them individually or in bulk.
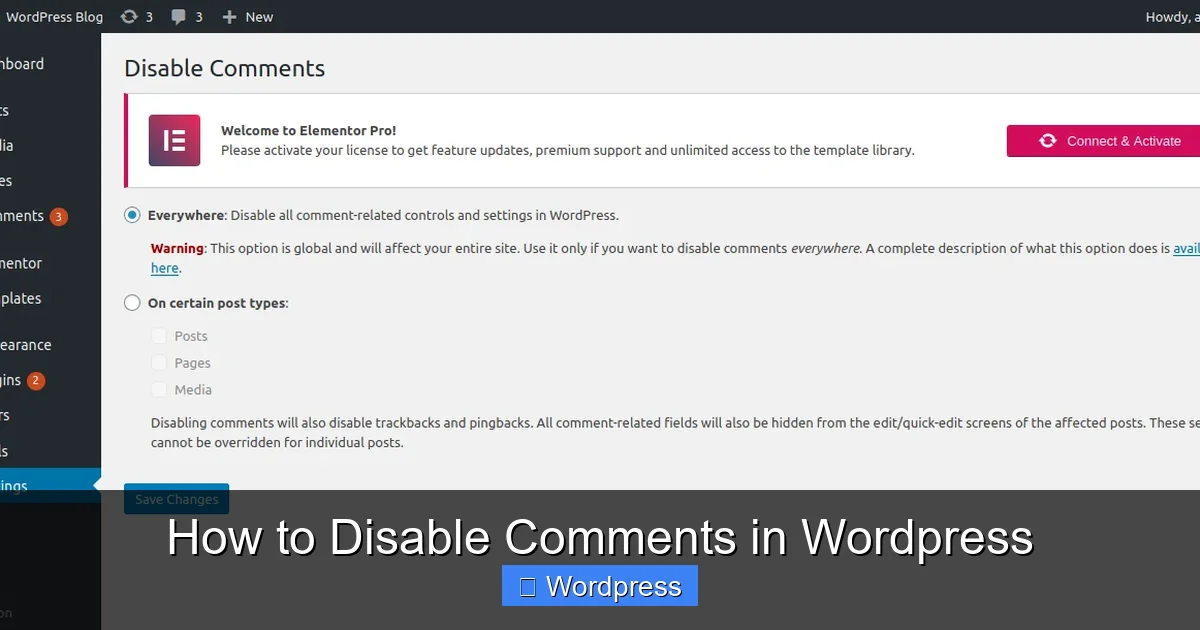
Method 3: Use a Plugin to Disable Comments
For more control—like disabling comments only on pages or custom post types—use a plugin. The Disable Comments plugin is lightweight, free, and highly effective.
Step 1: Install the Plugin
Go to Plugins > Add New. Search for “Disable Comments” by Samir Shah. Click Install Now, then Activate.
Step 2: Configure the Plugin
After activation, go to Settings > Disable Comments. You’ll see options to disable comments:
– Everywhere (entire site)
– For specific post types (e.g., posts, pages, media)
– Only on certain pages or posts
Choose “Disable comments everywhere” for full control, or select specific types if you only want to turn off comments on pages, for example.
Step 3: Save and Confirm
Click Save Changes. The plugin will remove comment forms and disable the comment section across your site instantly.
Bonus: This plugin also removes comment-related links from the admin menu and hides existing comment counts, giving you a cleaner backend.
Method 4: Hide Comments with Custom CSS (Optional)
If your theme still shows the comment section (even when disabled), you can hide it with CSS. This is a visual fix—comments are still disabled, but the area won’t appear.
Step 1: Find the Comment Section ID or Class
Right-click the comment area on your site and select Inspect. Look for an ID like #comments or a class like .comment-area.
Step 2: Add Custom CSS
Go to Appearance > Customize > Additional CSS. Paste this code (adjust the selector if needed):
 #comments, .comment-area {
 display: none !important;
 }
Click Publish to apply. The comment section will now be hidden from visitors.
Tip: This method works well with themes that don’t fully respect WordPress comment settings. For more on customizing your site’s appearance, check out our guide on the best way to add CSS in WordPress.
Troubleshooting Common Issues
Sometimes, comments may still appear after disabling them. Here’s how to fix common problems.
Comments Still Showing on Some Posts?
Double-check individual post settings. Edit the post, scroll down to the Discussion box, and ensure “Allow comments” is unchecked. Some themes or plugins may override global settings.
Comment Section Visible but Not Functional?
This usually means comments are disabled, but the theme still displays the area. Use the CSS method above to hide it.
Plugin Conflicts?
If a plugin like Jetpack or a page builder controls comments, it might interfere. Temporarily deactivate other plugins to test. Reactivate them one by one to find the culprit.
Theme Overrides Default Settings?
Some themes have their own comment controls. Check your theme’s documentation or settings panel. For example, themes built with Elementor may require adjustments in the template settings. Learn more about working with themes in our guide on what is a child theme in WordPress.
Should You Disable Comments Permanently?
Disabling comments isn’t right for every site. Consider your goals:
– Blogs and news sites: Comments encourage discussion—keep them unless spam is a problem.
– Portfolios and business sites: Comments may not add value. Disabling them keeps the focus on your work.
– High-traffic sites: Spam can overwhelm your site. Use moderation tools or disable comments if needed.
You can always re-enable comments later. Just reverse the steps above—recheck the boxes in Discussion settings, deactivate the plugin, or remove the CSS.
Final Thoughts
Knowing how to disable comments in WordPress gives you full control over your site’s interaction level. Whether you’re fighting spam, simplifying your design, or just prefer a comment-free experience, WordPress offers flexible solutions.
Start with the built-in settings for a quick fix. Use the Disable Comments plugin for advanced control. And if your theme acts up, a little CSS can clean things up fast. Remember, all changes are reversible—so experiment with confidence.
For more WordPress tips, explore our guide on how to delete a theme in WordPress or learn how to fix broken links in WordPress without a plugin to keep your site running smoothly.