Image upload problems in WordPress can be frustrating, but they’re usually fixable with a few targeted steps. This guide walks you through common causes and practical fixes, from file permissions to plugin conflicts, so you can get your media uploading smoothly again.
Key Takeaways
- Check file size and format: WordPress has default limits—ensure your images are under 2MB and in JPEG, PNG, or GIF format.
- Verify folder permissions: The wp-content/uploads directory must be writable (usually 755 or 644) for uploads to work.
- Disable conflicting plugins: A faulty plugin often blocks uploads—temporarily deactivate all plugins to test.
- Update WordPress and themes: Outdated core files or themes can cause compatibility issues with media handling.
- Increase PHP memory limit: Low memory can halt uploads—raise it to at least 256MB via wp-config.php.
- Clear browser and server cache: Cached data may interfere—refresh or purge cache after making changes.
- Use safe mode troubleshooting: Switch to a default theme like Twenty Twenty-Four to rule out theme-related errors.
Introduction
Staring at a spinning wheel or an error message when trying to upload an image in WordPress is more common than you think. Whether you’re adding a featured image to a blog post or updating your site’s gallery, image upload issues can halt your workflow instantly. The good news? Most of these problems have straightforward solutions.
In this guide, you’ll learn how to diagnose and fix the most frequent causes of image upload failures in WordPress. We’ll cover everything from basic file checks to advanced server settings—no coding expertise required. By the end, you’ll be able to upload images confidently and keep your site running smoothly.
Step 1: Check Image File Size and Format
The first thing to verify is whether your image meets WordPress’s basic requirements. WordPress supports JPEG, PNG, GIF, and WebP formats, but each hosting provider sets a maximum file size limit—typically between 2MB and 64MB.
How to check your current upload limit
Go to Media > Add New in your WordPress dashboard. Look just below the upload area—you’ll see a line like “Maximum upload file size: 2MB.” If your image exceeds this, it won’t upload.
How to reduce image size
Use free tools like TinyPNG or Squoosh to compress your image without losing quality. Alternatively, resize it in Photoshop or even your phone’s photo editor before uploading.
Pro tip: Save images at 1500px width or less for web use—this balances quality and performance.
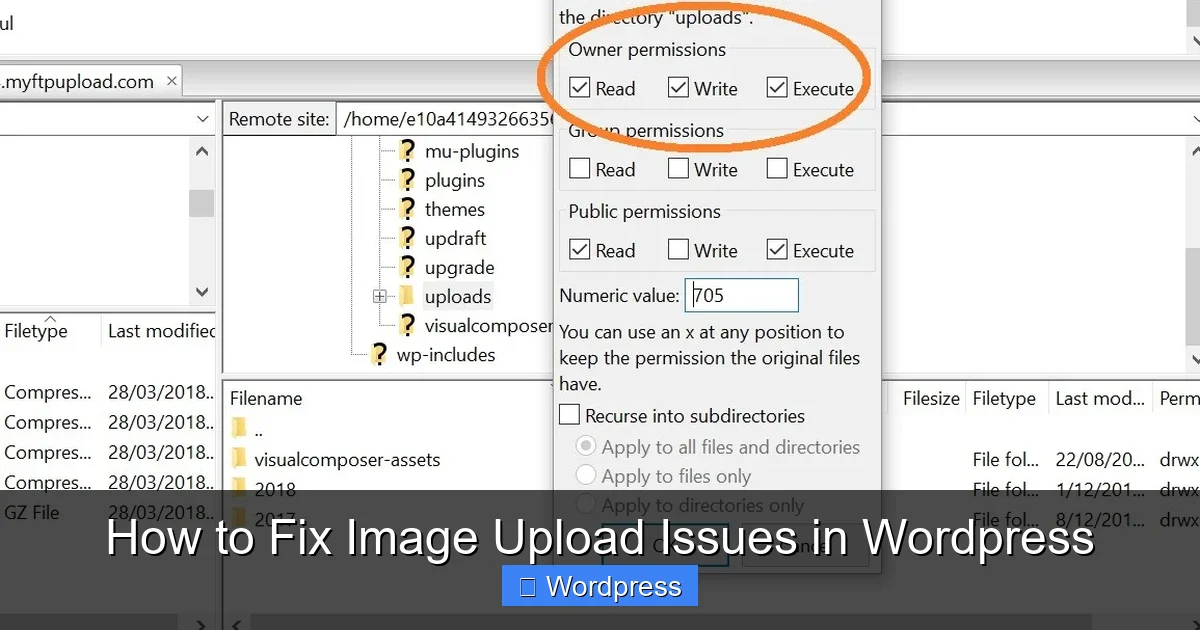
Step 2: Verify Upload Folder Permissions
WordPress stores uploaded images in the wp-content/uploads folder. If this folder isn’t writable by the web server, uploads will fail—even if everything else is correct.
Visual guide about How to Fix Image Upload Issues in WordPress
Image source: themely.com
How to check and fix permissions
Access your site via FTP or your hosting control panel (like cPanel). Navigate to wp-content/uploads. Right-click the folder and select “File Permissions” or “CHMOD.”
The ideal setting is 755 for folders and 644 for files. If it’s set to 600 or 700, change it. On some servers, 775 may be needed—but avoid 777 for security reasons.
If you’re unsure, contact your hosting provider. Many offer one-click fixes for permission issues through their support team.
Step 3: Disable Plugins Temporarily
Plugins can interfere with WordPress’s media handling—especially security, image optimization, or caching plugins. A quick way to test this is by disabling all plugins.
How to disable plugins safely
In your WordPress dashboard, go to Plugins > Installed Plugins. Select all plugins, choose “Deactivate” from the bulk actions menu, and click “Apply.”
Now try uploading an image again. If it works, reactivate plugins one by one until the issue returns. That plugin is the culprit. Check for updates or consider replacing it with a lighter alternative.
Note: Always back up your site before making bulk changes. If you can’t access the dashboard, rename the plugins folder via FTP to plugins-old—this deactivates all plugins instantly.
Step 4: Switch to a Default Theme
Sometimes, your active theme contains bugs or incompatible code that breaks the media uploader. Testing with a default WordPress theme helps isolate the issue.
How to switch themes temporarily
Go to Appearance > Themes. If you don’t see a default theme like Twenty Twenty-Four, install one from the WordPress repository. Activate it, then try uploading an image.
If uploads work, the problem lies in your original theme. Check for theme updates or review recent customizations. For deeper fixes, consider consulting our guide on how to update a WordPress theme safely.
Once resolved, you can switch back—or keep using the default theme if it meets your needs.
Step 5: Increase PHP Memory Limit
WordPress needs sufficient memory to process image uploads. The default is often 64MB or 128MB—too low for large images or busy sites.
How to raise the memory limit
Edit your wp-config.php file (located in your site’s root directory). Add this line above the “That’s all, stop editing!” comment:
define('WP_MEMORY_LIMIT', '256M');Save the file and refresh your site. Most hosts allow up to 512MB. If you’re on shared hosting, check with your provider before exceeding 256MB.
Alternatively, some hosts let you adjust this via .htaccess or php.ini. Add php_value memory_limit 256M to .htaccess if allowed.
Step 6: Update WordPress, Themes, and Plugins
Outdated software is a common source of bugs—including media upload failures. WordPress regularly releases updates that patch security flaws and improve compatibility.
How to update safely
Go to Dashboard > Updates. If WordPress core, your theme, or any plugins show available updates, install them. Always back up your site first.
For themes, follow best practices: use a child theme to preserve customizations during updates. This prevents losing changes when the parent theme updates.
After updating, clear your browser cache and try uploading again.
Step 7: Clear Cache (Browser and Server)
Cached data can sometimes serve outdated scripts that break the uploader. Clear both your browser cache and any server-side caching.
How to clear browser cache
In Chrome, press Ctrl+Shift+R (Windows) or Cmd+Shift+R (Mac) for a hard reload. In Firefox, use Ctrl+F5. This bypasses cached files.
How to clear server cache
If you use a caching plugin like WP Super Cache or W3 Total Cache, go to its settings and click “Delete Cache.” If your host provides built-in caching (e.g., SiteGround Optimizer), use their dashboard to purge it.
After clearing cache, log out and back into WordPress, then test the uploader.
Troubleshooting Advanced Issues
If none of the above steps work, consider these deeper fixes:
- Check .htaccess file: A corrupted
.htaccesscan block uploads. Rename it temporarily to.htaccess-oldand see if uploads resume. WordPress will generate a new one automatically. - Review error logs: Your hosting provider usually offers access to error logs via cPanel or a dashboard. Look for “PHP Fatal error” or “Permission denied” messages related to
wp-admin/async-upload.php. - Test with a fresh WordPress install: As a last resort, install a fresh copy of WordPress in a subfolder. If uploads work there, your main site may have corrupted core files.
Conclusion
Image upload issues in WordPress are rarely permanent—they’re usually caused by simple oversights like file size, permissions, or plugin conflicts. By following this step-by-step guide, you’ve equipped yourself with the tools to diagnose and resolve most upload problems quickly.
Remember: always back up your site before making changes, and test one fix at a time. With a little patience, your media library will be back in action, letting you focus on creating great content instead of fighting technical glitches.