This guide walks you through how to customize a WordPress theme safely and effectively using the built-in Customizer, child themes, and plugins. You’ll learn to tweak designs, add custom CSS, adjust menus, and more—all while keeping your site stable and update-ready.
Key Takeaways
- Use the WordPress Customizer: It’s the safest, easiest way to preview changes in real time before publishing.
- Always use a child theme: Prevents your customizations from being overwritten during theme updates.
- Customize colors, fonts, and layouts: Most modern themes support easy styling via the Customizer or theme options panel.
- Add custom CSS safely: Use the built-in Additional CSS panel or a child theme’s style.css file.
- Modify widgets and menus: Rearrange sidebars, footers, and navigation with drag-and-drop tools.
- Test changes on a staging site: Avoid breaking your live site by testing major tweaks first.
- Keep backups: Always back up your site before making deep customizations.
How to Customize Theme in WordPress: A Complete Guide
Customizing your WordPress theme lets you create a unique, professional-looking website that reflects your brand. Whether you’re running a blog, portfolio, or online store, knowing how to customize a theme in WordPress gives you full control over design and functionality—without needing to code from scratch.
In this guide, you’ll learn safe, effective methods to personalize your site using built-in tools, child themes, and best practices. We’ll cover everything from changing colors and fonts to modifying layouts and adding custom code—all while keeping your site secure and update-friendly.
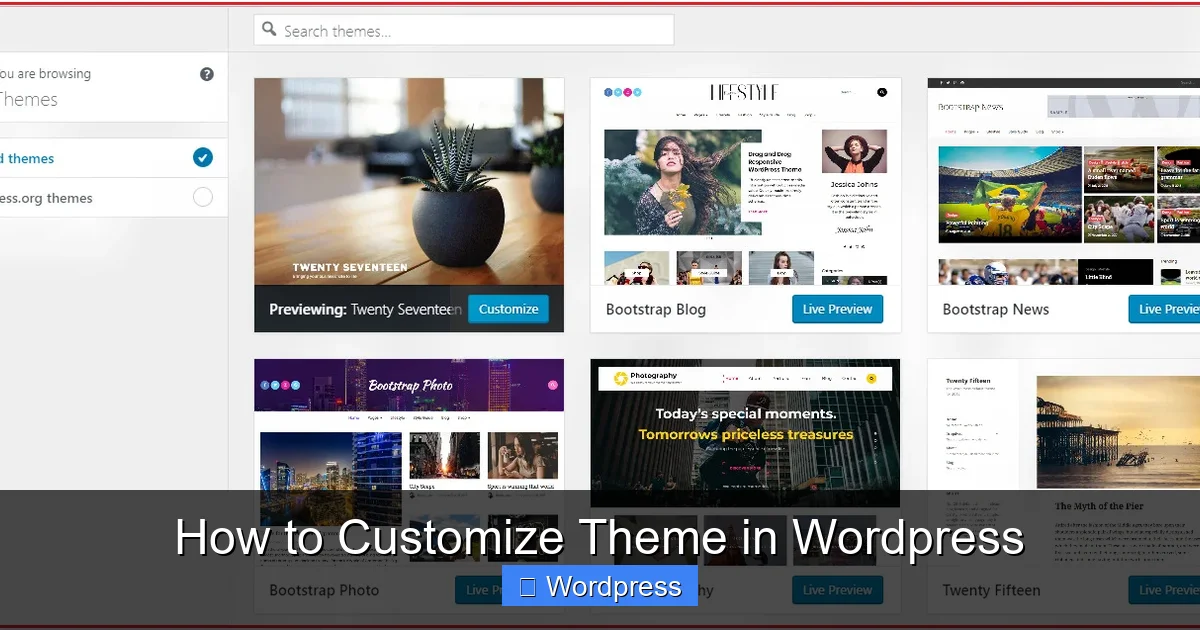
Step 1: Access the WordPress Customizer
The WordPress Customizer is your go-to tool for real-time theme customization. It lets you preview changes instantly before making them live.
Visual guide about How to Customize Theme in WordPress
Image source: whitewp.com
How to Open the Customizer
- Log in to your WordPress dashboard.
- Go to Appearance > Customize.
- The Customizer will open in a split-screen view: your site on the right, settings on the left.
What You Can Customize
Depending on your theme, you’ll see options like:
- Site Identity: Change your site title, tagline, and logo.
- Colors: Adjust background, text, and accent colors.
- Typography: Modify font families, sizes, and weights (if supported).
- Header & Footer: Upload header images or edit footer text.
- Widgets: Add or rearrange content blocks in sidebars and footers.
- Menus: Create or edit navigation menus.
- Homepage Settings: Choose between a static page or latest posts.
Tip: Always click “Publish” to save your changes. If you close the Customizer without publishing, your edits will be lost.
Step 2: Use a Child Theme for Safe Customization
One of the most important rules in WordPress customization is: never edit your parent theme directly. Why? Because when you update the theme, all your changes will be erased.
Visual guide about How to Customize Theme in WordPress
Image source: coderepublics.com
The solution? A child theme.
What Is a Child Theme?
A child theme inherits all the functionality and styling of its parent theme but allows you to make modifications safely. Updates to the parent theme won’t affect your custom code.
How to Create a Child Theme
You can create a child theme manually or use a plugin like Child Theme Configurator. Here’s the manual method:
- Create a new folder in
/wp-content/themes/(e.g.,mytheme-child). - Add a
style.cssfile with this header:/* Theme Name: MyTheme Child Template: mytheme */
- Add a
functions.phpfile to enqueue the parent theme’s styles: - Activate the child theme under Appearance > Themes.
For a detailed walkthrough, check out our guide on what is a child theme in WordPress and why it’s essential.
Step 3: Customize Colors and Typography
Most modern themes support easy color and font changes via the Customizer. Here’s how to do it:
Changing Colors
- In the Customizer, go to Colors or Theme Options > Colors.
- Use the color picker to change background, text, link, or button colors.
- Some themes offer preset color schemes—try them for quick styling.
Adjusting Fonts
- Look for a Typography or Fonts section in the Customizer.
- Choose font families (e.g., Google Fonts like Roboto or Open Sans).
- Set font sizes for headings, body text, and buttons.
Pro Tip: Stick to 2–3 fonts max for readability and performance. Too many fonts slow down your site.
Step 4: Modify Layouts and Widgets
Widgets let you add content to sidebars, footers, and other widget-ready areas. You can drag and drop them for easy layout changes.
How to Edit Widgets
- Go to Appearance > Widgets or use the Customizer’s Widgets panel.
- Drag widgets (like Recent Posts, Search, or Custom HTML) into widget areas.
- Configure each widget’s settings (e.g., title, number of posts).
Customizing Layouts
Some themes offer layout options (e.g., full-width, boxed, or grid layouts). Check under:
- Customizer > Layout
- Theme Options > Page Layout
- Page Editor > Template Settings (in block editor)
For advanced layout control, consider using a page builder like Elementor. Learn how to build custom designs with our guide on how to create a WordPress theme with Elementor.
Step 5: Add Custom CSS
Sometimes, the Customizer doesn’t offer the exact styling you need. That’s where custom CSS comes in.
Using the Additional CSS Panel
- In the Customizer, go to Additional CSS.
- Add your CSS code (e.g.,
.site-title { color: #ff6600; }). - Preview changes instantly and publish when ready.
Adding CSS via Child Theme
If you’re using a child theme, add your CSS to the style.css file. This is better for larger customizations.
For more tips on styling, visit our article on the best way to add CSS in WordPress.
Step 6: Customize Menus and Navigation
Menus are key to user experience. WordPress makes it easy to create and manage them.
How to Edit Menus
- Go to Appearance > Menus.
- Create a new menu or edit an existing one.
- Add pages, posts, custom links, or categories.
- Drag items to reorder or create dropdowns.
- Assign the menu to a location (e.g., Primary, Footer).
Not sure if your theme auto-generates menus? Read our post: Are navigation menus automatically generated in WordPress themes?
Step 7: Update and Maintain Your Theme
Keeping your theme updated is crucial for security and performance. But updates can break customizations—especially if you didn’t use a child theme.
How to Update Safely
- Always back up your site before updating.
- Use a staging site to test updates first.
- If you customized the parent theme, your changes may be lost. That’s why a child theme is essential.
Need to update your theme? Follow our step-by-step guide on how to update a theme on WordPress without losing your work.
Troubleshooting Common Issues
Customizing themes can sometimes lead to problems. Here’s how to fix the most common ones:
Changes Not Showing Up?
- Clear your browser cache and WordPress cache (if using a plugin).
- Check if you published the changes in the Customizer.
- Ensure you’re editing the correct menu or widget area.
Site Looks Broken After Update?
- Switch to a default theme (like Twenty Twenty-Four) to see if the issue is theme-related.
- Reactivate your child theme and check for missing files.
- Restore from a backup if needed.
Custom CSS Not Working?
- Check for syntax errors (missing semicolons or braces).
- Use browser developer tools (F12) to inspect elements and test CSS.
- Make sure your selectors are correct (e.g.,
.classvs#id).
Conclusion
Learning how to customize a theme in WordPress opens up endless possibilities for creating a website that truly represents your brand. By using the Customizer, child themes, and safe coding practices, you can make professional-level changes without risking your site’s stability.
Remember: always back up, test on staging, and use a child theme. With these habits, you’ll customize with confidence—and keep your site looking fresh through every update.